使用Ctrl+f输入“实例”以搜索样例代码。
Python 课程概述
# 实例:hello world
>>> print("hello, world")
hello, world
>>> name=input('input your name: ')
input your name: ldq
>>> print(name,'hello world')
ldq hello world
print() - python 内置函数
dir(_builtins_)len(dir(_builtins_))help(print)
>>> help(print)
Help on built-in function print in module builtins:

print(...)
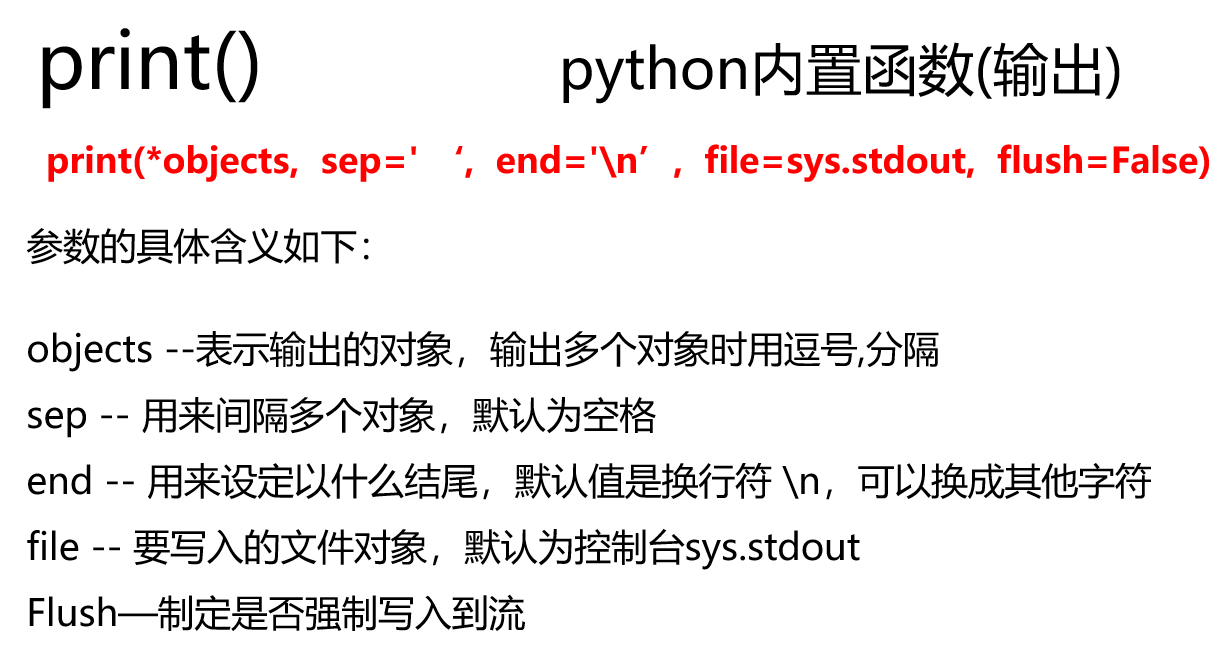
    print(value, ..., sep=' ', end='\n', file=sys.stdout, flush=False)

    Prints the values to a stream, or to sys.stdout by default.
    Optional keyword arguments:
    file:  a file-like object (stream); defaults to the current sys.stdout.
    sep:   string inserted between values, default a space.
    end:   string appended after the last value, default a newline.
    flush: whether to forcibly flush the stream.
>>> help(input)
Help on built-in function input in module builtins:

input(prompt=None, /)
    Read a string from standard input.  The trailing newline is stripped.

    The prompt string, if given, is printed to standard output without a
    trailing newline before reading input.

    If the user hits EOF (*nix: Ctrl-D, Windows: Ctrl-Z+Return), raise EOFError.
    On *nix systems, readline is used if available.
Python 基本语法元素
交互式:
>>> r=25
>>> area=3.1415*r*r
>>> print(r,area)
25 1963.4375000000002
>>> print("r=%2d,area=%.2f"%(r,area))
r=25,area=1963.44
文件式:
# 实例:圆面积的计算
r = 25
area = 3.1415 * r * r
print(r,area)
print("r=",r,"area=",area)
print("r=%2d,area=%.2f"%(r,area))
保存为文件并运行,输出如下:
25 1963.4375000000002
r= 25 area= 1963.4375000000002
r=25,area=1963.44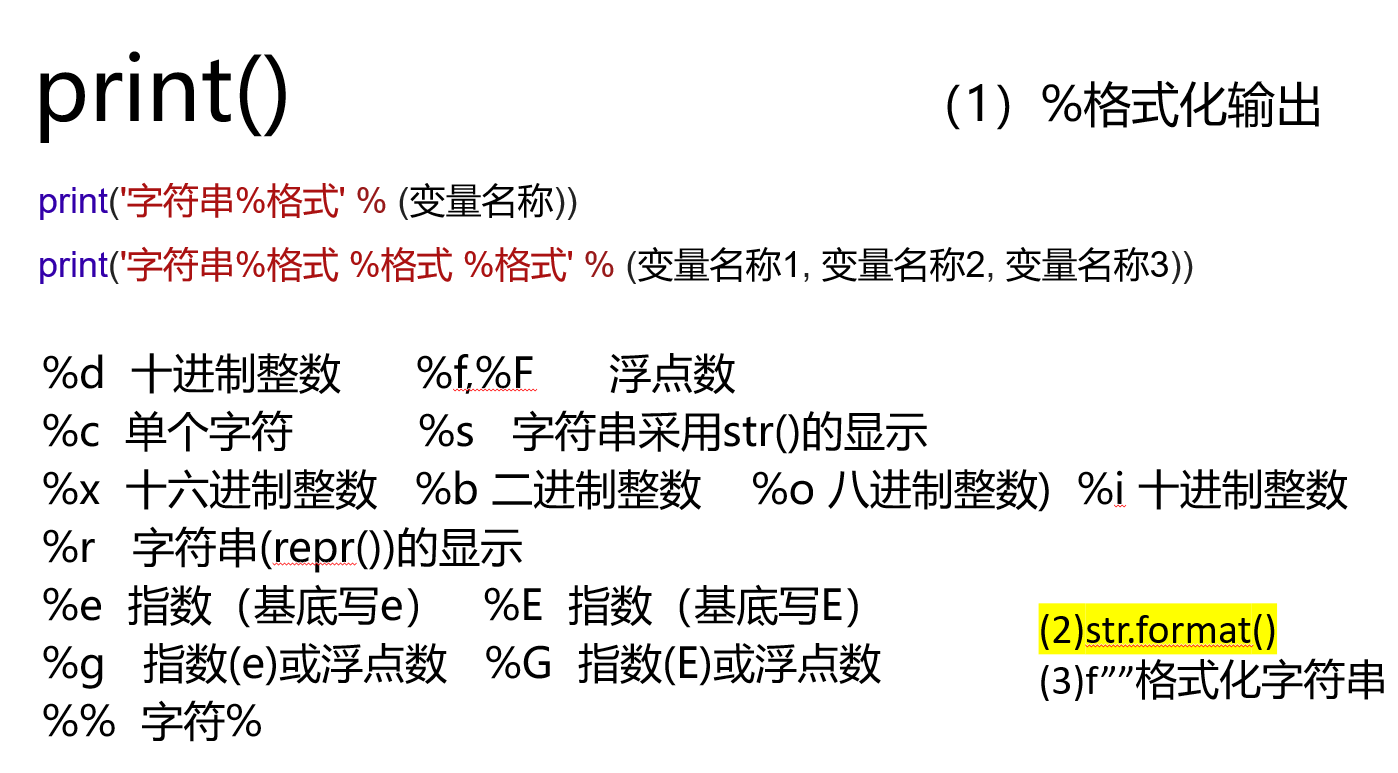
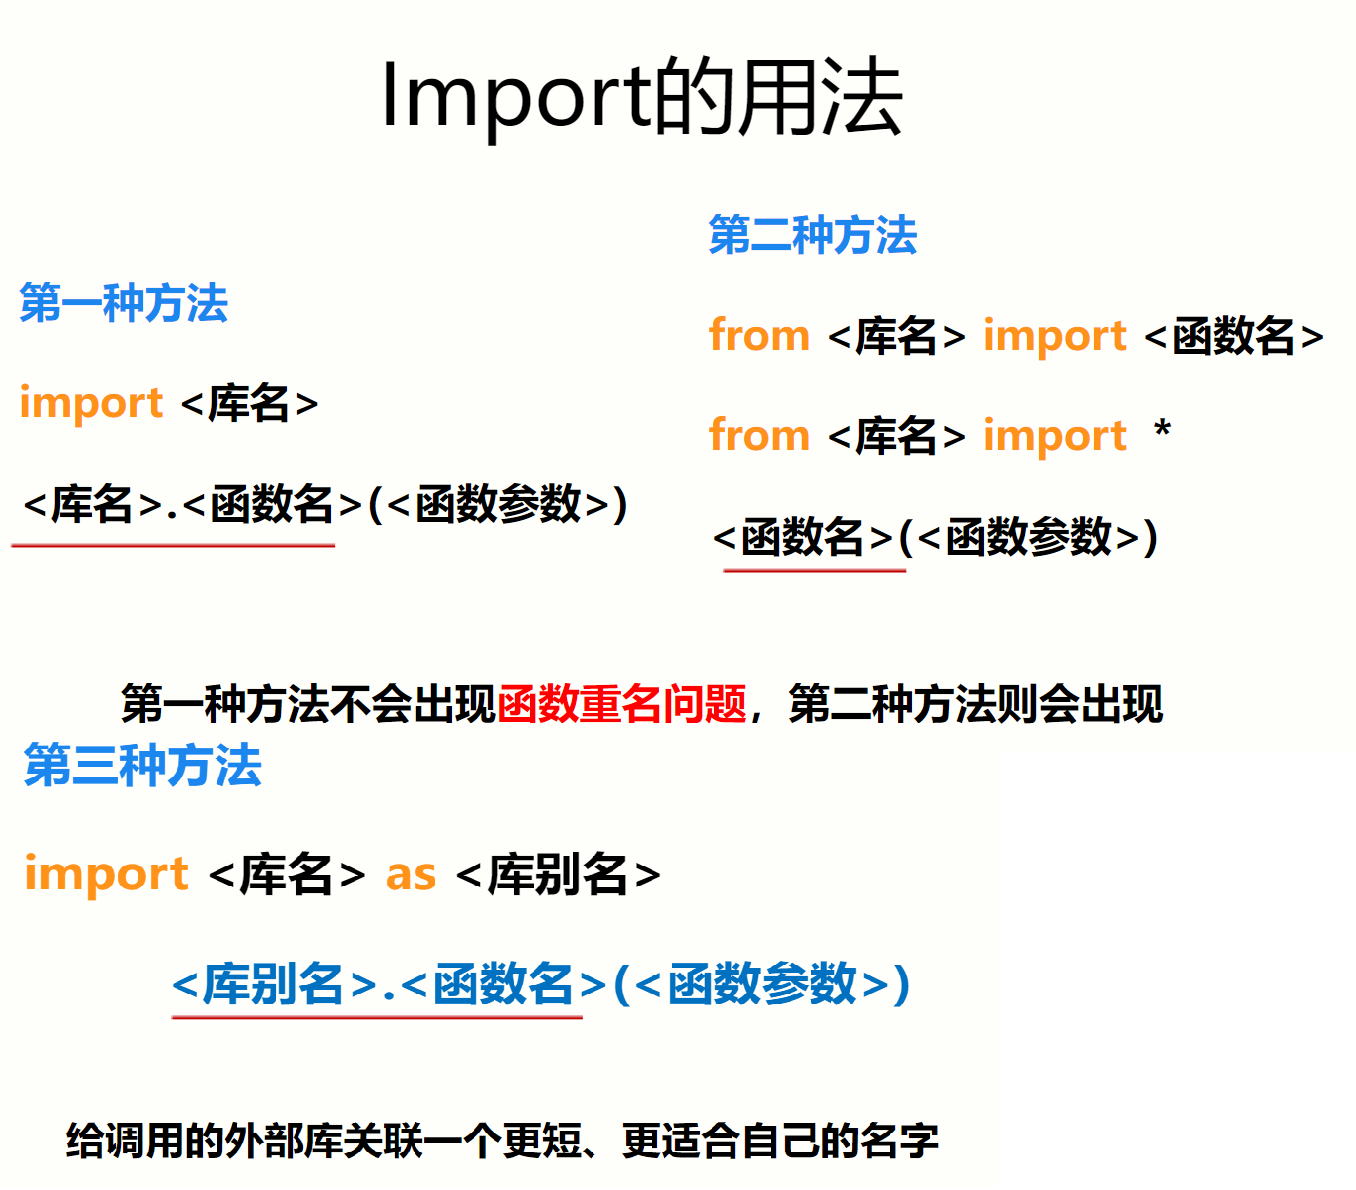
import math
import math
r = 25
area = math.pi * r * r
print(r,area)
print("r=",r,"area=",area)
print("r=%2d,area=%.2f"%(r,area))
输出如下:
25 1963.4954084936207
r= 25 area= 1963.4954084936207
r=25,area=1963.50import:python 保留字,引用函数库
math:python 中内置的标准库
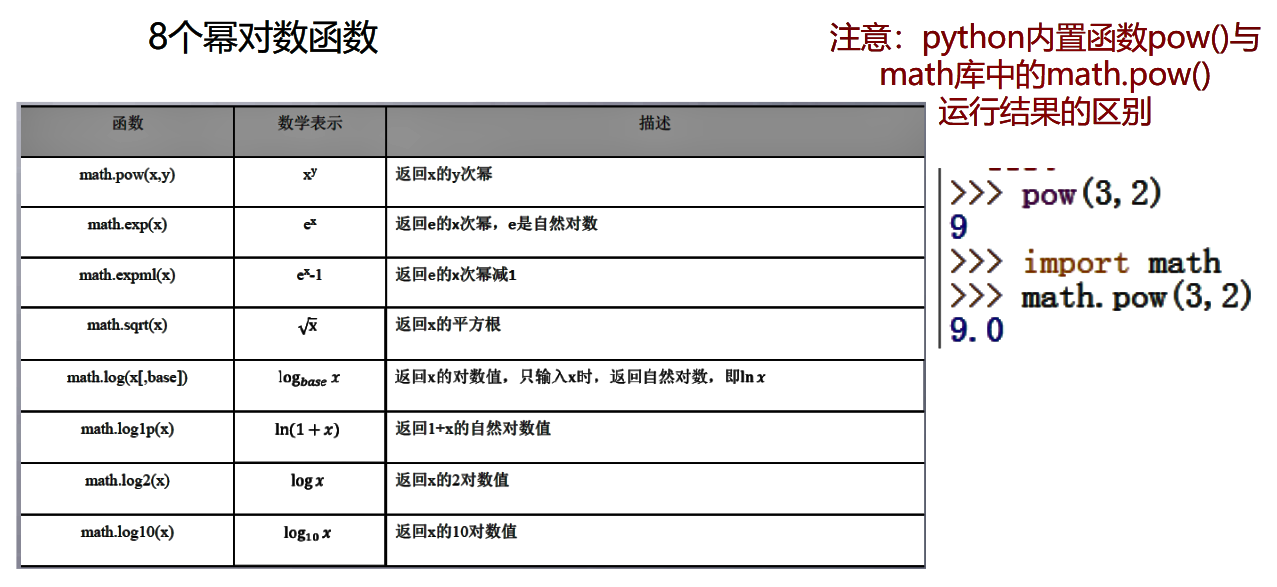
math.pi$\quad$ 常量值math.pow(x,y)$\quad$ 返回 x 的 y 次幂math.sqrt(x)$\quad$ 求 x 的平方根
# 实例:同切圆绘制
import turtle
turtle.pensize(2)
turtle.circle(10)
turtle.circle(40)
turtle.circle(80)
turtle.circle(160)
from turtle import pensize
from turtle import circle
pensize(2)
circle(10)
circle(40)
circle(80)
circle(160)
from turtle import *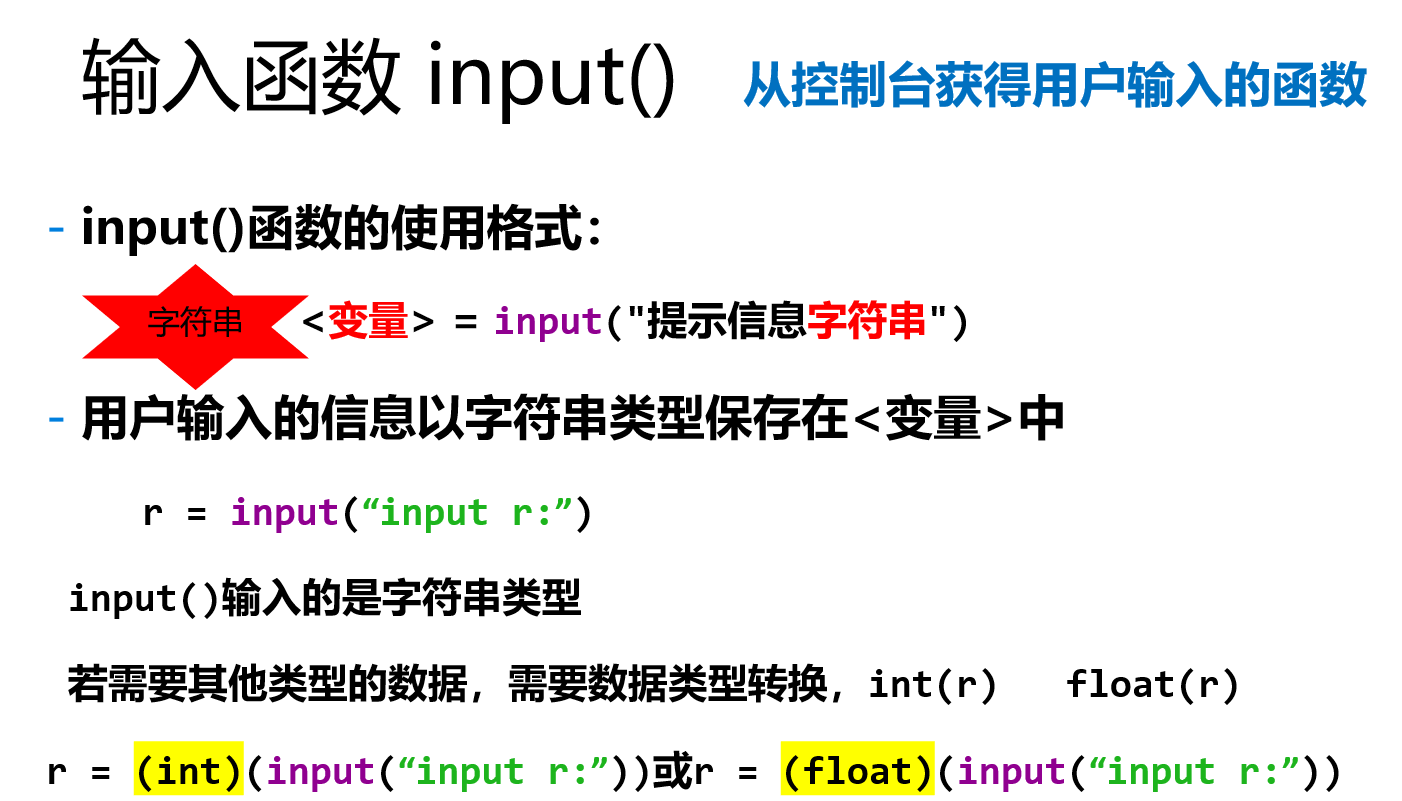
# 实例:温度转换
# 这是一条性感的注释
TempStr = input("请输入带有符号的温度值:")

if TempStr[-1] in ['F','f']:
    C = (eval(TempStr[0:-1])-32)/1.8
    print("转换后的温度是{:.2f}C".format(C))
elif TempStr[-1] in ['C','c']:
    F = 1.8*eval(TempStr[0:-1])+32
    print("转换后的温度是{:.2f}F".format(F))
else:
    print("输入格式错误")
'''
多
    行
        注
            释
'''
在 python 中,缩进是语法的一部分,缩进不正确程序运行错误。长度一致: 程序内一致即可,一般用 4 个空格或 1 个TAB。
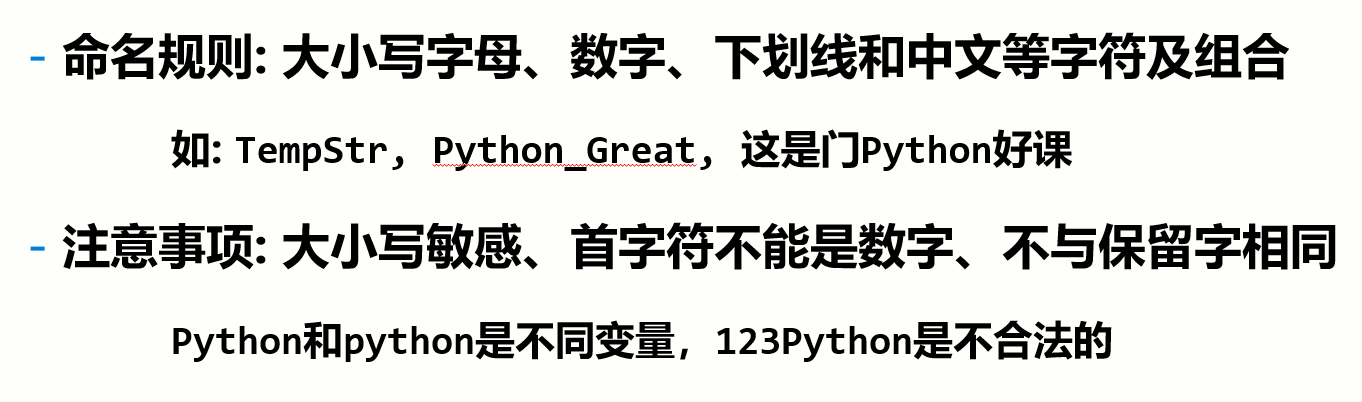
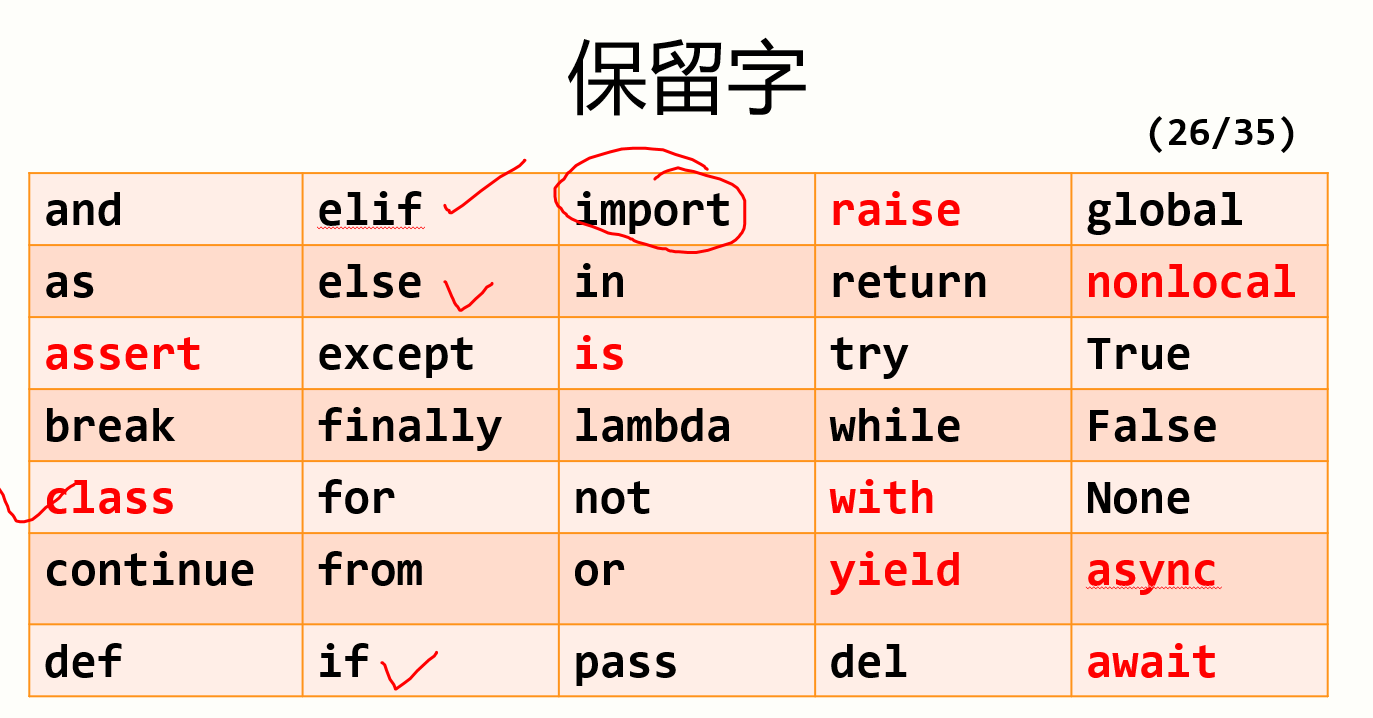
变量的命名:
数据类型:
- 整数类型:
10011101 - 字符串类型:
"10,011,101" - 列表类型:
[10, 011, 101]
字符串,由0个或多个字符组成的有序字符序列:
- 字符串由一对单引号或一对双引号或一对三引号表示
"请输入带有符号的温度值: "或者'C'或者'''C'''(?详见该内容(网页内容已备份),另外,虽然三个单引号可以用于表示多行字符串和多行注释,但它们不会相互干扰或冲突。)
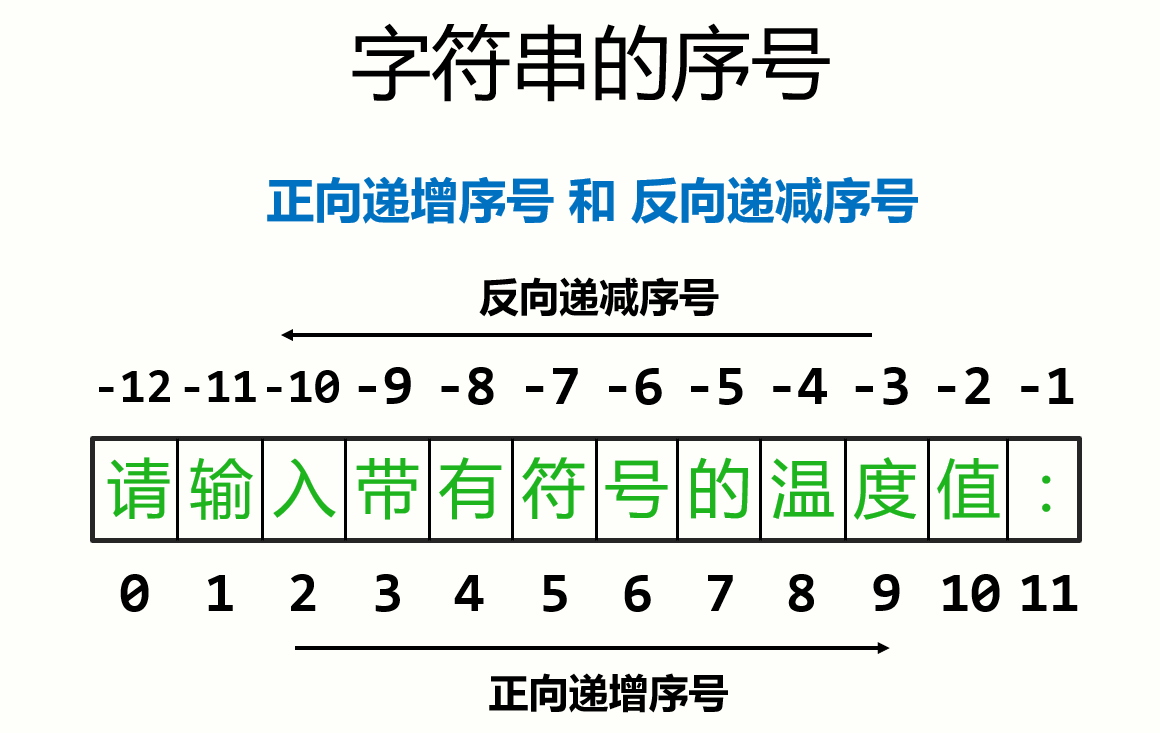
- 字符串是字符的有序序列,可以对其中的字符进行索引
"请"是"请输入带有符号的温度值: "的第0个字符(这个中文字符串暂且存疑)
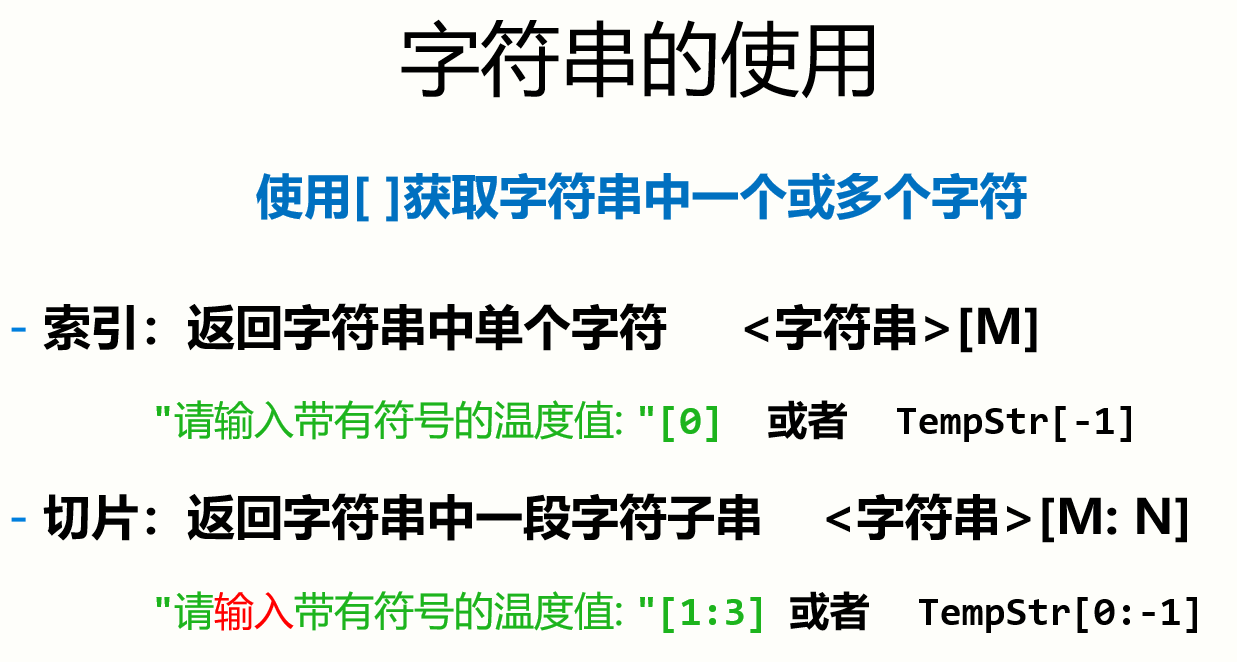
提取最后N个字符:
>>> letter = 'abcdefghijklmnopqrstuvwxyz'
>>> letter[-3:]
'xyz'
从开头到结尾,step为N:
>>> letter[::5]
'afkpuz'
将字符串倒转(reverse), 通过设置步长为负数:
>>> letter[::-1]
'zyxwvutsrqponmlkjihgfedcba'
列表类型,由 0 个或多个数据组成的有序序列:
- 列表使用
[]表示,采用,分隔各元素['F','f']表示两个元素'F'和'f'
- 使用保留字
in判断一个元素是否在列表中TempStr[-1] in ['C','c']判断前者是否与列表中某个元素相同
eval(),去掉参数最外侧引号并执行余下语句的函数:
>>>x = 7
>>> eval( '3 * x' )
21
>>> eval('pow(2,2)')
4
>>> eval('2 + 2')
4
>>> n=81
>>> eval("n + 4")
85
一些其他的例子:
>>> eval('"1+2"')
'1+2'
>>> eval('print("hello")')
hello
r = eval(input("input r=")),如果键盘输入数值5,x 值是数字5。
print()中格式化输出:字符串的format()方法
Python 基本图形绘制
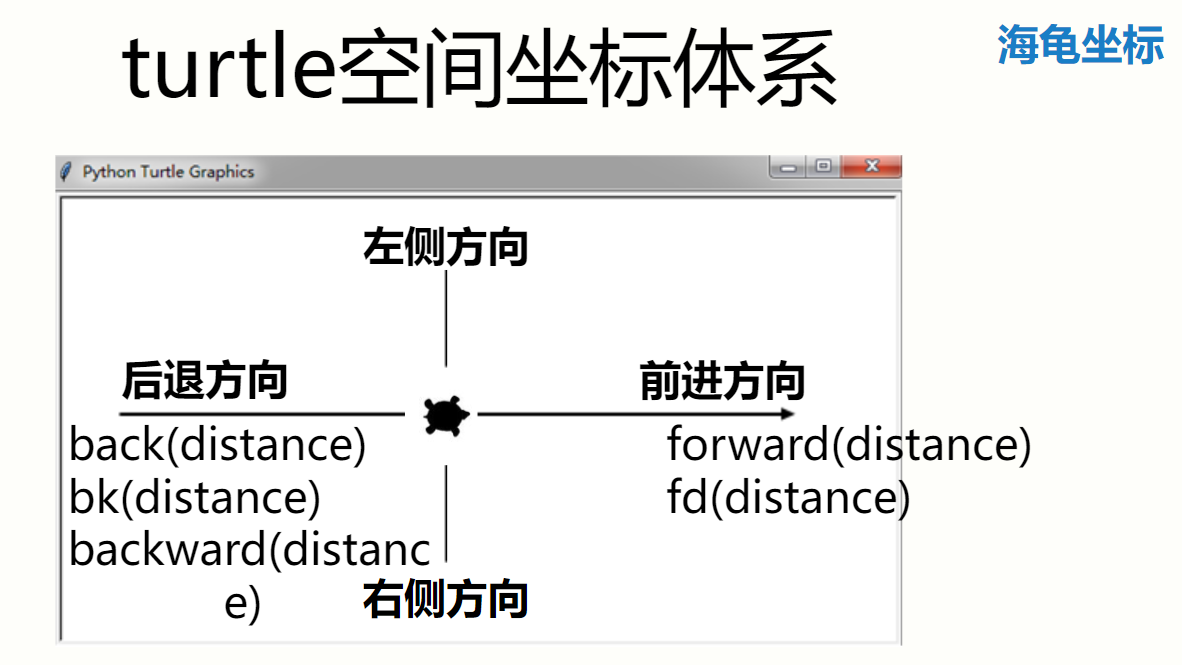
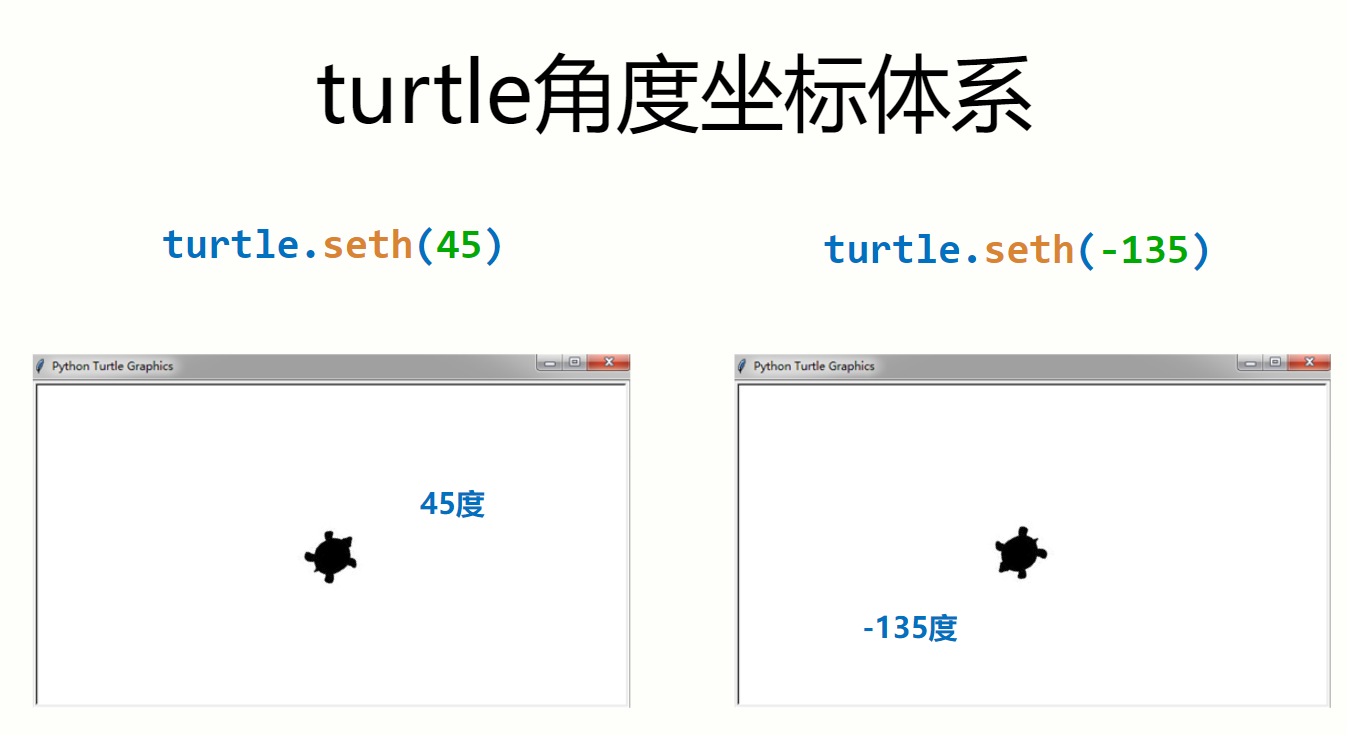
turtle 库是 python 语言的标准库之一。
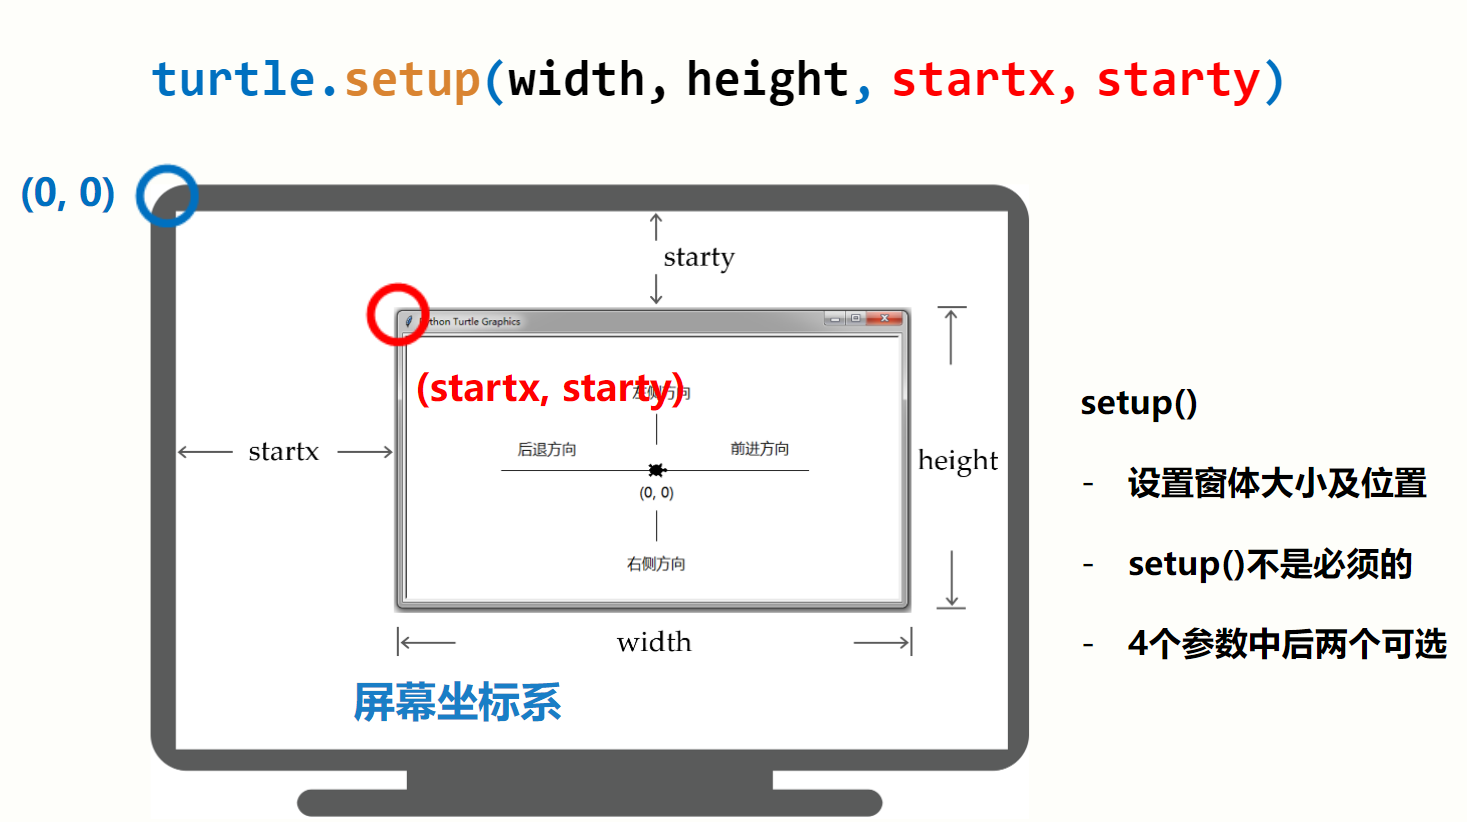
import turtle
turtle.goto(100,100)
turtle.goto(100,-100)
turtle.goto(-100,-100)
turtle.goto(-100,100)
turtle.goto(0,0)
turtle.done()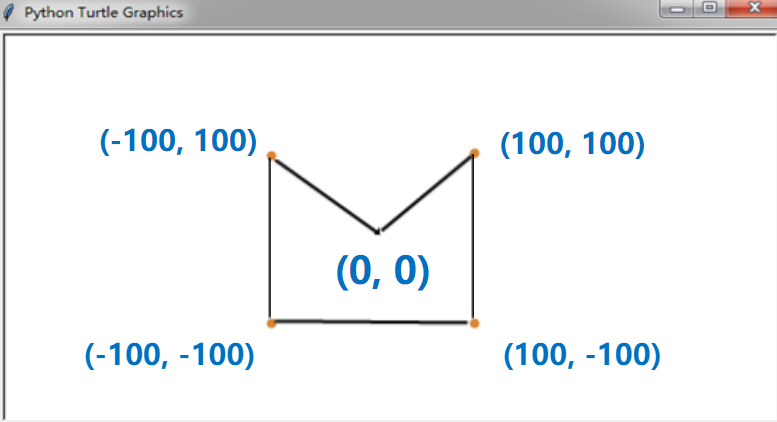
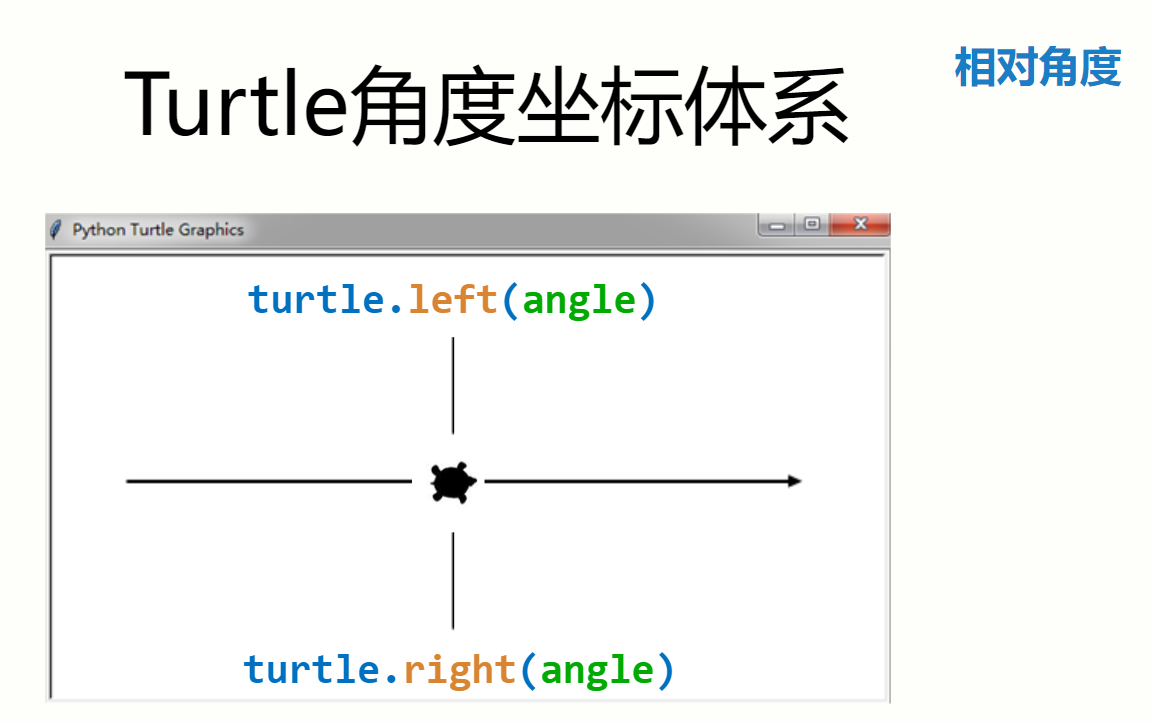
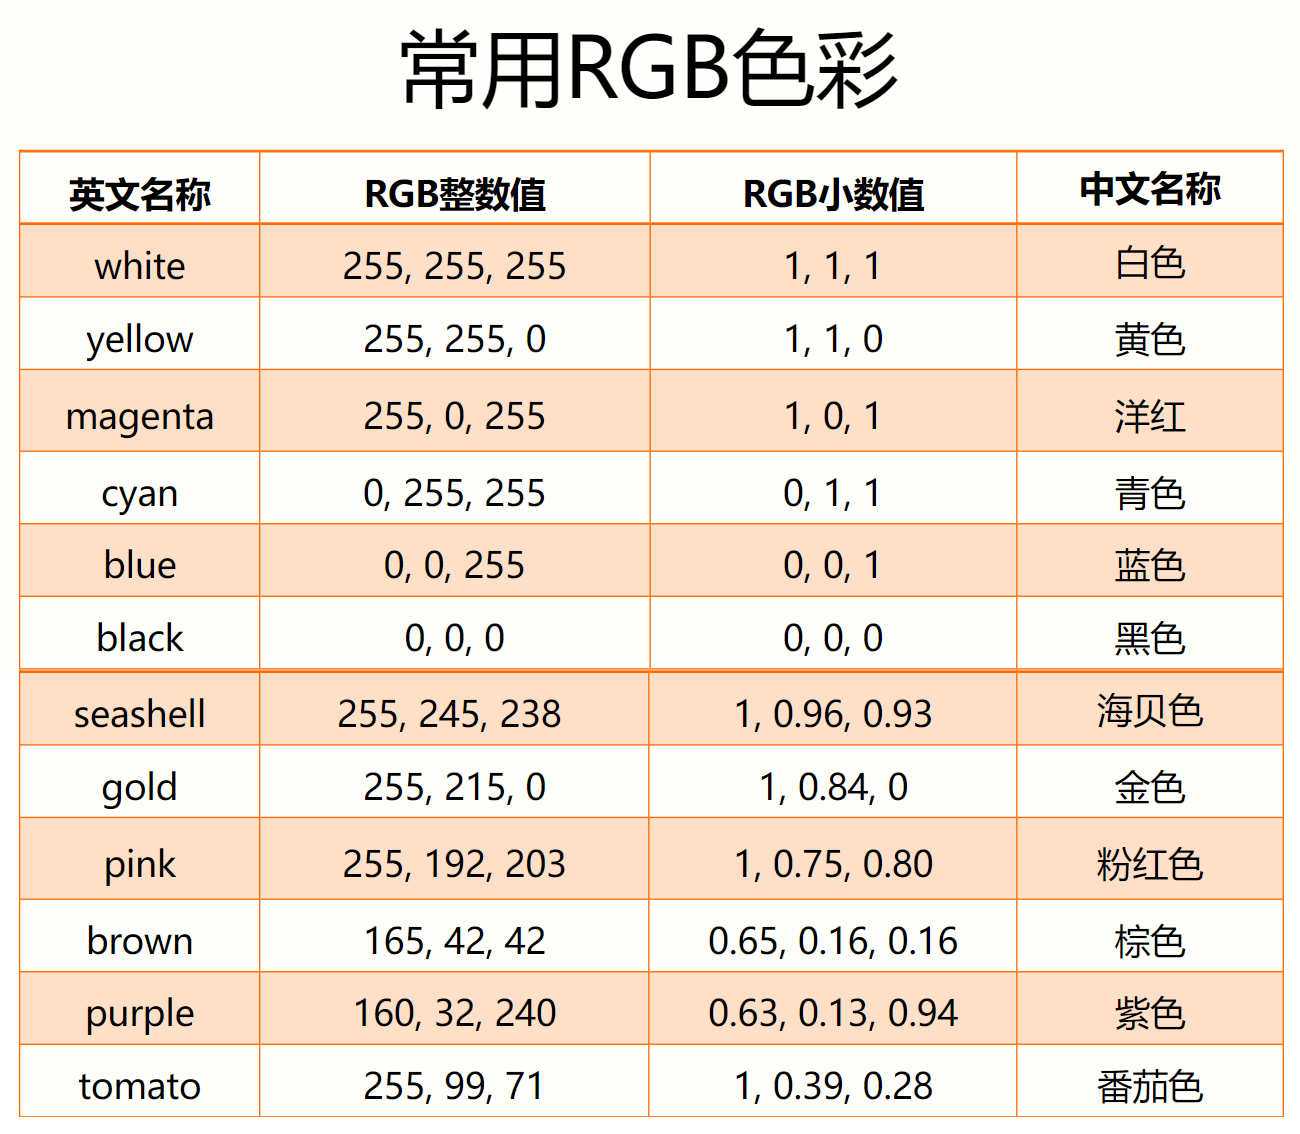
色彩模式:
# 实例:蟒蛇绘制
# PythonDraw.py
import turtle as tu
tu.setup(650,350,200,200)
tu.penup()
tu.fd(-250)
tu.pendown()
tu.pensize(25)
tu.seth(-40)
for i in range(4):
    tu.pencolor("yellow")
    tu.circle(40,80)
    tu.pencolor("gold")
    tu.circle(-40,80)
tu.circle(40,80/2)
tu.fd(40)
tu.circle(32,180)
tu.fd(40*2/3)
tu.done()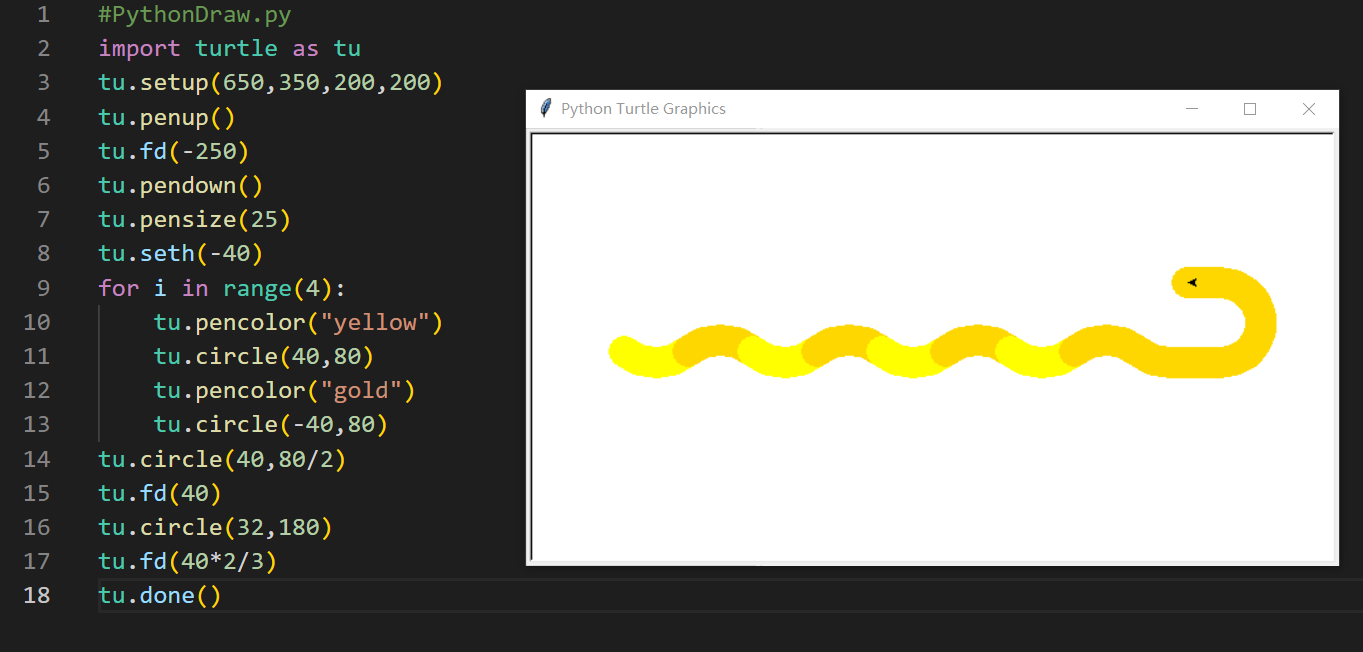
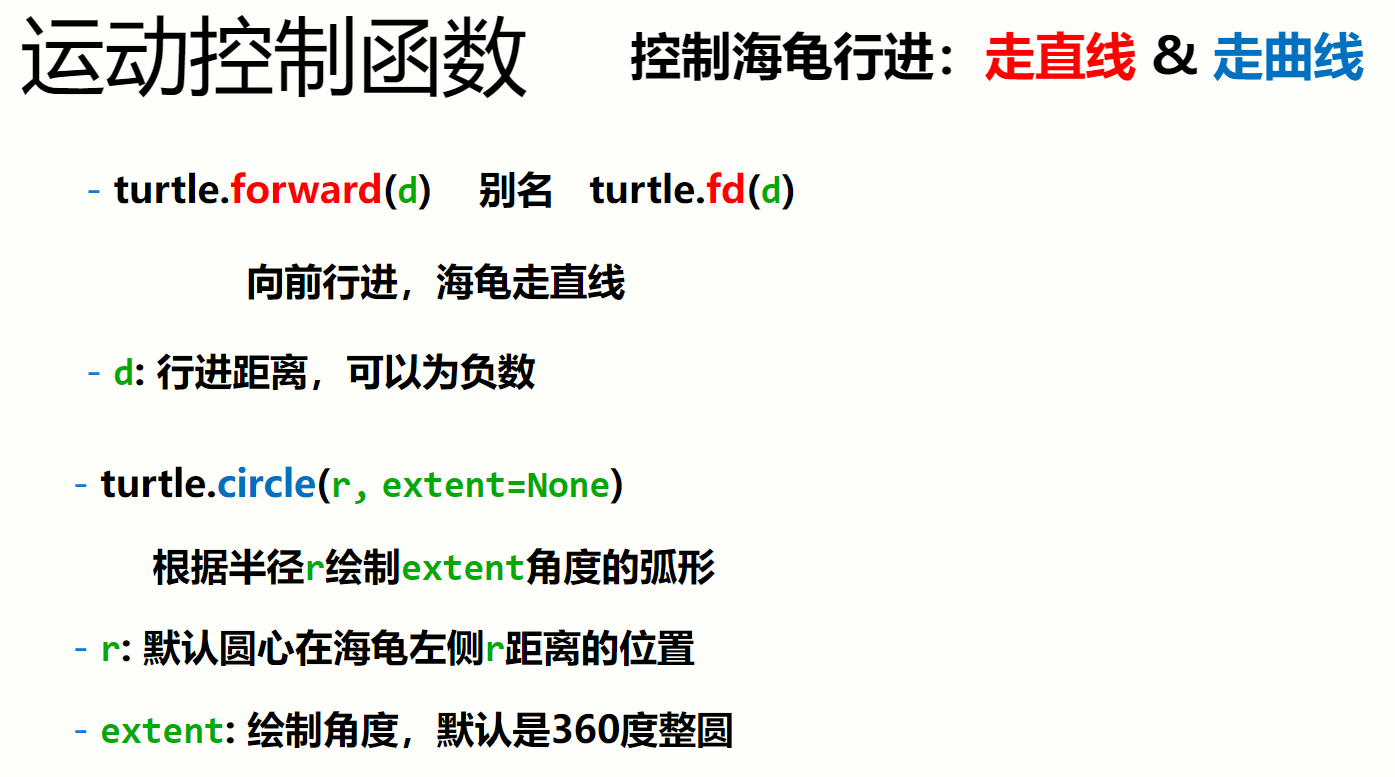
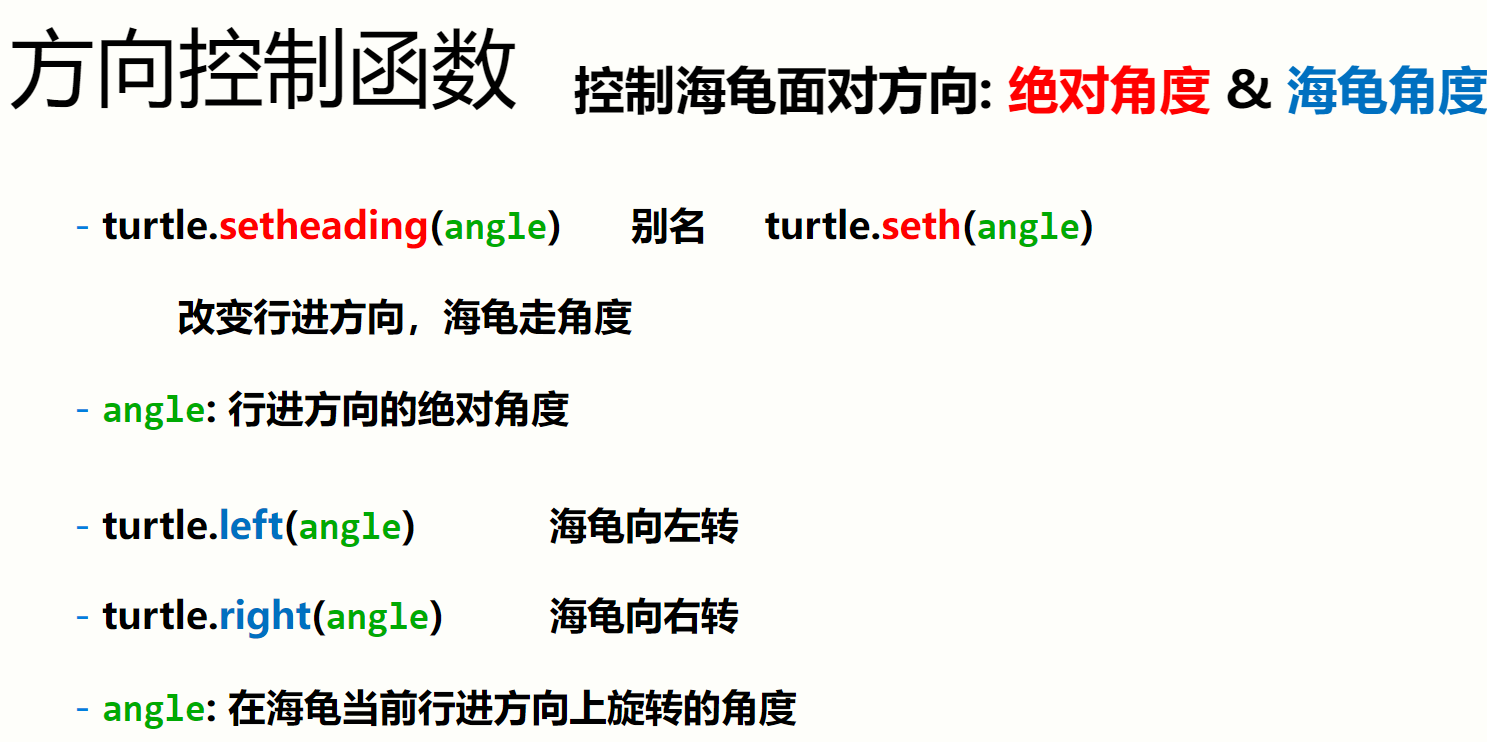
画笔控制函数:
turtle.penup(),别名turtle.pu()- 抬起画笔,海龟在飞行
turtle.pendown(),别名turtle.pd()- 落下画笔,海龟在爬行
- 画笔操作后一直有效,一般成对出现。
turtle.pensize(width),别名turtle.width(width)- 画笔宽度,海龟的腰围
turtle.pencolor(color),color为颜色字符串或 rgb 值- 画笔颜色,海龟在涂装
- 画笔设置后一直有效,直到下次重新设置
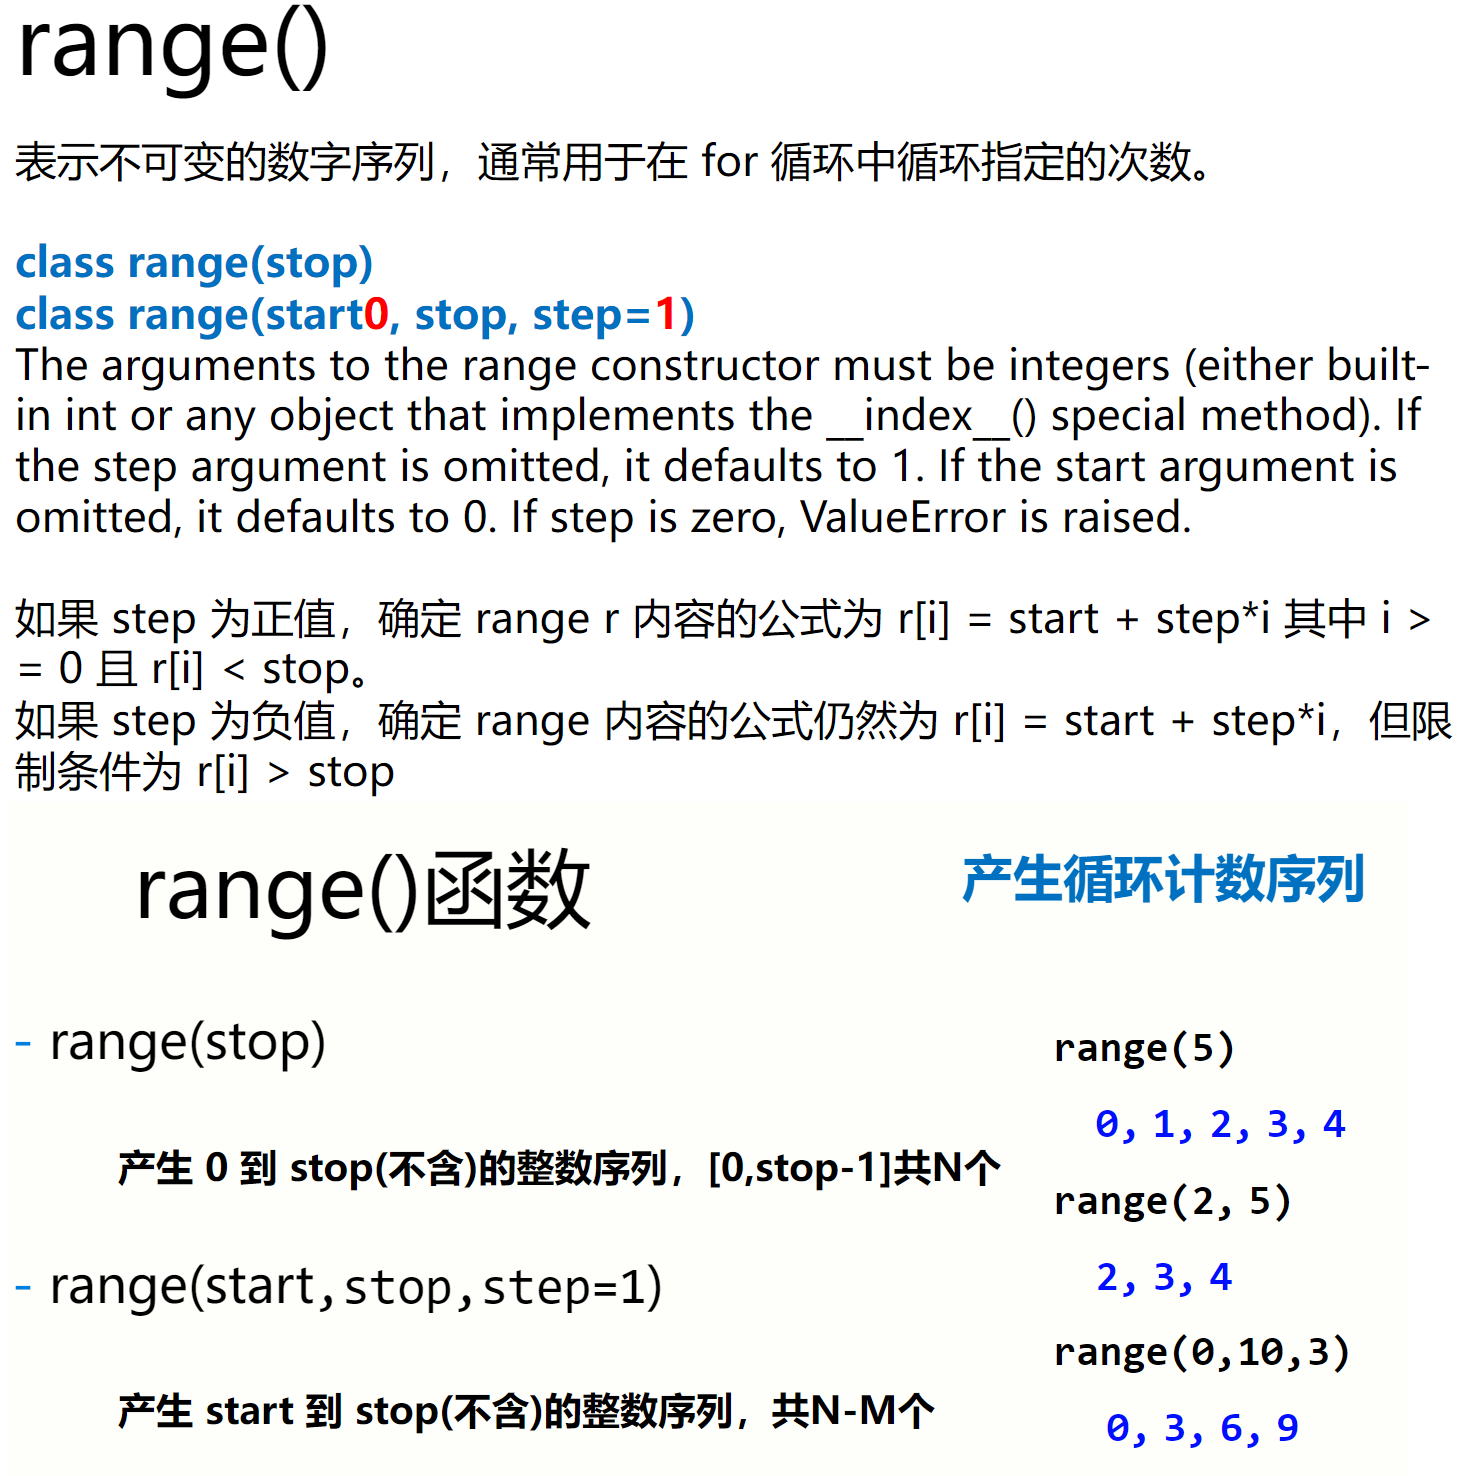
循环语句:
for i in range(5):
    print("hello: ",i)
'''
    运行结果:
hello:  0
hello:  1
hello:  2
hello:  3
hello:  4
'''
基本数据类型
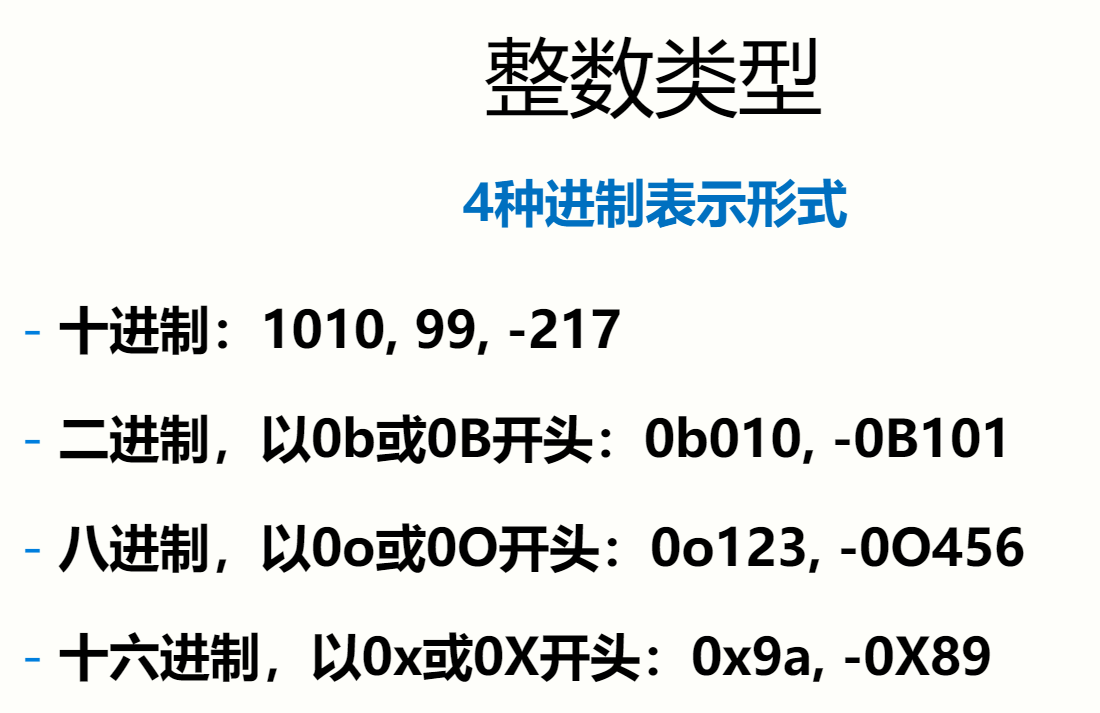
浮点数取值范围和小数精度存在限制,但常规计算可忽略。取值范围数量级约为$-10^{307}$~$10^{308}$,精度数量级$10^{-16}$ .
浮点数运算存在不确定尾数,不是 bug:
>>> 0.1+0.3
0.4
>>> 0.1+0.2
0.30000000000000004
这是因为二进制表示小数,有时可以无限接近,但不完全相同。
round(x,d):对 x 四舍五入,d 是小数截取位数。不确定尾数一般发生在$10^{-16}$左右,round()十分有效。
>>> 0.1+0.2==0.3
False
>>> round(0.1+0.2,1)==0.3
True
科学计数法和 C++ 类似。
复数类型:z.real获得实部,z.imag获得虚部。
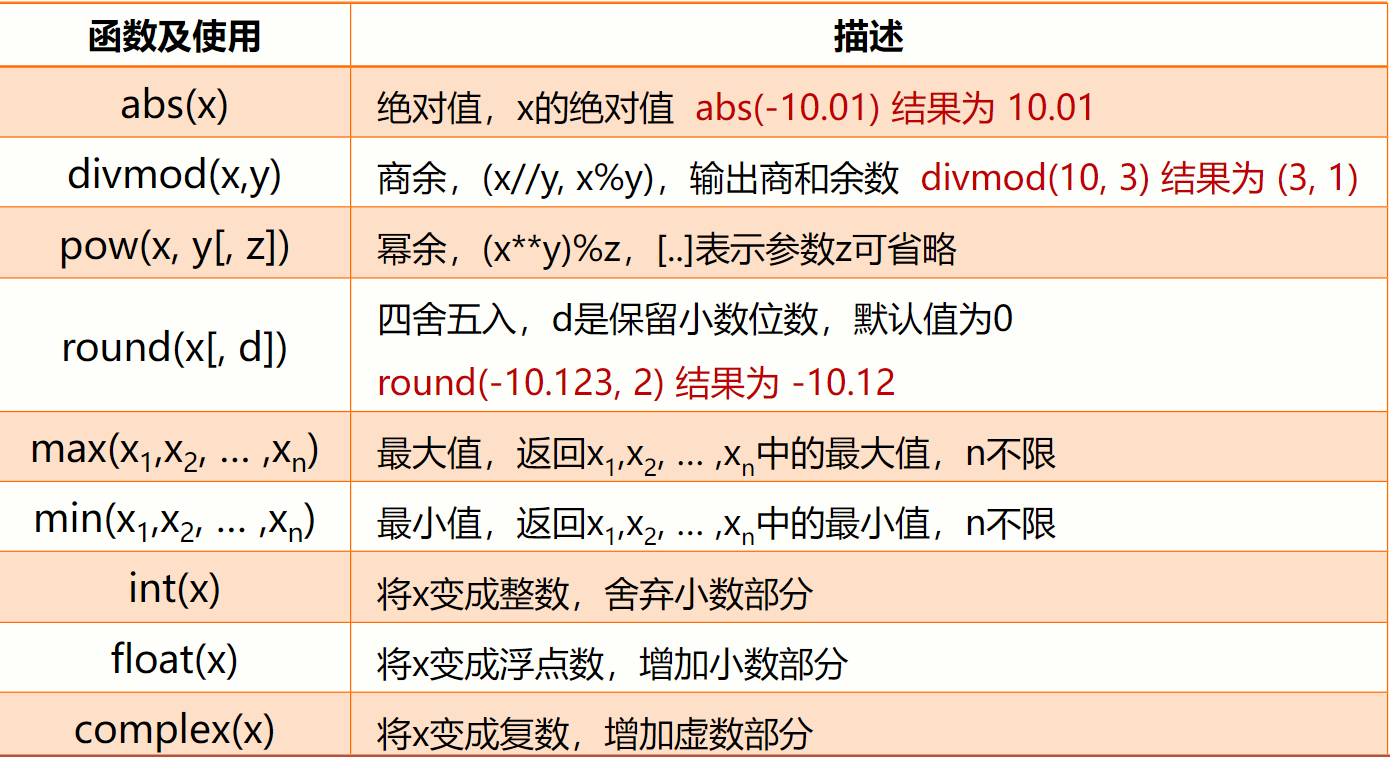
Python中的x/y带有小数部分。Python中的x//y,效果同 C++ 中的x/y。
x ** y幂运算,$x^y$,其中$y$可以是小数。
查看类型、判断是否类型一致:
>>> type(3)
<class 'int'>
>>> type(3.3)
<class 'float'>
>>> type('3')
<class 'str'>
>>> type((3,))
<class 'tuple'>
>>> type([3,4])
<class 'list'>
>>> isinstance(3,int)
True
>>> isinstance(3.5,int)
False
>>> isinstance([1,2,3],list)
True
比较运算符与 C++ 一致。
逻辑运算:and,or,not .
math库 4 个数学常数:
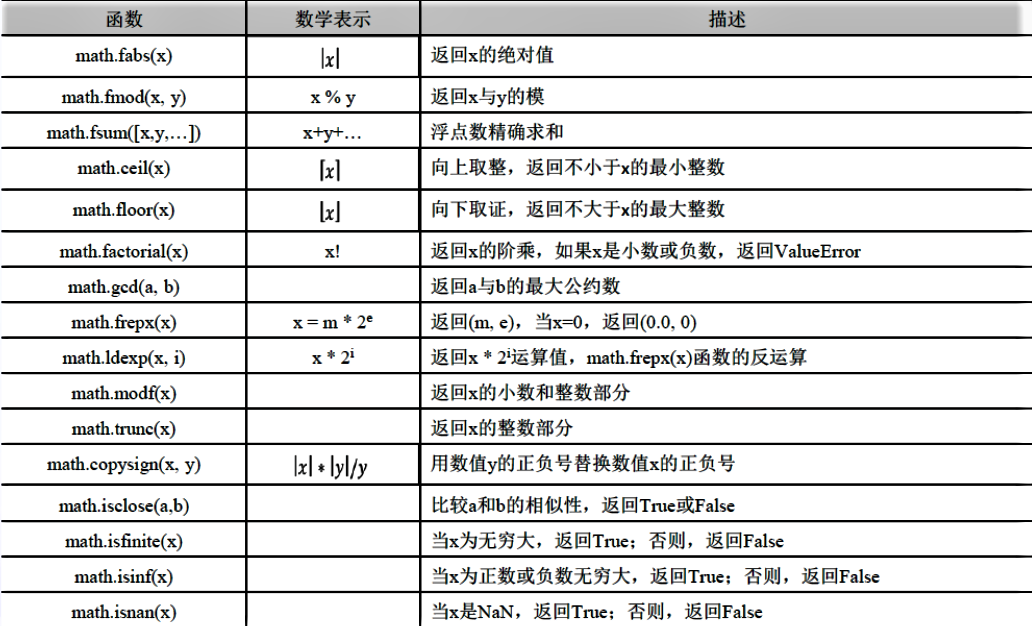
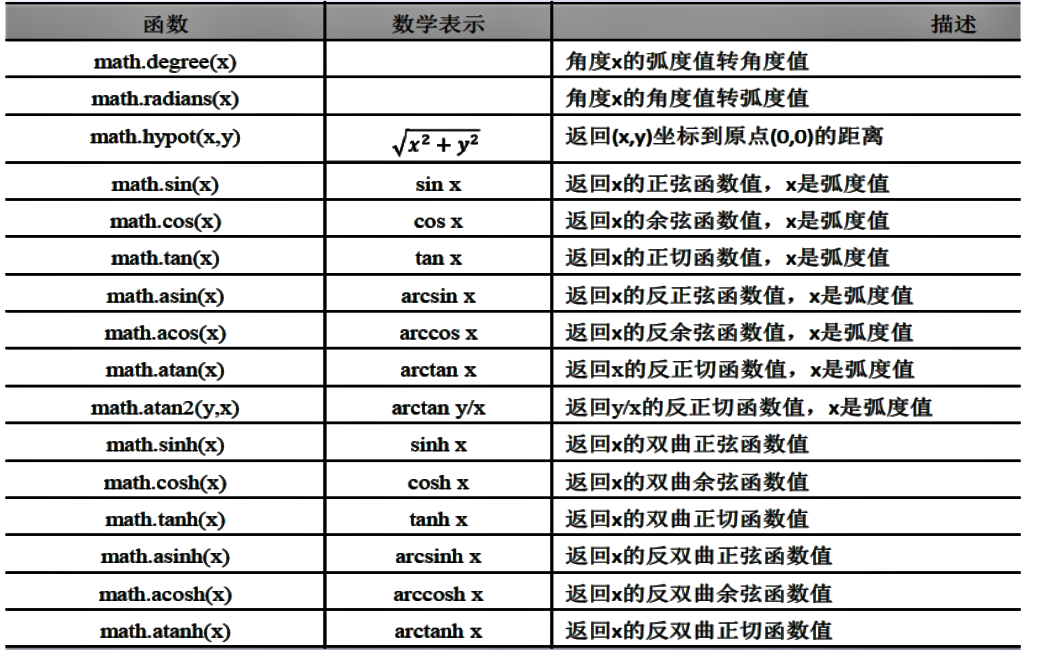
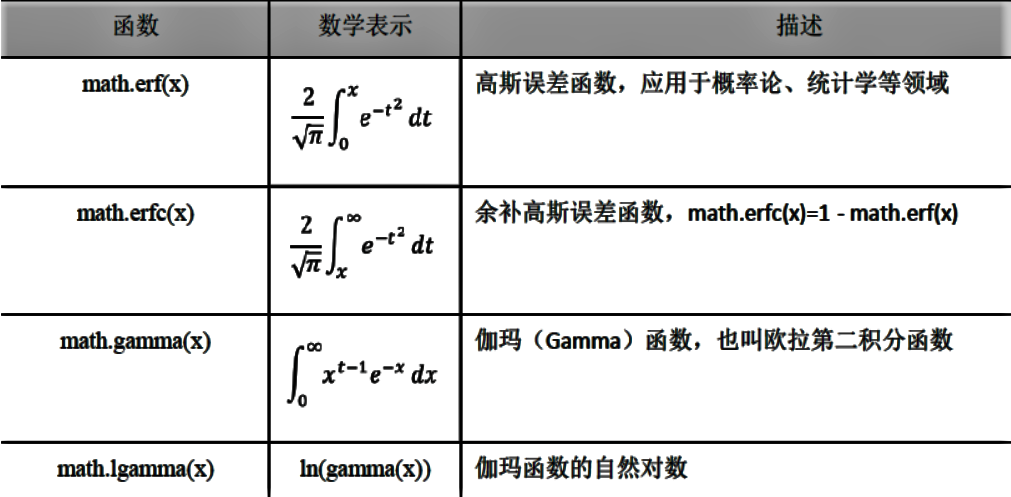
math.pi,圆周率math.e,自然对数math.inf,正无穷大。负无穷大记为-math.infmath.nan,非浮点数标记,NaN(Not a Number)
# 实例:自适应simpson
import math

def f(x)->float:
    return math.pow(1+1/x, x)

def simpson(l,r)->float:
    mid = (l+r)/2.0
    return (f(l)+4*f(mid)+f(r))/6.0*(r-l)

def asr(l, r, eps, S, cnt)->float:
    mid =(l+r)/2.0
    s1 = simpson(l, mid)
    s2 = simpson(mid, r)
    if (math.fabs(s1+s2-S)<=15*eps and cnt<=0):
        return s1+s2+(s1+s2-S)/15.0
    return asr(l, mid, eps/2, s1, cnt-1) + asr(mid, r, eps/2, s2, cnt-1)

def calc(l, r, eps)->float:
    return asr(l, r, eps, simpson(l,r), 12)

x = (float)(input())
print(format(calc(0.0000000000001, x, 1e-8),'.8f'))
字符串操作符:
x + y,连接两个字符串 x 和 yn * x或x * n,复制 n 次字符串 xx in S,如果 x 是 S 的子串,返回True
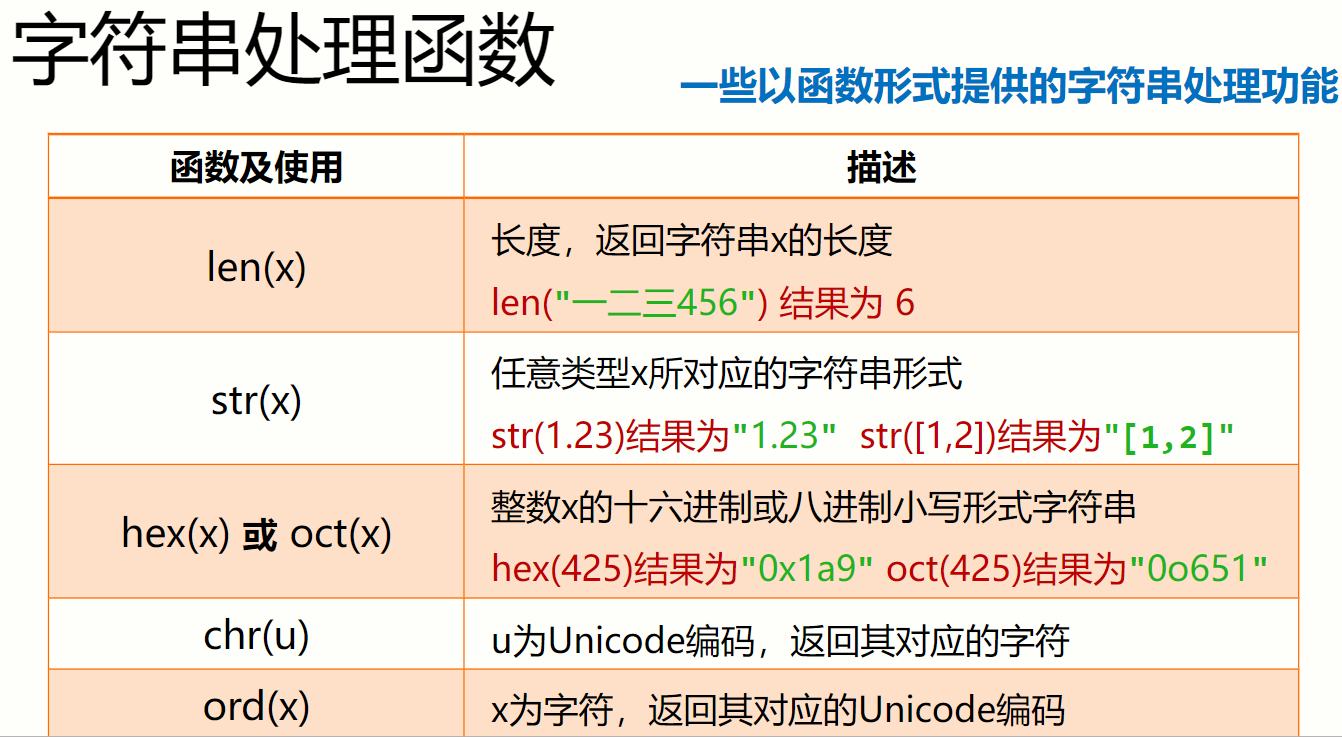
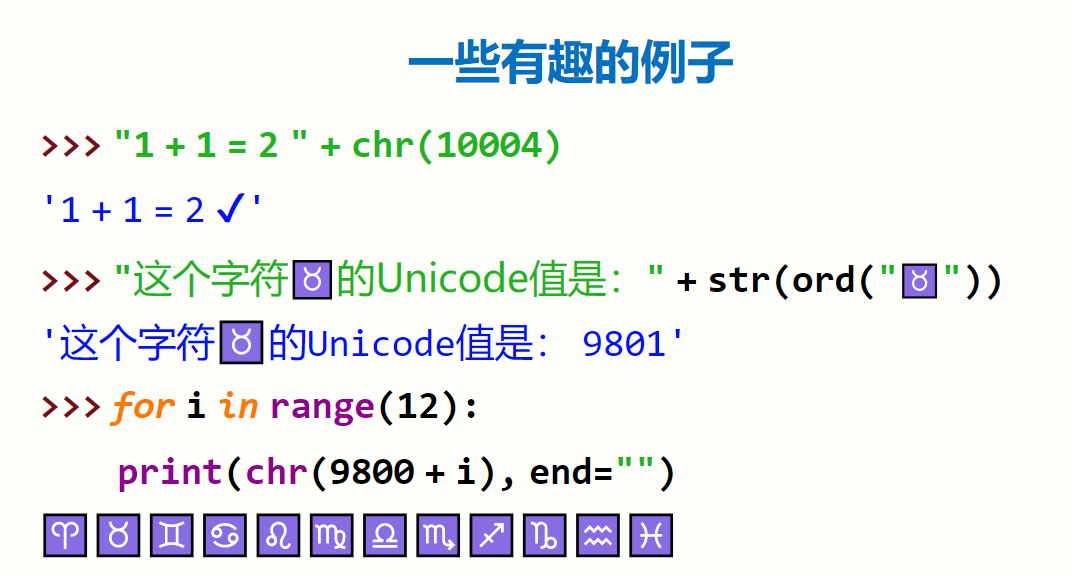
Python 字符串中每个字符都是 Unicode 编码字符。
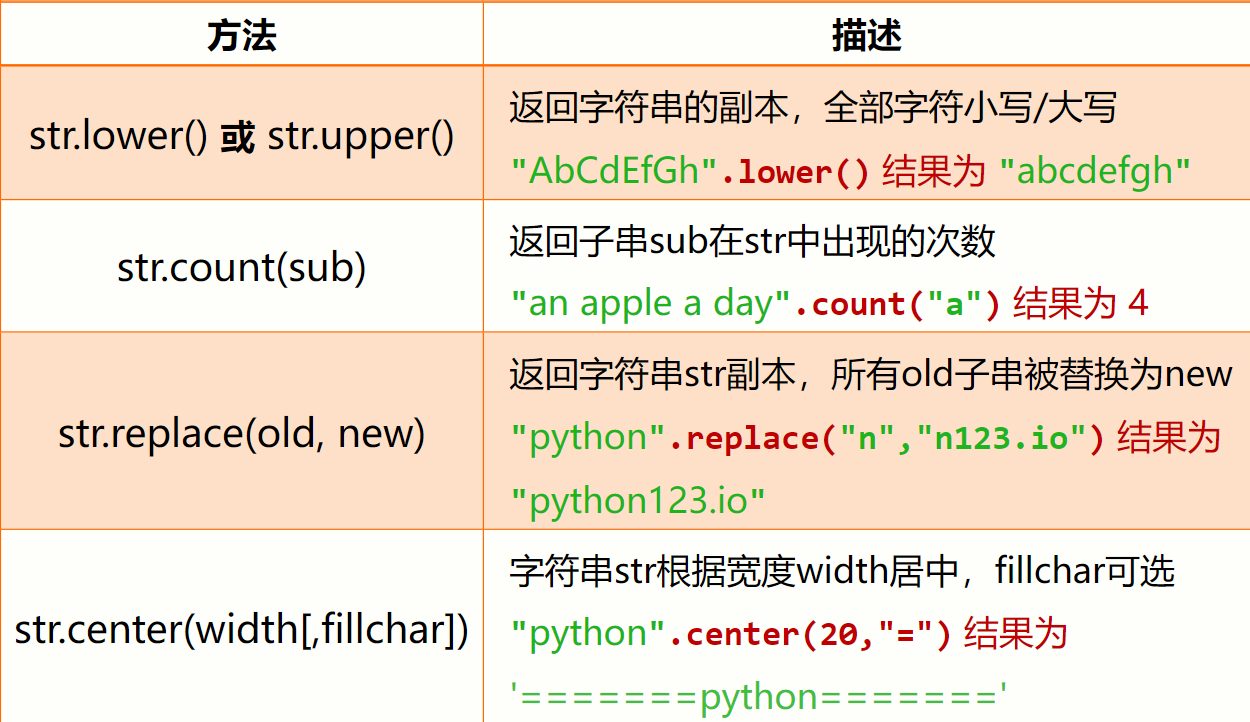
字符串处理方法:
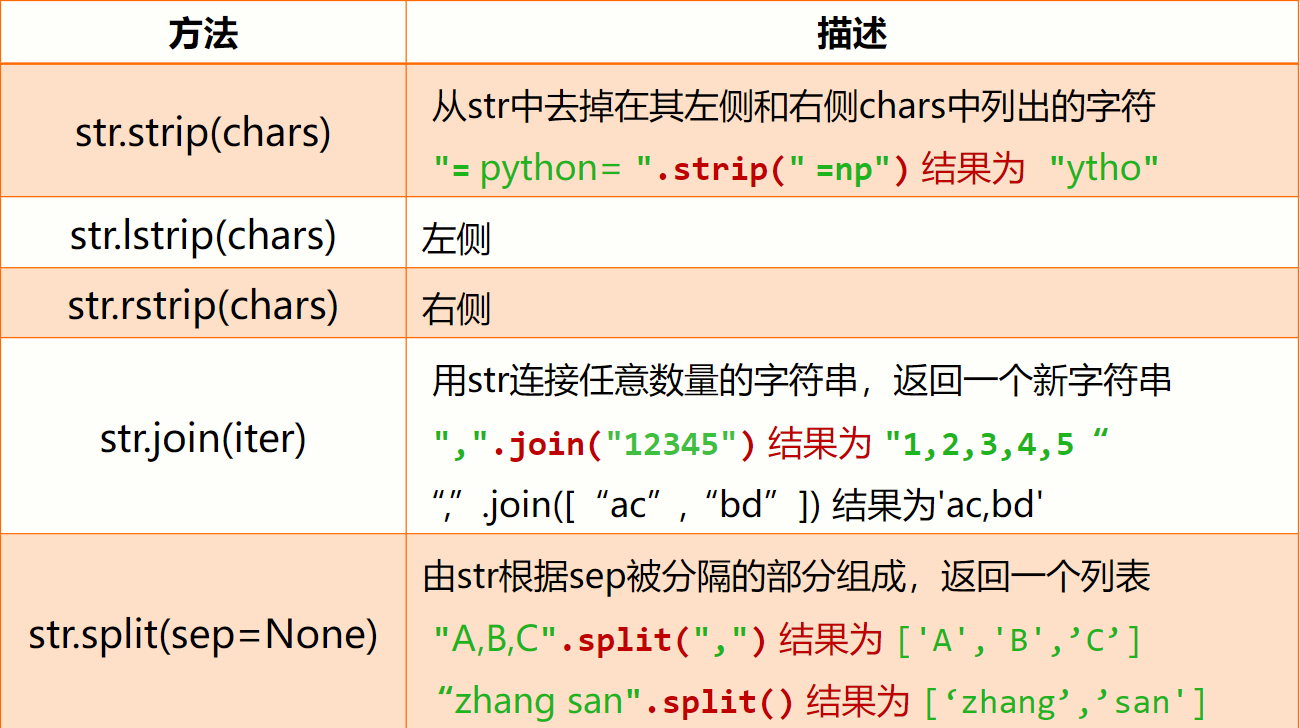
- “方法”在编程中是一个专有名词
- “方法”特指
<a>.<b>()风格中的函数<b>() - 方法本身也是函数,但与
<a>有关,<a>.<b>()风格使用 - 字符串或字符串变量是
<a>,存在一些可用方法
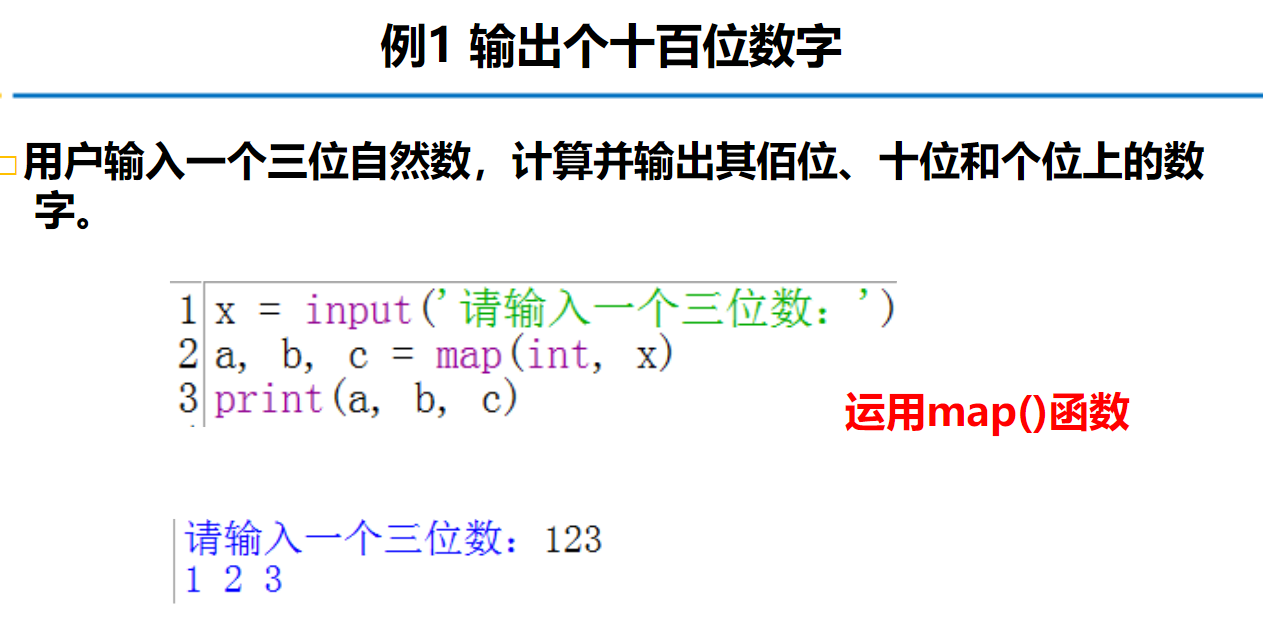
输入 3 个数:
a = eval(input())
b = eval(input())
C = eval(input())
a,b,C = eval(input()) # 输入:3,4,5
a,b,C = map(eval, input().split()) # 输入:3 4 5
map(func, *iterables):上网查。
format()方法:更多用法请上网查。
name = 'ldq'
age = 24
print('我叫%s,今年%d岁' % (name, age))
# 输出:我叫ldq,今年24岁
print('我叫{0},今年{1}岁'.format(name, age))
# 输出:我叫ldq,今年24岁
程序的控制结构
异常处理:
# 示例1
try:
    num = eval(input("请输入一个整数:"))
    print(num**2)
except:
    print("输入不是整数")
# 示例2
try:
num = eval(input("请输入一个整数:"))
print(num**2)
except NameError: # 标注异常类型后,仅响应此类异常
print("输入不是整数")异常处理的高级使用:
try:
    # <语句块1>
except:
    # <语句块2>
else:
    # <语句块3>     # 不发生异常时会执行
finally:
    # <语句块4>     # 一定执行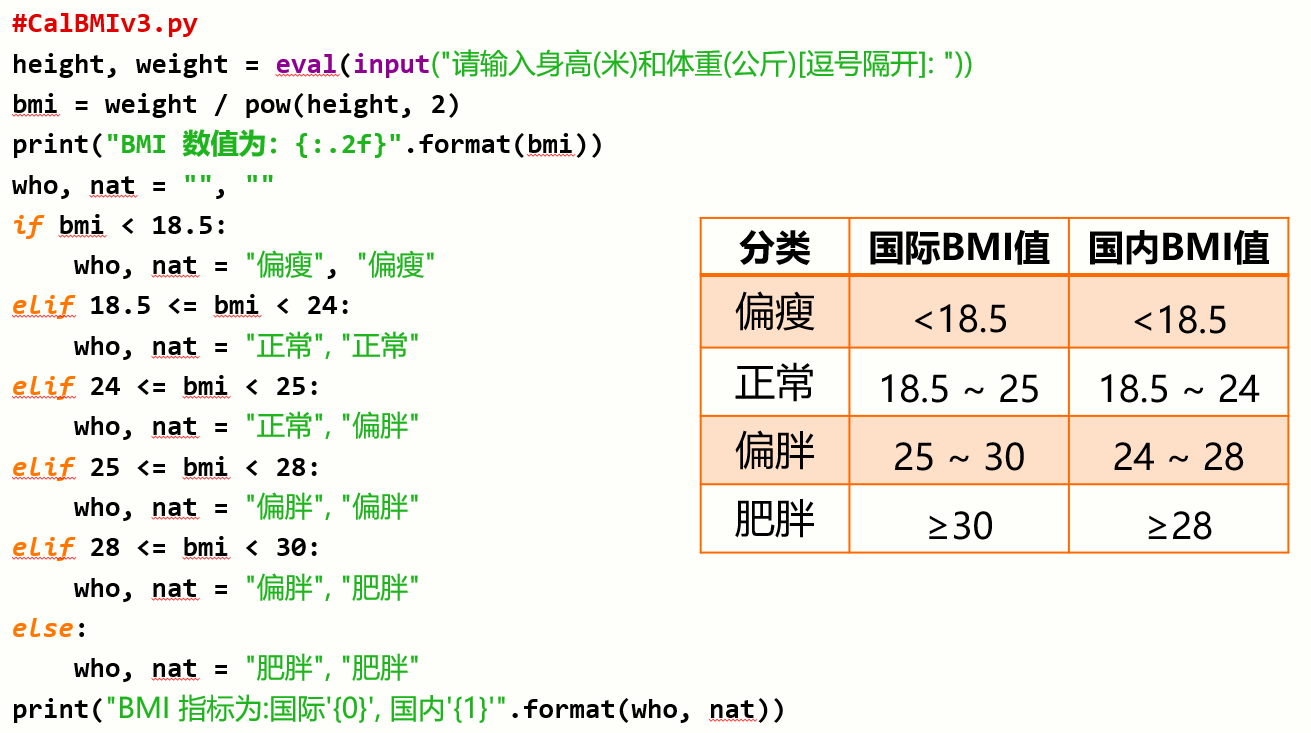
循环结构:
for i in range(1,6,2):
    print("hello:",i)
# 输出结果:
hello: 1
hello: 3
hello: 5
字符串遍历循环:
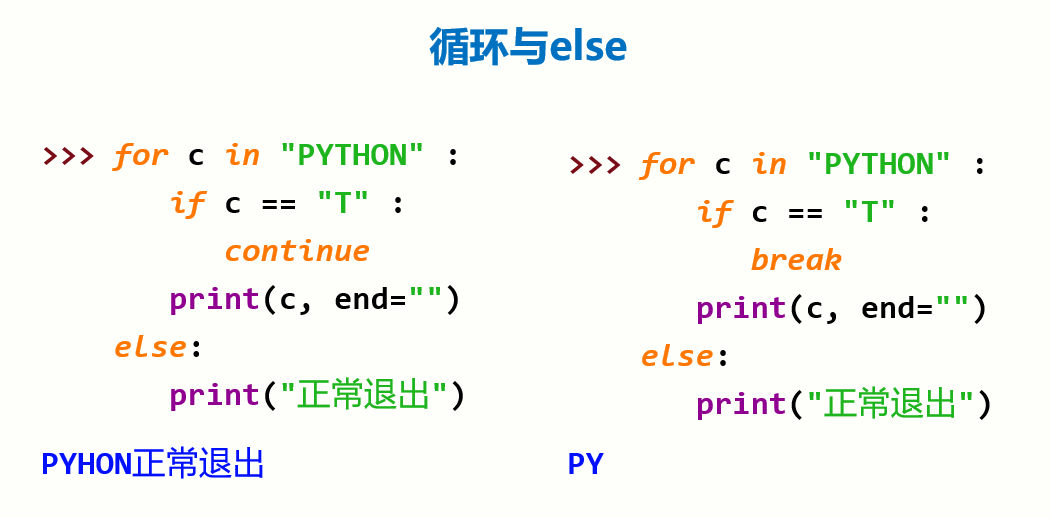
for c in "Python123":
    print(c, end=",")
# 输出结果:
P,y,t,h,o,n,1,2,3,
列表遍历循环:
for item in [123, "PY", 456]:
    print(item, end=",")
# 输出结果:
123,PY,456,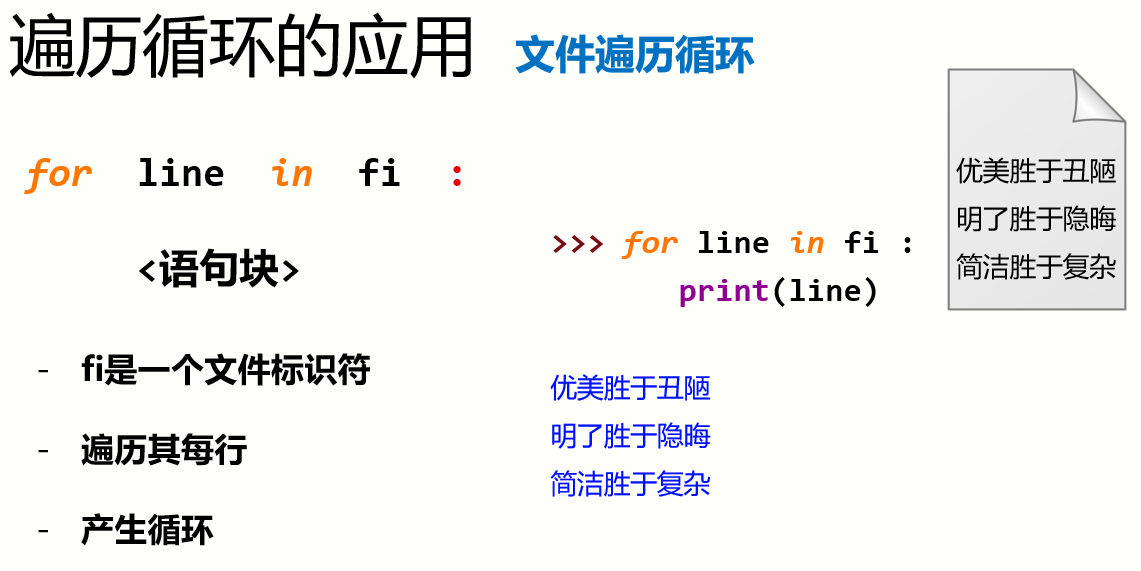
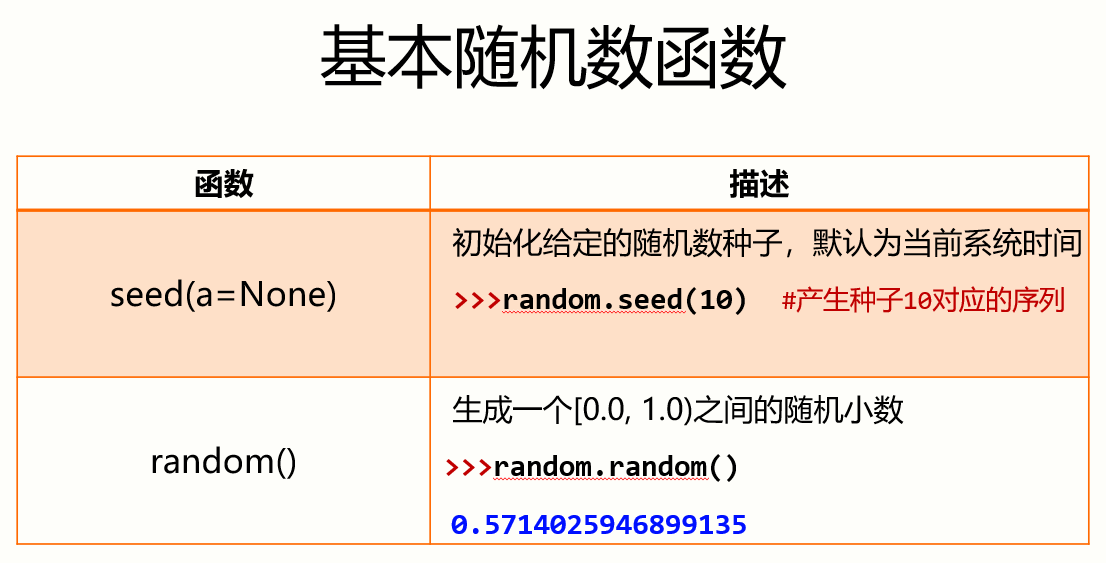
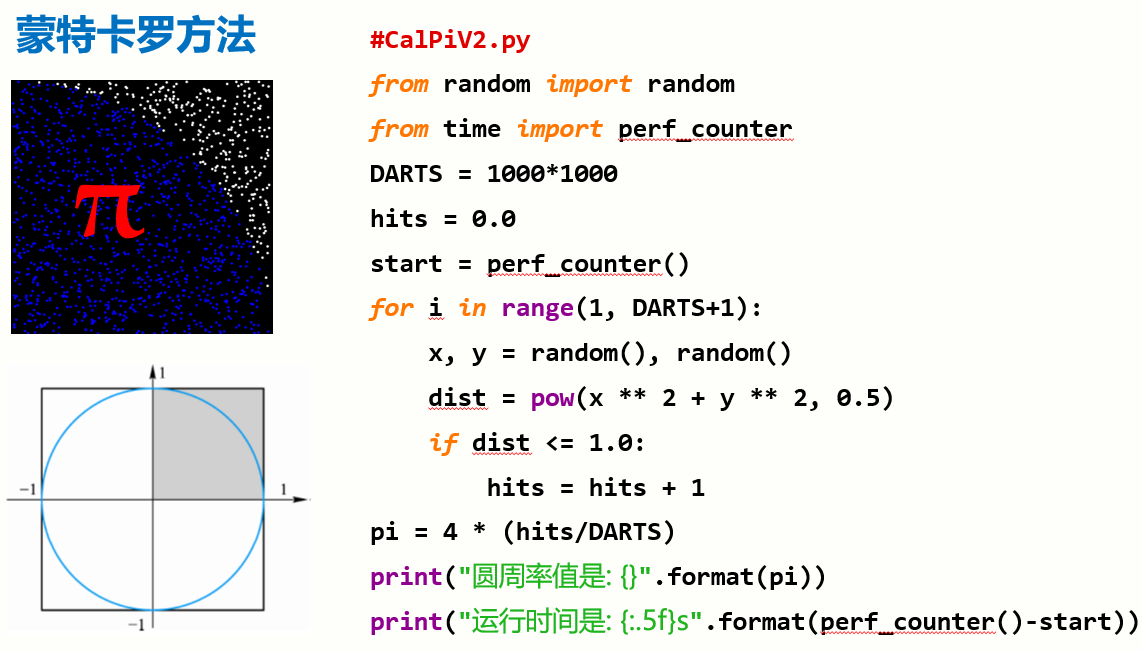
使用random库: import random
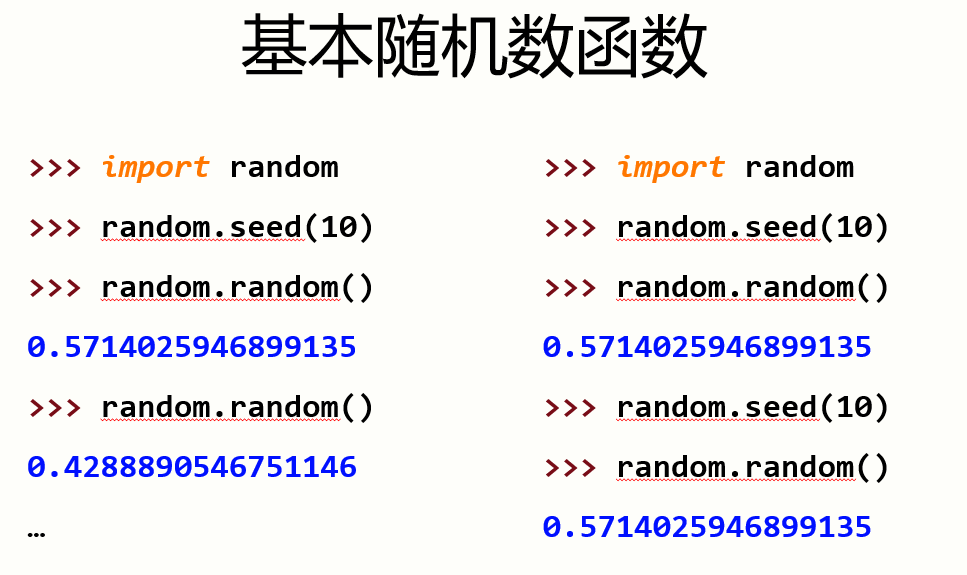
基本随机数函数:seed()、random()
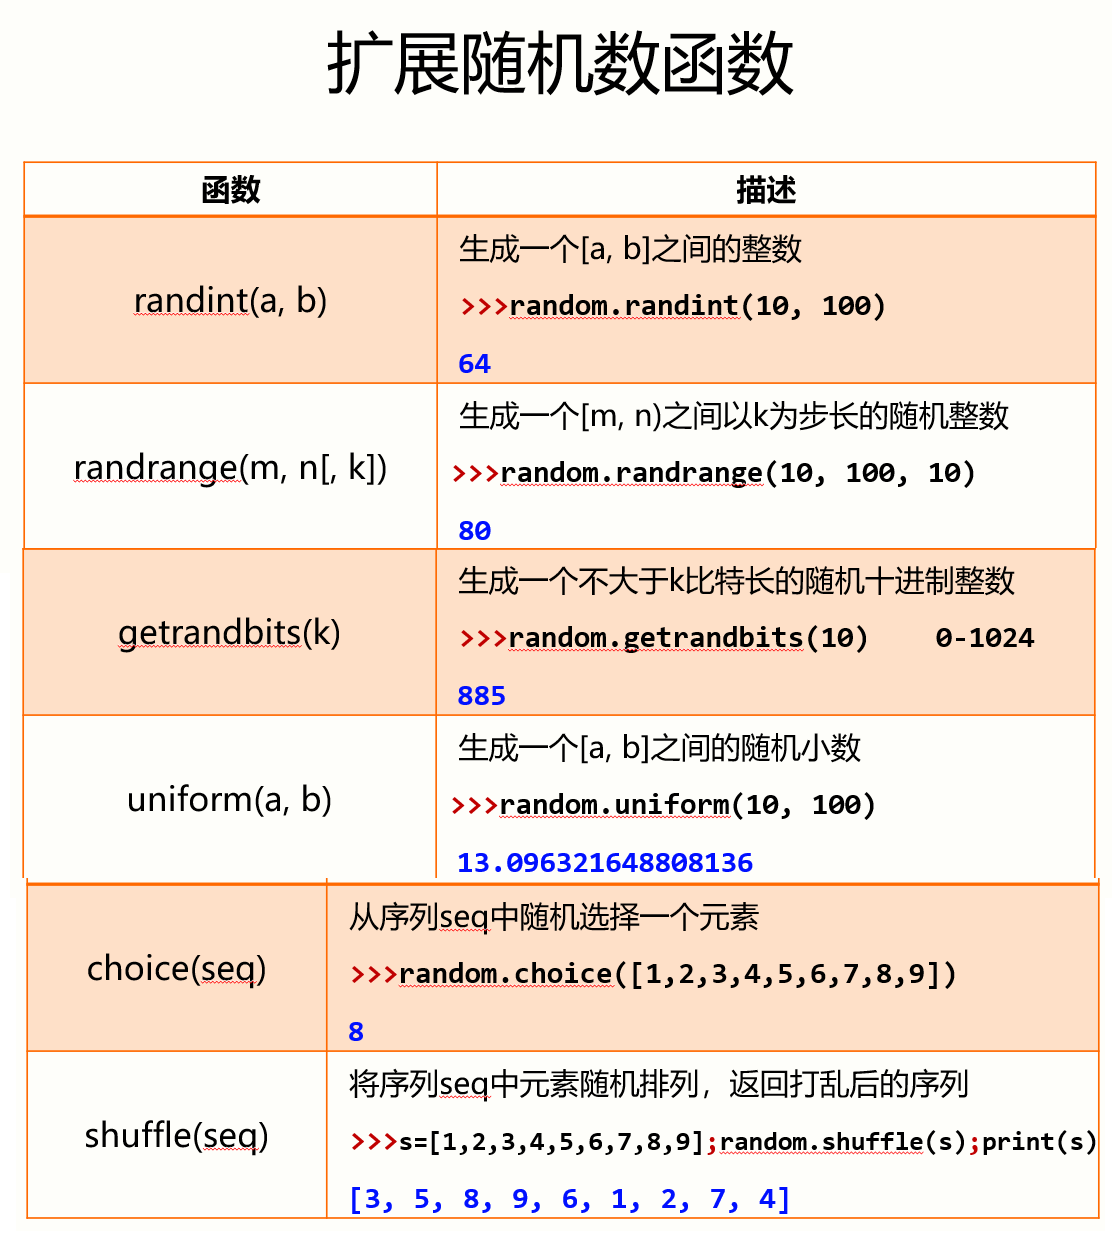
扩展随机数函数:randint()、getrandbits()、uniform()、randrange()、choice()、shuffle()
函数和代码复用
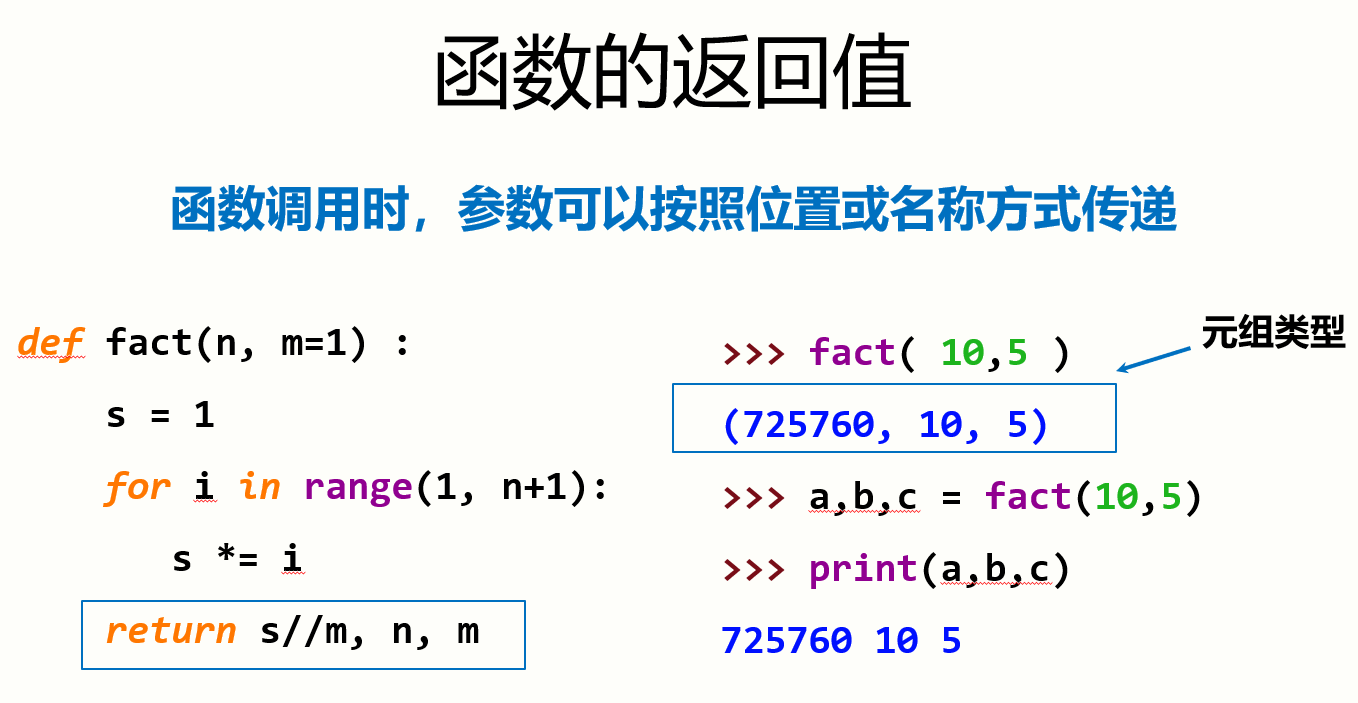
可变参数传递:
def fact(n, *b):
    s = 1
    for i in range(1, n+1):
        s *= i
    for item in b:
        s *= item
    return s
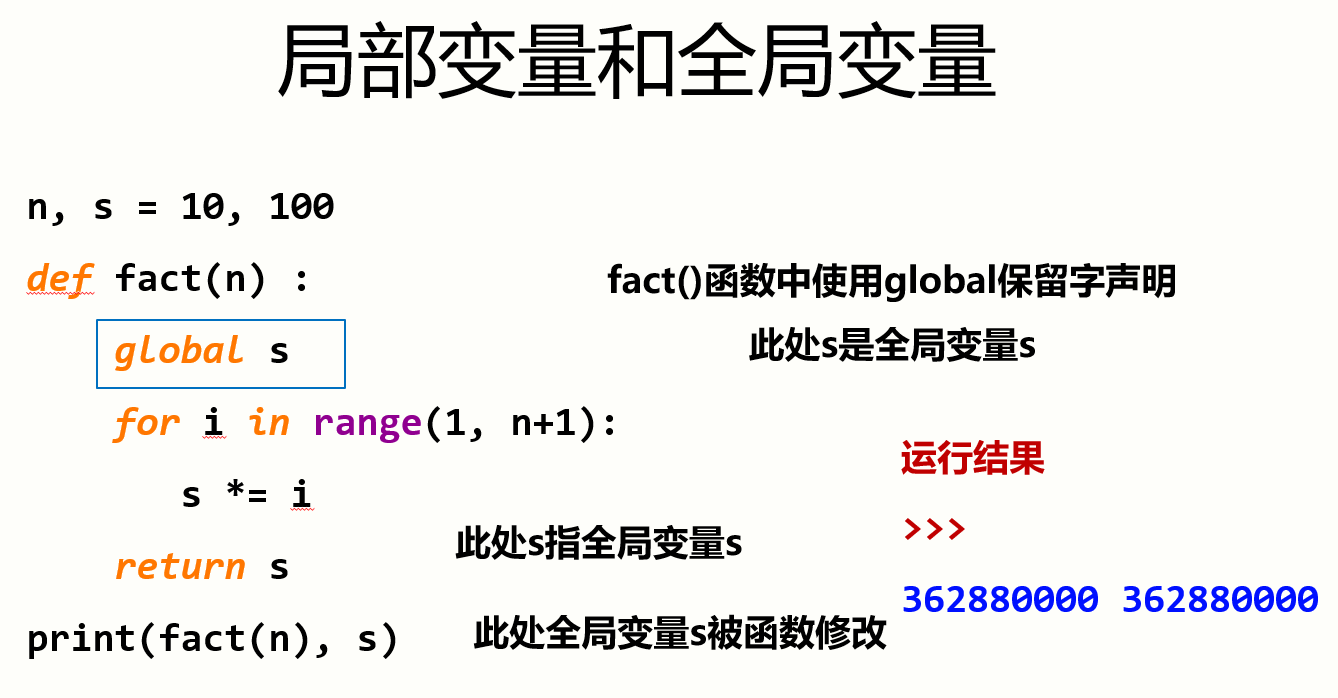
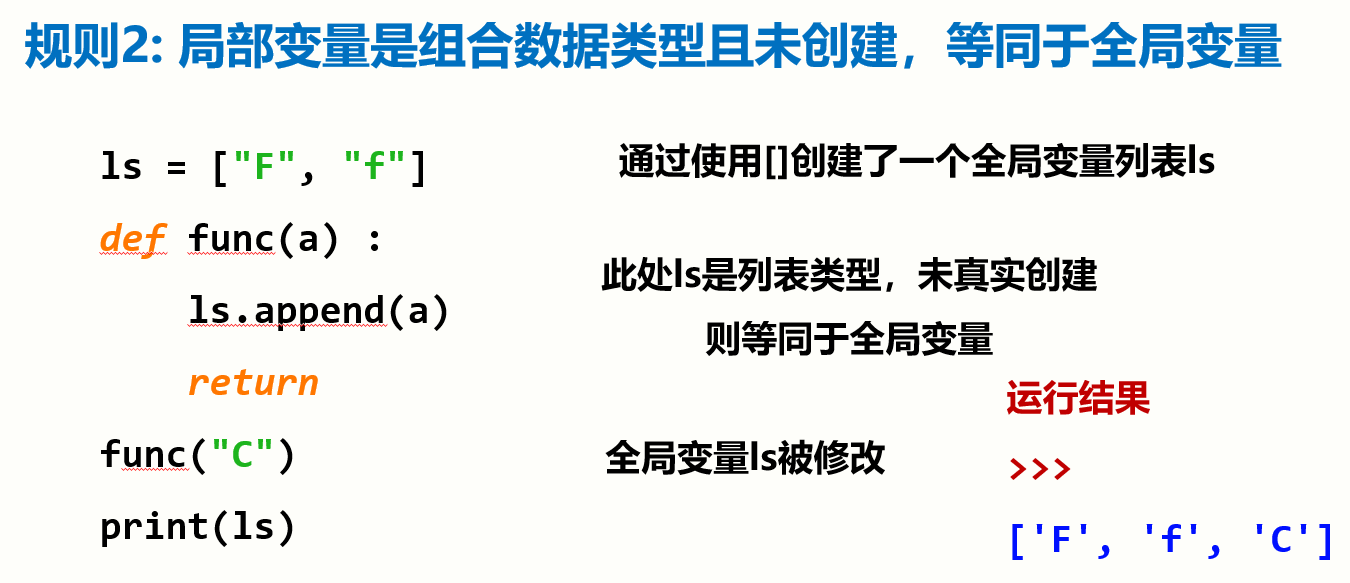
函数调用时,参数可以按照位置或名称方式传递。(歪门邪道,少用)
lambda函数:
- 一种匿名函数
- 使用
lambda保留字定义,函数名是返回结果 lambda函数用于定义简单的、能在一行内表示的函数- 主要用作一些特定函数或方法的参数
>>> f = lambda x,y : x+y
>>> f(10,15)
25
>>> f = lambda : "lambda函数"
>>> print(f())
lambda函数
【实例】七段数码管绘制:
import turtle, time
def drawGap():   #绘制数码管间隔
    turtle.penup()
    turtle.fd(5)

def drawLine(draw):   #绘制单段数码管
    drawGap()
    turtle.pendown() if draw else turtle.penup()
    turtle.fd(40)
    drawGap()
    turtle.right(90)

def drawDigit(digit): #根据数字绘制七段数码管
    drawLine(True) if digit in [2,3,4,5,6,8,9] else drawLine(False)
    drawLine(True) if digit in [0,1,3,4,5,6,7,8,9] else drawLine(False)
    drawLine(True) if digit in [0,2,3,5,6,8,9] else drawLine(False)
    drawLine(True) if digit in [0,2,6,8] else drawLine(False)
    turtle.left(90)
    drawLine(True) if digit in [0,4,5,6,8,9] else drawLine(False)
    drawLine(True) if digit in [0,2,3,5,6,7,8,9] else drawLine(False)
    drawLine(True) if digit in [0,1,2,3,4,7,8,9] else drawLine(False)
    turtle.left(180)
    turtle.penup() #为绘制后续数字确定位置
    turtle.fd(20)  #为绘制后续数字确定位置

def drawDate(date):   #data为日期,格式为 '%Y-%m=%d+'
    turtle.pencolor("red")
    for i in date:
        if i == '-':
            turtle.write('年',font=("Arial", 18, "normal"))
            turtle.pencolor("green")
            turtle.fd(40)
        elif i == '=':
            turtle.write('月',font=("Arial", 18, "normal"))
            turtle.pencolor("blue")
            turtle.fd(40)
        elif i == '+':
            turtle.write('日',font=("Arial", 18, "normal"))
        else:
            drawDigit(eval(i))

def main():
    turtle.speed(10)
    turtle.delay(0)
    turtle.setup(800, 350, 200, 200)
    turtle.penup()
    turtle.fd(-300)
    turtle.pensize(5)
    drawDate(time.strftime('%Y-%m=%d+',time.gmtime()))
    turtle.hideturtle()
    turtle.done()

main()
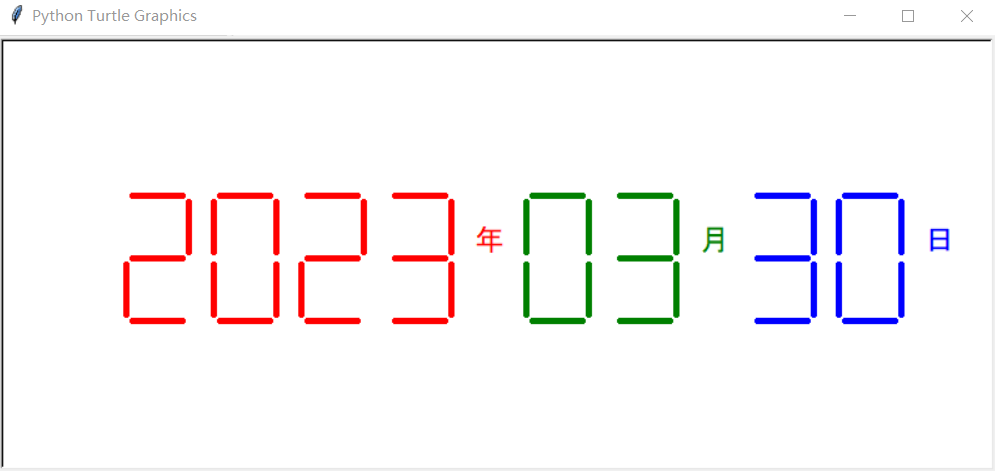
运行结果:
【实例】修正如下的绘制奥运五环的程序,将五环绘制部分代码改为用循环实现,提示(每个圆的坐标点、颜色可以选用组合数据类型保持)
import turtle
turtle.speed(10)
turtle.delay(0)
turtle.width(10)

turtle.color("blue")
turtle.circle(50)

turtle.penup()
turtle.goto(120, 0)
turtle.pendown()
turtle.color("black")
turtle.circle(50)

turtle.penup()
turtle.goto(240, 0)
turtle.pendown()
turtle.color("red")
turtle.circle(50)

turtle.penup()
turtle.goto(60, -50)
turtle.pendown()
turtle.color("yellow")
turtle.circle(50)

turtle.penup()
turtle.goto(180, -50)
turtle.pendown()
turtle.color("green")
turtle.circle(50)

turtle.penup()
turtle.goto(40, -100)
turtle.pendown()
turtle.color("black")
turtle.write("Beijing 2022", font=("微软雅⿊", 20, "bold"))
turtle.hideturtle()
turtle.done()
【解答】这里写点字只是因为不想看起来不舒服。
import turtle
turtle.speed(10)
turtle.delay(0)

rings = [{'color': 'blue', 'position': (0, 0)},
         {'color': 'black', 'position': (120, 0)},
         {'color': 'red', 'position': (240, 0)},
         {'color': 'yellow', 'position': (60, -50)},
         {'color': 'green', 'position': (180, -50)}]

turtle.width(10)

for ring in rings:
    turtle.color(ring['color'])
    turtle.penup()
    turtle.goto(ring['position'])
    turtle.pendown()
    turtle.circle(50)

turtle.penup()
turtle.goto(40, -100)
turtle.pendown()
turtle.color("black")
turtle.write("Beijing 2022", font=("微软雅⿊", 20, "bold"))
turtle.hideturtle()
turtle.done()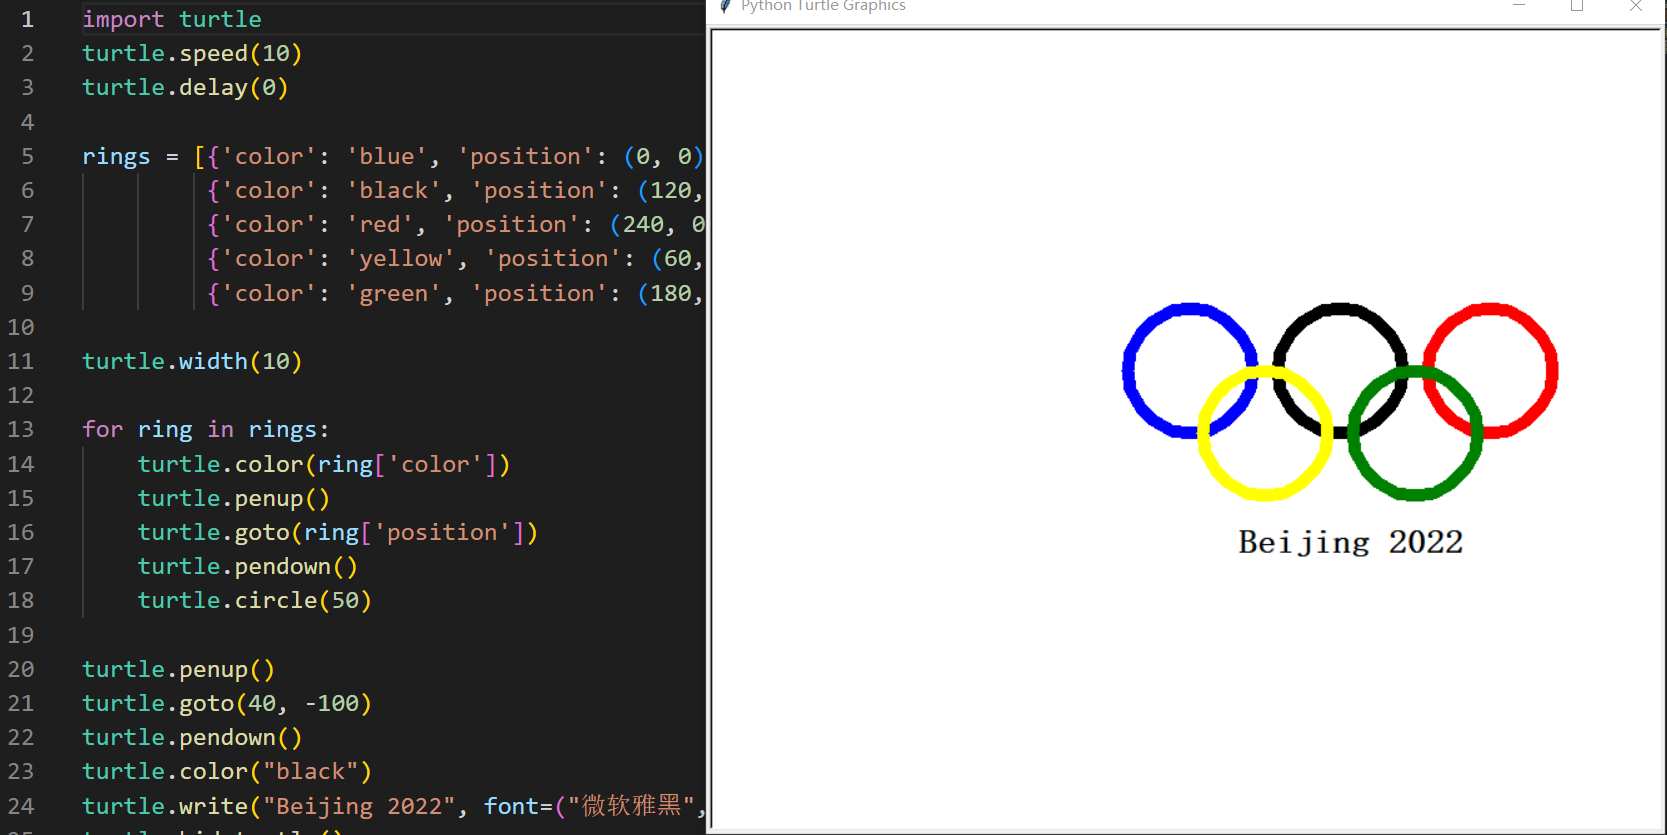
【实例】修正绘制奥运五环的程序,将五环绘制部分代码改为用函数实现,提示(可以通过参数传每个圆的坐标点、颜色值)
【解答】没什么可分析的。
import turtle
turtle.speed(10)
turtle.delay(0)
turtle.width(10)

def draw_circle(x, y, color):
    turtle.color(color)
    turtle.penup()
    turtle.goto(x, y)
    turtle.pendown()
    turtle.circle(50)

draw_circle(0, 0, 'blue')
draw_circle(120, 0, 'black')
draw_circle(240, 0, 'red')
draw_circle(60, -50, 'yellow')
draw_circle(180, -50, 'green')

turtle.penup()
turtle.goto(40, -100)
turtle.pendown()
turtle.color("black")
turtle.write("Beijing 2022", font=("微软雅⿊", 20, "bold"))
turtle.hideturtle()
turtle.done()
组合数据类型
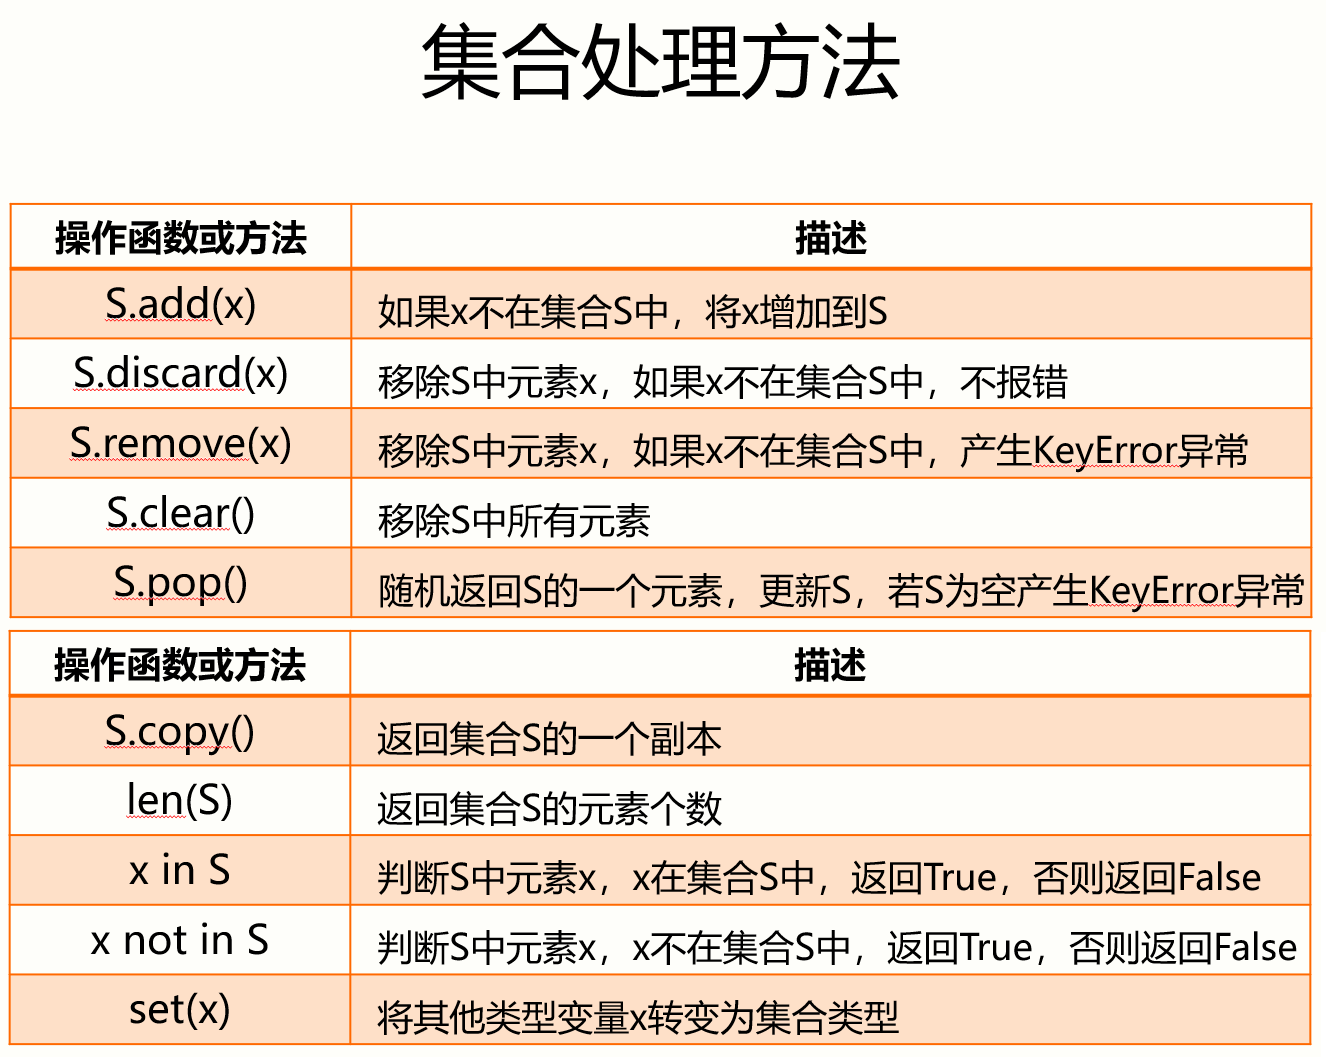
集合类型的定义:
- 与数学中集合的概念一致
- 集合元素不可更改,不能是可变数据类型
- 用
{}表示,元素间用逗号分隔 - 建立集合类型用
{}或set() - 建立空集合类型,必须用
set()
>>> A = {"python", 123, ("python",123)}  #使用{}建立集合
{123, 'python', ('python', 123)}
>>> B = set("pypy123")         #使用set()建立集合
{'1', 'p', '2', '3', 'y'}
>>> C = {"python", 123, "python",123}
{'python', 123}
包含关系比较:
>>> "p" in {"p", "y" , 123}
True
>>> {"p", "y"} >= {"p", "y" , 123}
False
数据去重,集合类型所有元素无重复:
>>> ls = ["p", "p", "y", "y", 123]
>>> s = set(ls)    # 利用了集合无重复元素的特点
{'p', 'y', 123}
>>> lt = list(s)   # 还可以将集合转换为列表
['p', 'y', 123]
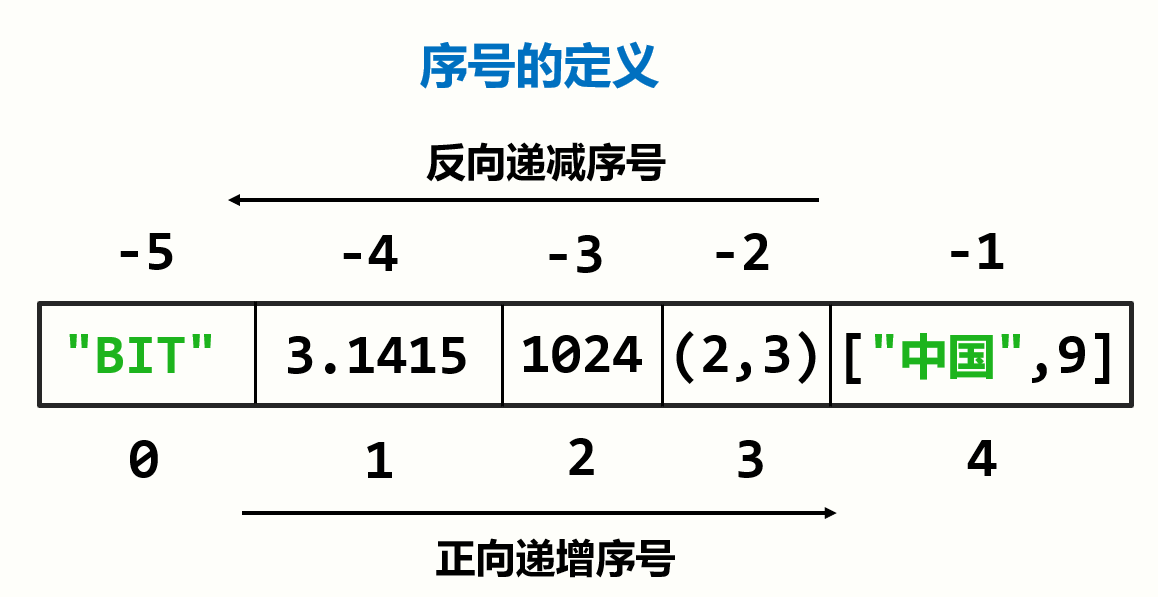
序列类型定义(序列是具有先后关系的一组元素 ):
- 序列是一维元素向量,元素类型可以不同
- 类似数学元素序列: s0, s1, … , sn-1
- 元素间由序号引导,通过下标访问序列的特定元素
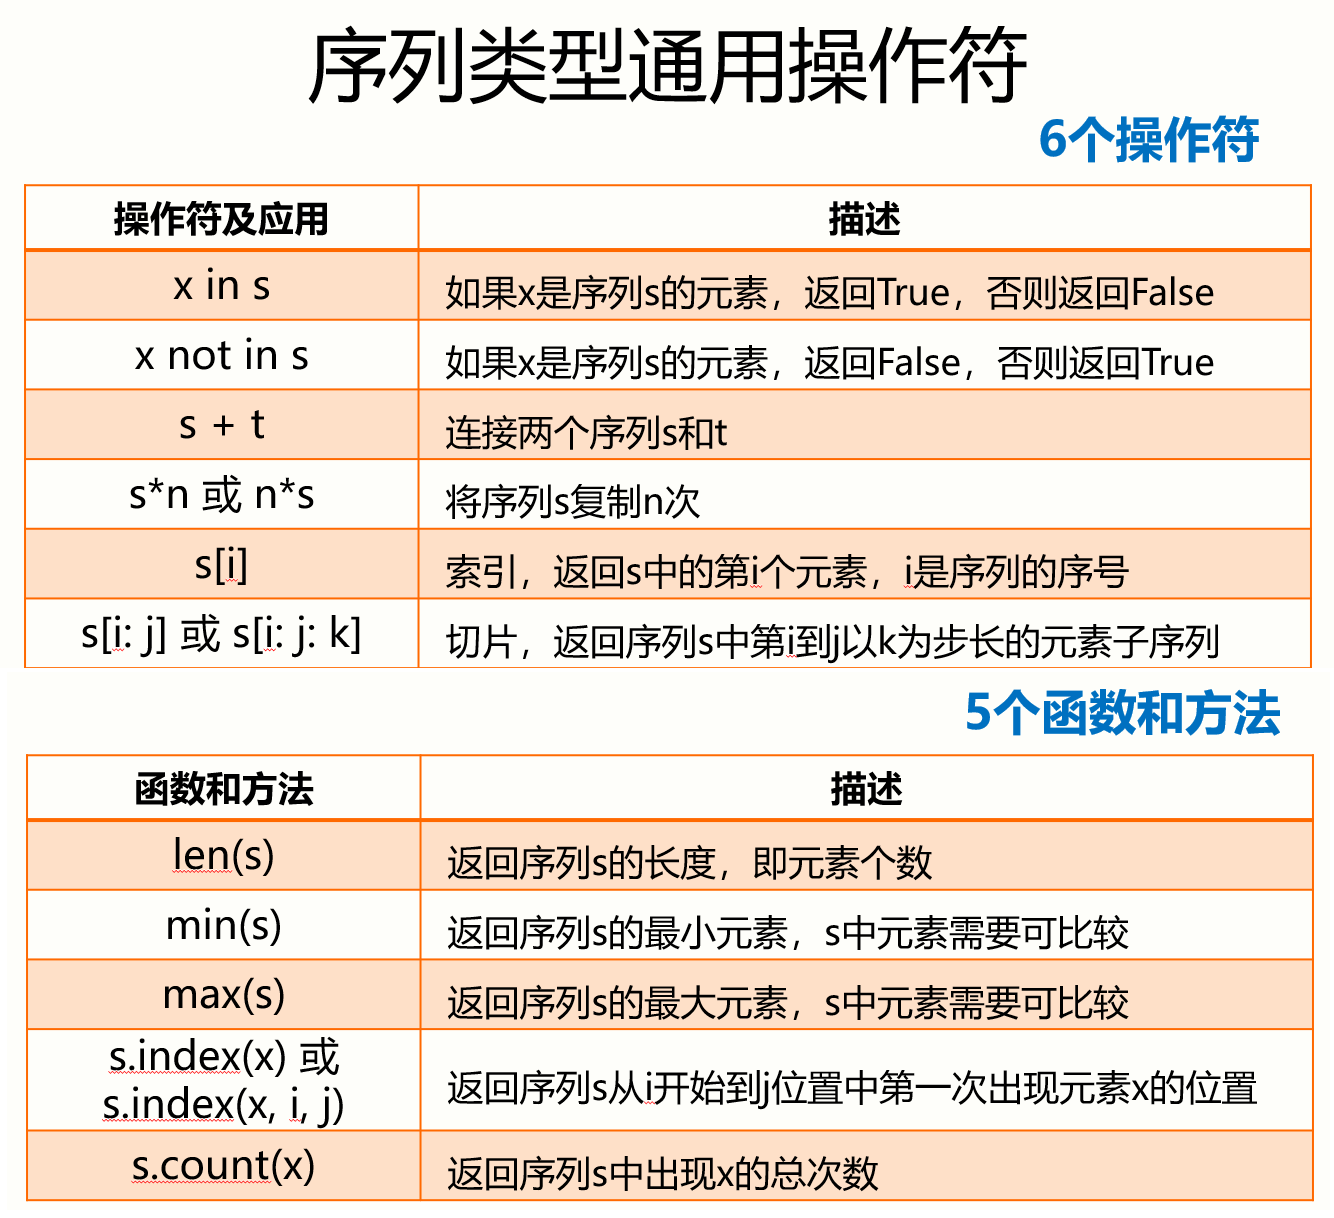
序列是一个基类类型。 序列类型 -> 字符串类型、元组类型、列表类型。
# 序列类型操作实例
>>> ls = ["python", 123, ".io"]
>>> ls[::-1]
['.io', 123, 'python']
>>> s = "python123.io"
>>> s[::-1]
'oi.321nohtyp'
>>>Print(ls)
['python’,123,'.io’]
>>> ls = ["python", 123, ".io"]
>>> len(ls)
3
>>> s = "python123.io"
>>> max(s)
'y'元组类型定义(元组是序列类型的一种扩展,继承了序列类型的全部通用操作):
- 使用小括号
()或tuple()创建,元素间用逗号分隔 - 可以使用或不使用小括号
- 一旦创建就不能被修改
- 没有特殊操作(增删改)
>>> creature = "cat", "dog", "tiger", "human"
>>> creature
('cat', 'dog', 'tiger', 'human')
>>> creature[::-1]
('human', 'tiger', 'dog', 'cat')
>>> creature
('cat', 'dog', 'tiger', 'human')
>>> color = (0x001100, "blue", creature)
>>> color[-1][2]
'tiger'
列表类型定义(列表是序列类型的一种扩展,十分常用):
- 列表是一种序列类型,创建后可以随意被修改
- 使用方括号
[]或list()创建,元素间用逗号分隔 - 列表中各元素类型可以不同,无长度限制
>>> ls = ["cat", "dog", "tiger", 1024]
>>> ls
['cat', 'dog', 'tiger', 1024]
>>> lt = ls
>>> lt
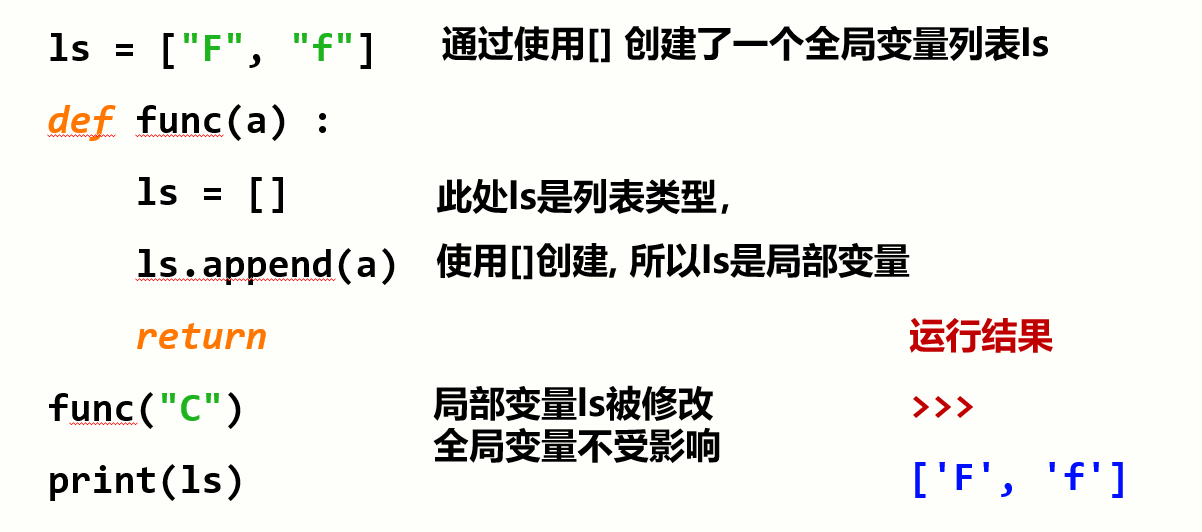
['cat', 'dog', 'tiger', 1024] 方括号[]真正创建一个列表,赋值仅传递引用。
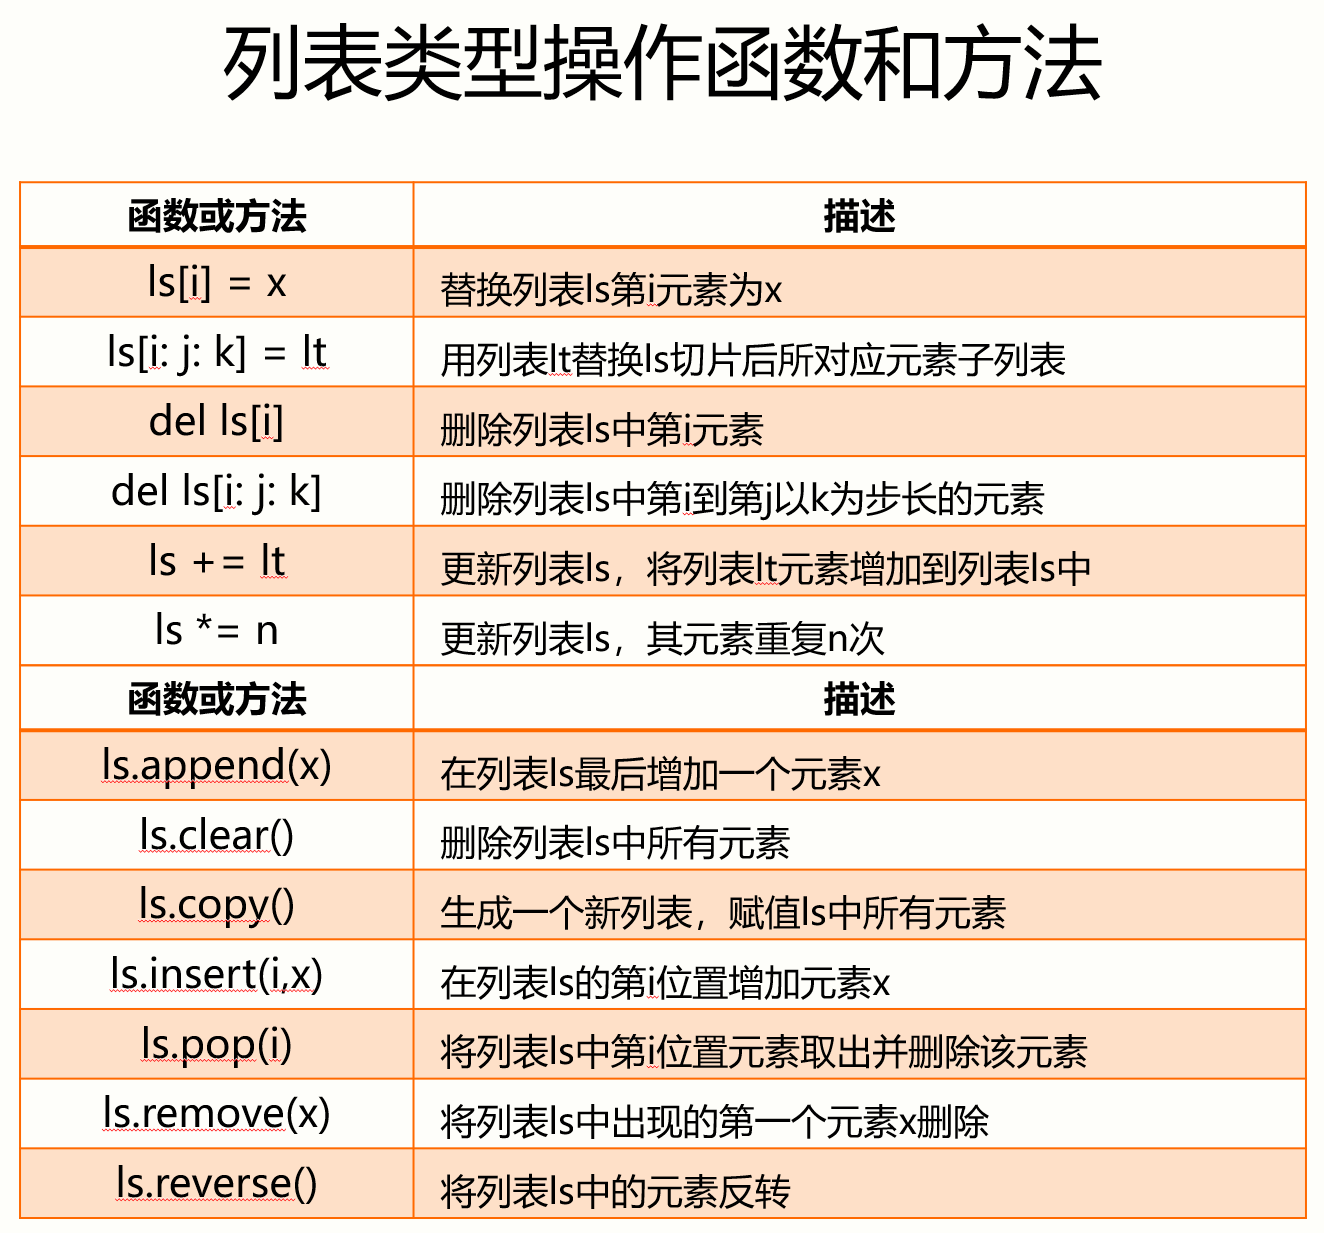
>>> ls = ["cat", "dog", "tiger", 1024]
>>> ls[1:2] = [1, 2, 3, 4]
['cat', 1, 2, 3, 4, 'tiger', 1024]
>>> del ls[::3]
[1, 2, 4, 'tiger']
>>> ls*2
[1, 2, 4, 'tiger', 1, 2, 4, 'tiger']
>>> ls = ["cat", "dog", "tiger", 1024]
>>> ls.append(1234)
['cat', 'dog', 'tiger', 1024, 1234]
>>> ls.insert(3, "human")
['cat', 'dog', 'tiger', 'human', 1024, 1234]
>>> ls.reverse()
[1234, 1024, 'human', 'tiger', 'dog', 'cat']如果不希望数据被程序所改变,转换成元组类型:
>>> ls = ["cat", "dog", "tiger", 1024]
>>> lt = tuple(ls)
>>> lt
('cat', 'dog', 'tiger', 1024)
【实例】 基本统计值计算
#CalStatisticsV1.py
def getNum():       #获取用户不定长度的输入
    nums = []
    iNumStr = input("请输入数字(回车退出): ")
    while iNumStr != "":
        nums.append(eval(iNumStr))
        iNumStr = input("请输入数字(回车退出): ")
    return nums

def mean(numbers):  #计算平均值
    s = 0.0
    for num in numbers:
        s = s + num
    return s / len(numbers)

def dev(numbers, mean):  #计算标准差
    sdev = 0.0
    for num in numbers:
        sdev = sdev + (num - mean)**2
    return pow(sdev / (len(numbers)-1), 0.5)

def median(numbers):    #计算中位数
    numbers.sort()    # sorted(numbers)
    size = len(numbers)
    if size % 2 == 0:
        med = (numbers[size//2-1] + numbers[size//2])/2
    else:
        med = numbers[size//2]
    return med

n =  getNum()
m =  mean(n)
print("平均值:{},标准差:{:.2},中位数:{}.".format(m, dev(n,m),median(n)))
注意:在上面的代码中,两条排序语句的运行结果不一样。
这是因为:
sorted()是Python内置函数,它接受一个可迭代对象(如列表)作为参数,返回一个新的排好序的列表,原来的列表不会被修改。list.sort()是列表对象的方法,它对原列表进行排序,不返回新的列表,而是直接修改原来的列表。
【作业】 代码补全 - 奥运五环
import turtle

def drawCircle(x,y,color):
    turtle.penup()
    turtle.goto(x, y)
    turtle.pendown()
    turtle.color(color)
    turtle.circle(50)

turtle.width(10)

##1
drawCircle(0,0,"blue")
drawCircle(120,0,"black")
drawCircle(240,0,"red")
drawCircle(60,-50,"yellow")
drawCircle(180,-50,"green")

##2
##xs = [0, 120, 240, 60, 180]
##ys = [0, 0, 0, -50, -50]
##colors = ['blue', 'black', 'red', 'yellow', 'green']
##for i in range(5):
##补全

##3
##coords = [(0,0),(120,0),(240,0),(60,-50),(180,-50)]
##colors = ["blue","black","red","yellow","green"]
##for i in range(5):
##补全

##4
##circles = [
##    (0, 0, "blue"),
##    (120, 0, "black"),
##    (240, 0, "red"),
##    (60, -50, "yellow"),
##    (180, -50, "green")
##]
##for circle in circles:
##补全

turtle.penup()
turtle.goto(40, -100)
turtle.pendown()
turtle.color("black")
turtle.write("Beijing 2022", font=("微软雅⿊", 20, "bold"))
turtle.hideturtle()
turtle.done()
2中补全的代码为:
drawCircle(xs[i], ys[i], colors[i])3中补全的代码为:
drawCircle(coords[i][0], coords[i][1], colors[i])4中补全的代码为:
drawCircle(circle[0], circle[1], circle[2])以上代码均通过测试。
字典类型定义(字典类型是“映射”的体现):
- 键值对:键是数据索引的扩展
- 字典是键值对的集合,键值对之间无序
- 采用大括号
{}和dict()创建,键值对用冒号:表示 {<键1>:<值1>, <键2>:<值2>, … , <键n>:<值n>}
在字典变量中,通过键获得值:
<字典变量> = {<键1>:<值1>, … , <键n>:<值n>}<值> = <字典变量>[<键>]<字典变量>[<键>] = <值>[]用来向字典变量中索引或增加元素
>>> d = {"中国":"北京", "美国":"华盛顿", "法国":"巴黎"}
>>> d
{'中国': '北京', '美国': '华盛顿', '法国': '巴黎'}
>>> d["中国"]
'北京'
>>> de = {} ; type(de)
<class 'dict'>type(x):返回变量x的类型。
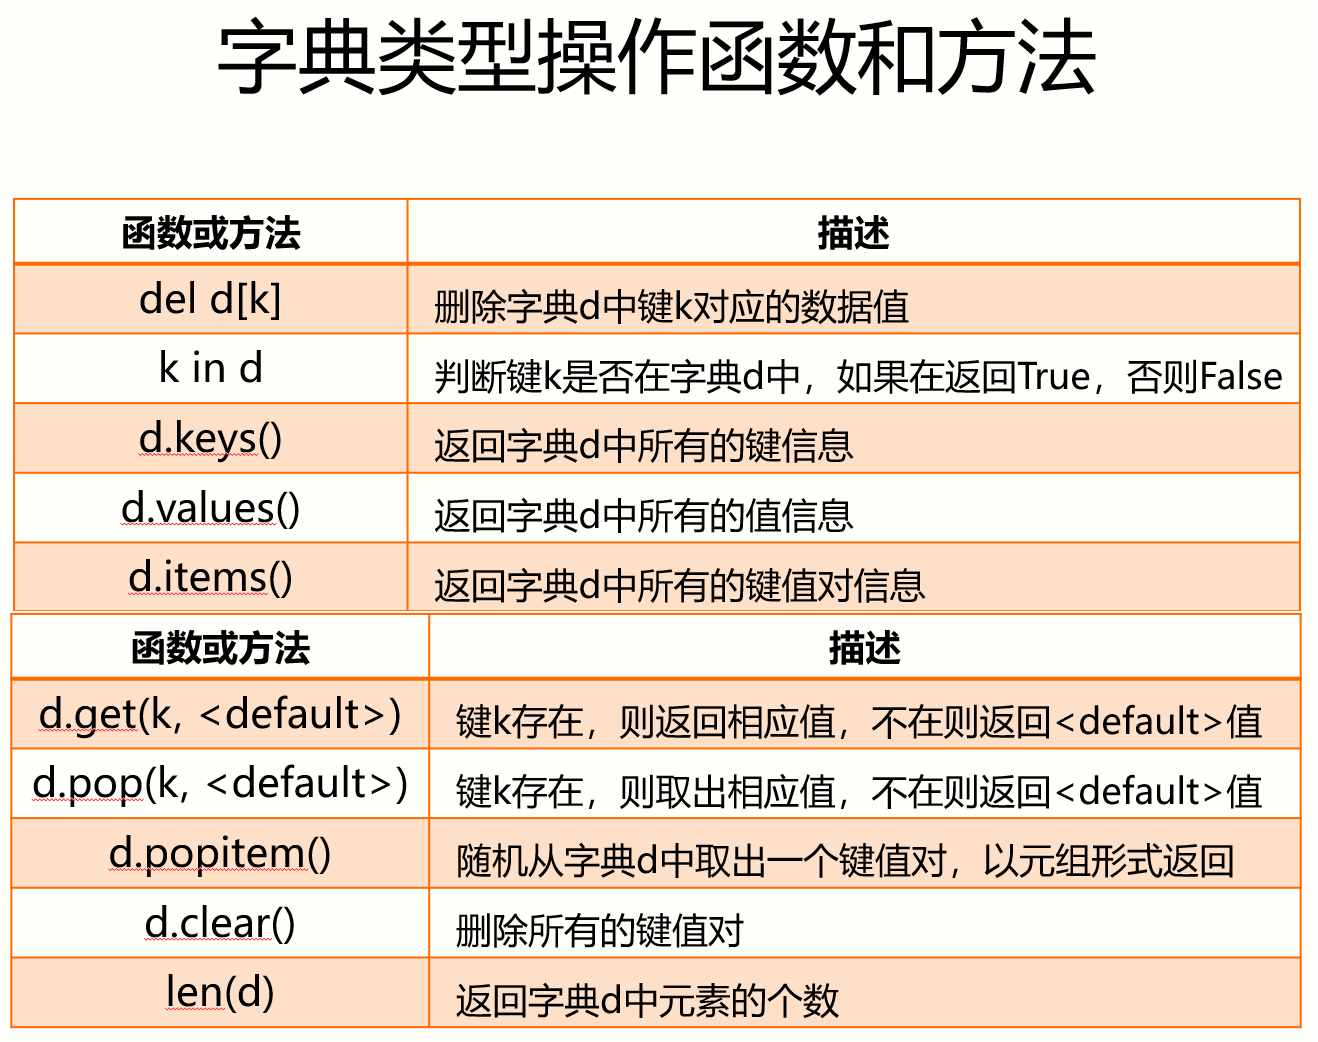
>>> d = {"中国":"北京", "美国":"华盛顿", "法国":"巴黎"}
>>> "中国" in d
True
>>> d.keys()
dict_keys(['中国', '美国', '法国'])
>>> d.values()
dict_values(['北京', '华盛顿', '巴黎'])
>>> d = {"中国":"北京", "美国":"华盛顿", "法国":"巴黎"}
>>> d.get("中国","伊斯兰堡")
'北京'
>>> d.get("巴基斯坦","伊斯兰堡")
'伊斯兰堡'
>>> d.popitem()
('美国', '华盛顿')字典类型应用场景,元素遍历:
for k,v in d.items():
for (k,v) in d.items():
for k in d.keys():
for v in d.values():
【作业】 课程成绩统计
import math

def score_type_in():    # 获取用户不定长度的输入
    nums = []
    iNumStr = input("请输入0-100的整数(回车退出): ")
    while iNumStr != "":
        nums.append(eval(iNumStr))
        if not(isinstance(nums[-1],int)) or nums[-1]<0 or nums[-1]>100:
            print("输入非法")
            del nums[-1]
        iNumStr = input("请输入0-100的整数(回车退出): ")
    nums.sort()
    return nums

def mean(numbers):  # 计算平均值
    s = 0.0
    for num in numbers:
        s = s + num
    return s / len(numbers)

def abcde_label(numbers):  # 打等级
    label_dict = {}
    for score in numbers:
        if score >= 90 :
            label_dict["优"] = label_dict.get("优",0) + 1
        elif score >= 80 :
            label_dict["良"] = label_dict.get("良",0) + 1
        elif score >= 70 :
            label_dict["中"] = label_dict.get("中",0) + 1
        elif score >= 60 :
            label_dict["及格"] = label_dict.get("及格",0) + 1
        else :
            label_dict["不及格"] = label_dict.get("不及格",0) + 1
    return label_dict

real_score = score_type_in()
print(real_score)
print(mean(real_score))
print(abcde_label(real_score))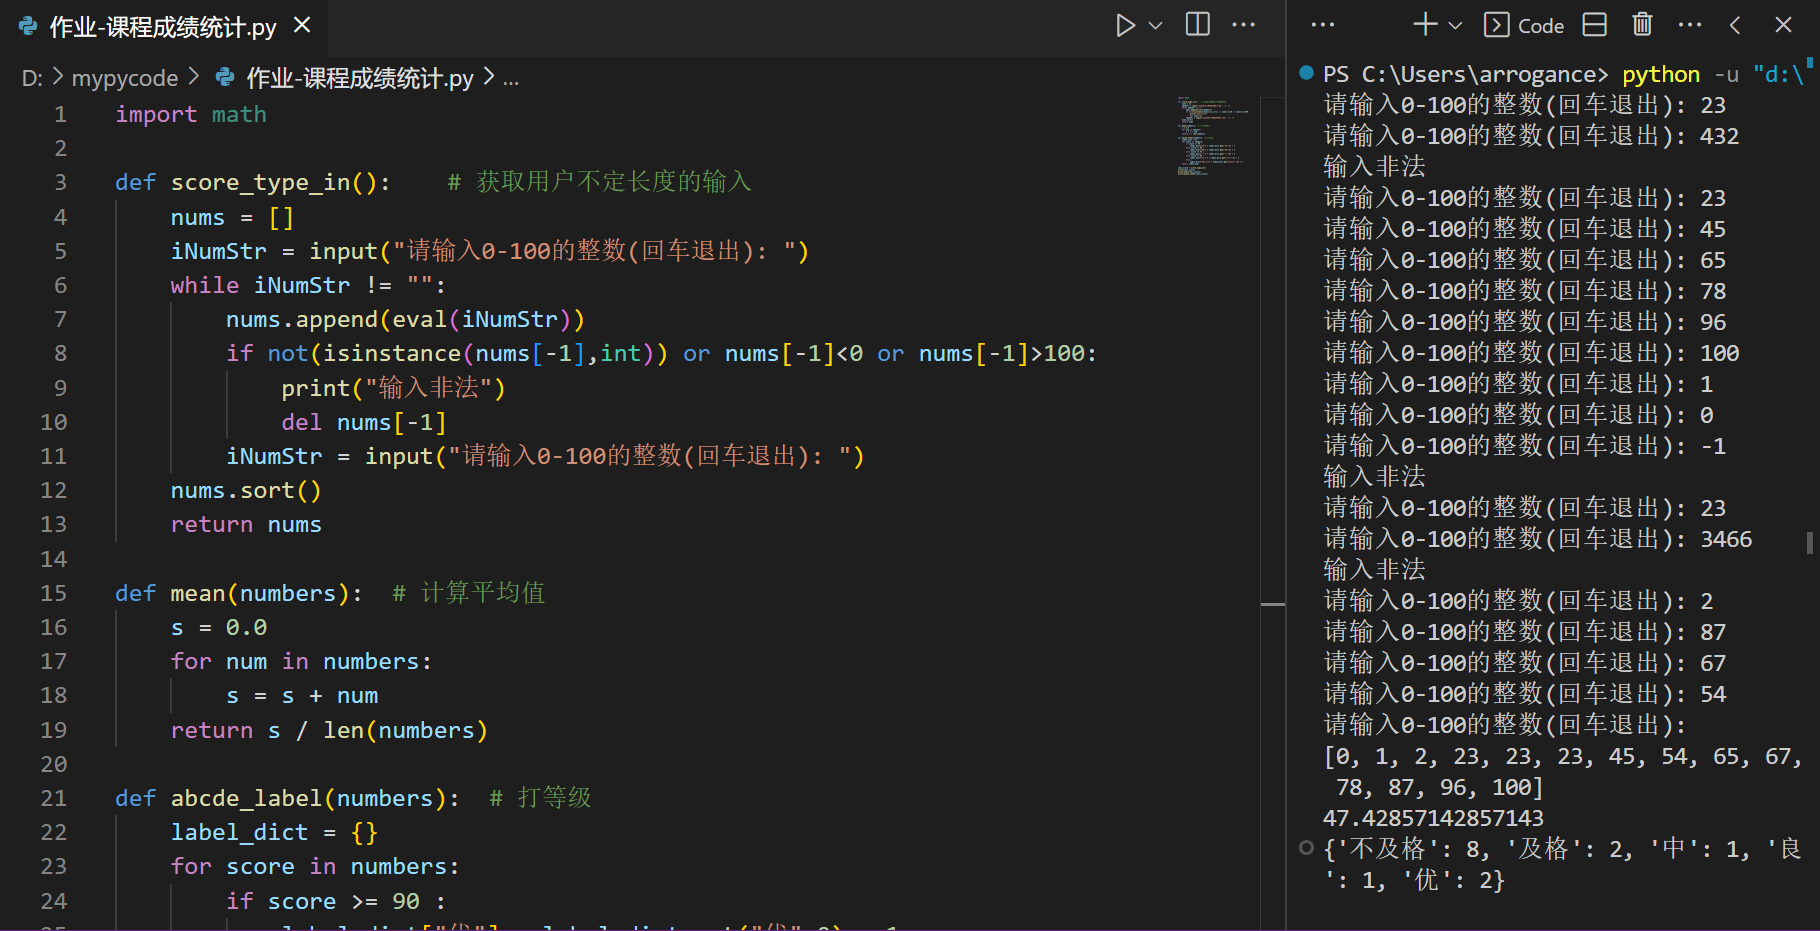
jieba 库的使用
安装:
pip install jiebajieba 分词的三种模式:
- 精确模式:把文本精确的切分开,不存在冗余单词
- 全模式:把文本中所有可能的词语都扫描出来,有冗余
- 搜索引擎模式:在精确模式基础上,对长词再次切分
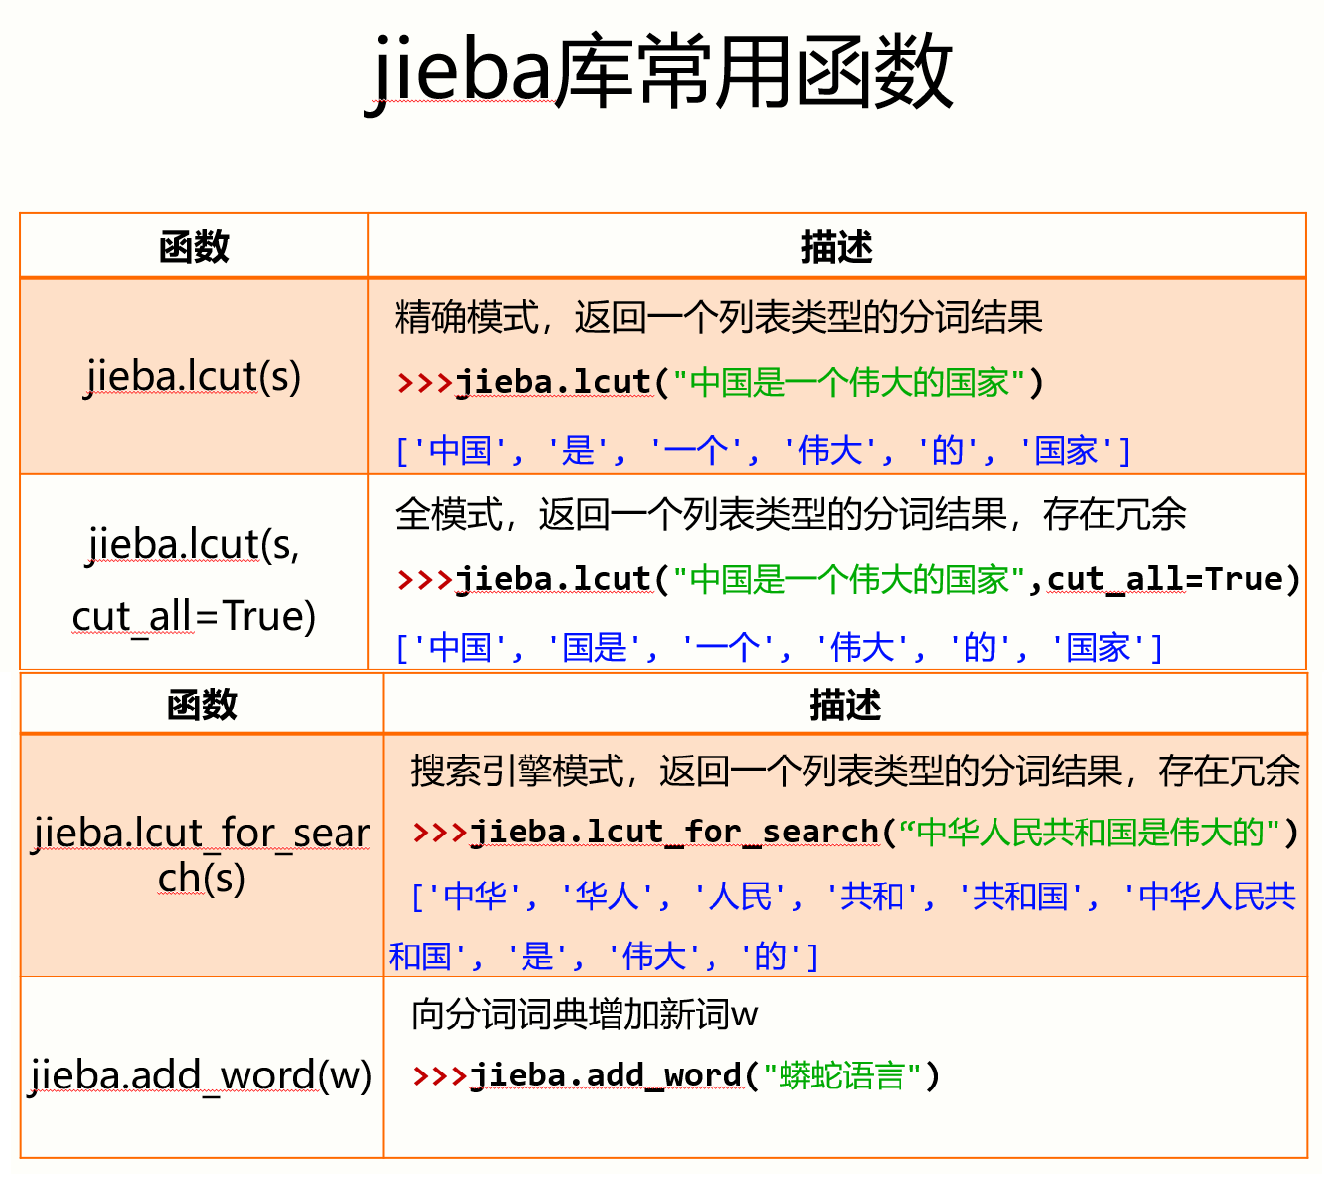
import jieba
print("/".join(jieba.lcut("中国是一个伟大的国家")))
命令、打印信息及输出结果:
PS C:\Users\arrogance> python -u "d:\mypycode\tmp.py"
Building prefix dict from the default dictionary ...
Loading model from cache C:\Users\ARROGA~1\AppData\Local\Temp\jieba.cache
Loading model cost 0.618 seconds.
Prefix dict has been built successfully.
中国/是/一个/伟大/的/国家
注意:如果找不到 jieba ,可能是路径的问题。在命令行中修改路径,然后运行即可。
【实例】 文本词频统计
资料:
- 英文文本:Hamlet 分析词频 https://python123.io/resources/pye/hamlet.txt
- 中文文本:《三国演义》 分析人物 https://python123.io/resources/pye/threekingdoms.txt
#CalHamletV1.py
def getText():    # 文本去噪及归一化
    txt = open("D:\mypycode\hamletcnt\hamlet.txt", "r").read()
    txt = txt.lower()
    for ch in '!"#$%&()*+,-./:;<=>?@[\\]^_‘{|}~':
        txt = txt.replace(ch, " ")
    return txt

hamletTxt = getText()
words  = hamletTxt.split()
counts = {}
for word in words:
    counts[word] = counts.get(word,0) + 1
items = list(counts.items())
items.sort(key=lambda x:x[1], reverse=True)
for i in range(10):
    word, count = items[i]
    print("{0:<10}{1:>5}".format(word, count))
输出结果:
the        1138
and         965
to          754
of          669
you         550
i           542
a           542
my          514
hamlet      462
in          436
代码解释:
items.sort(key=lambda x:x[1], reverse=True)ChatGPT :
这行Python代码使用了列表对象的sort()方法,根据列表中每个元素的第二个值(也就是下标为1的元素)进行降序排序。 lambda表达式创建了一个匿名函数,它取一个参数x并返回x[1],也就是列表中每个元素的第二个值。 reverse=True参数指定了要按降序排序,也就是从大到小排序。如果没有指定该参数,sort()方法默认使用升序排序,也就是从小到大排序。 综上所述,这行代码的作用是对列表对象items按照其元素的第二个值进行降序排序。
#CalThreeKingdomsV1.py
import jieba
txt = open("D:\mypycode\\threekingdomscnt\\threekingdoms.txt", "r", encoding="utf-8").read()
words = jieba.lcut(txt)
counts = {}
for word in words:
    if len(word) == 1:
        continue
    else:
        counts[word] = counts.get(word,0) + 1
items = list(counts.items())
items.sort(key=lambda x:x[1], reverse=True)
for i in range(15):
    word, count = items[i]
    print("{0:<10}{1:>5}".format(word, count))
输出结果:
曹操          953
孔明          836
将军          772
却说          656
玄德          585
关公          510
丞相          491
二人          469
不可          440
荆州          425
玄德曰         390
孔明曰         390
不能          384
如此          378
张飞          358
以上只是词频统计,并不是人物出场统计,需要进一步优化:
#CalThreeKingdomsV2.py
import jieba
txt = open("D:\mypycode\\threekingdomscnt\\threekingdoms.txt", "r", encoding="utf-8").read()
excludes = {"将军","却说","荆州","二人","不可","不能","如此"}
words = jieba.lcut(txt)
counts = {}
for word in words:
    if len(word) == 1:
        continue
    elif word == "诸葛亮" or word == "孔明曰":
        rword = "孔明"
    elif word == "关公" or word == "云长":
        rword = "关羽"
    elif word == "玄德" or word == "玄德曰":
        rword = "刘备"
    elif word == "孟德" or word == "丞相":
        rword = "曹操"
    else:
        rword = word
    counts[rword] = counts.get(rword,0) + 1
for word in excludes:
    del counts[word]
items = list(counts.items())
items.sort(key=lambda x:x[1], reverse=True)
for i in range(10):
    word, count = items[i]
    print("{0:<10}{1:>5}".format(word, count))
输出结果:
曹操         1451
孔明         1383
刘备         1252
关羽          784
张飞          358
商议          344
如何          338
主公          331
军士          317
吕布          300
文件和数据格式化
文本文件(文件是数据的抽象和集合):
- 由单一特定编码组成的文件,如 UTF-8 编码
- 由于存在编码,也被看成是存储着的长字符串
- 适用于例如:
.txt文件、.py文件等
二进制文件:
- 直接由比特0和1组成,没有统一字符编码
- 一般存在二进制0和1的组织结构,即文件格式
- 适用于例如:
.png文件、.avi文件等
文本形式打开文件:
# f.txt文件保存:  "中国是个伟大的国家!"
tf = open("f.txt", "rt", encoding="utf-8")
print(tf.readline())
tf.close()
输出结果:
>>>
中国是个伟大的国家!
二进制形式打开文件:
# f.txt文件保存:  "中国是个伟大的国家!"
bf = open("f.txt", "rb")
print(bf.readline())
bf.close()
输出结果:
>>>
b'\xd6\xd0\xb9\xfa\xca\xc7\xb8\xf6\xce\xb0\xb4\xf3\xb5\xc4\xb9\xfa\xbc\xd2\xa3\xa1'
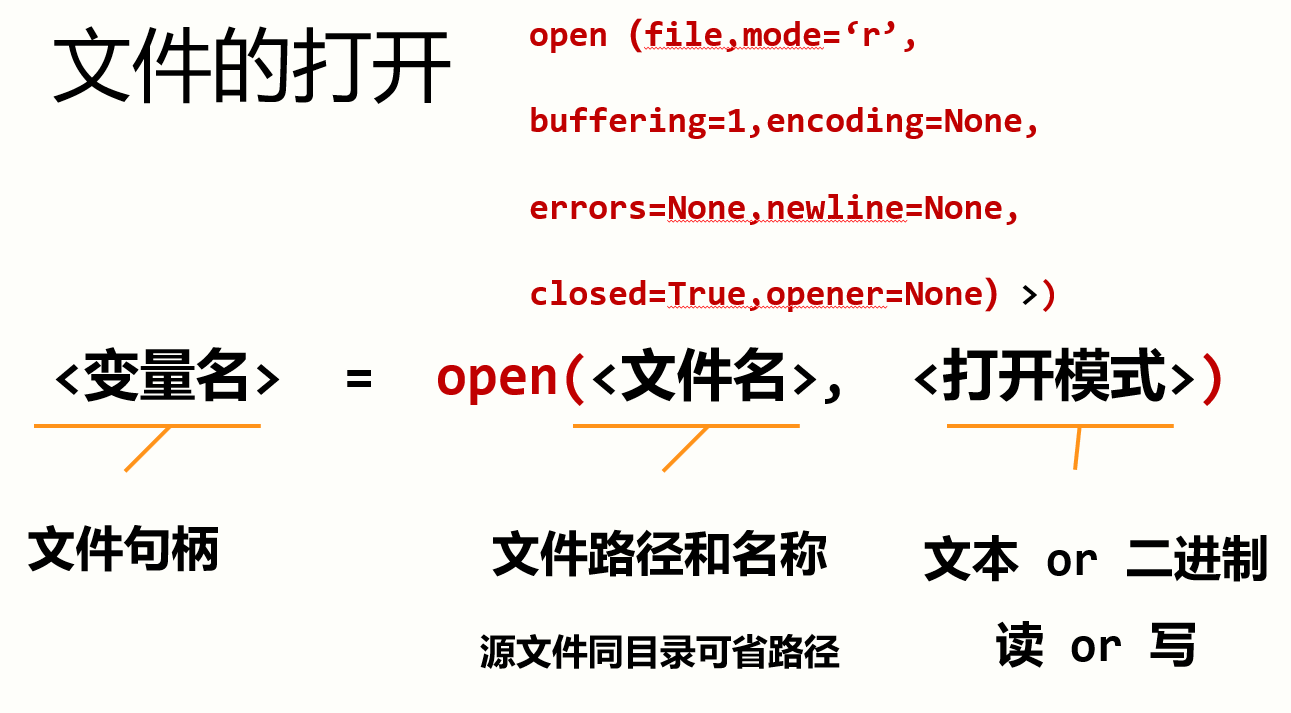
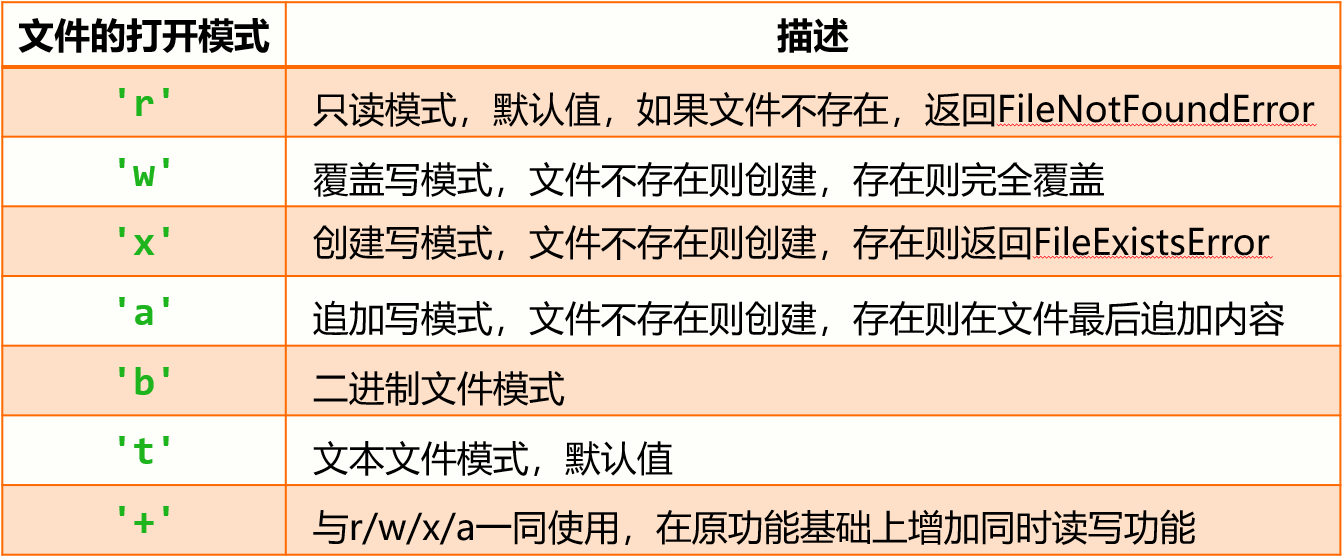
文件的打开:
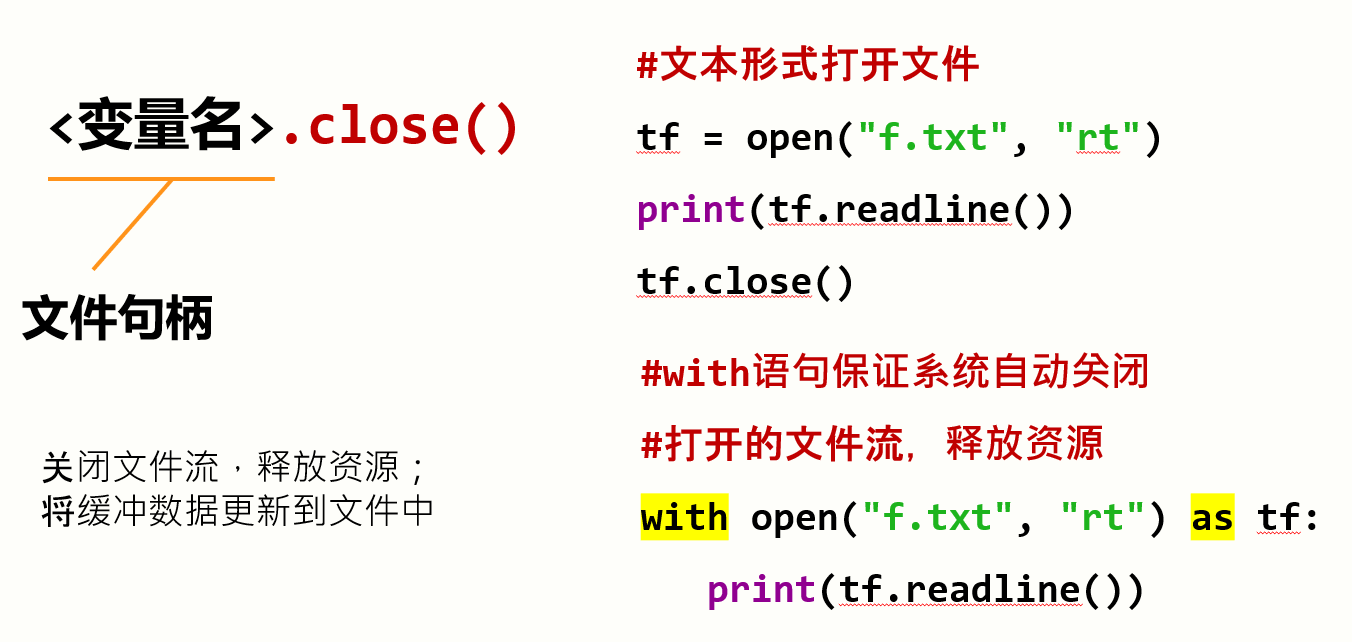
文件的关闭:
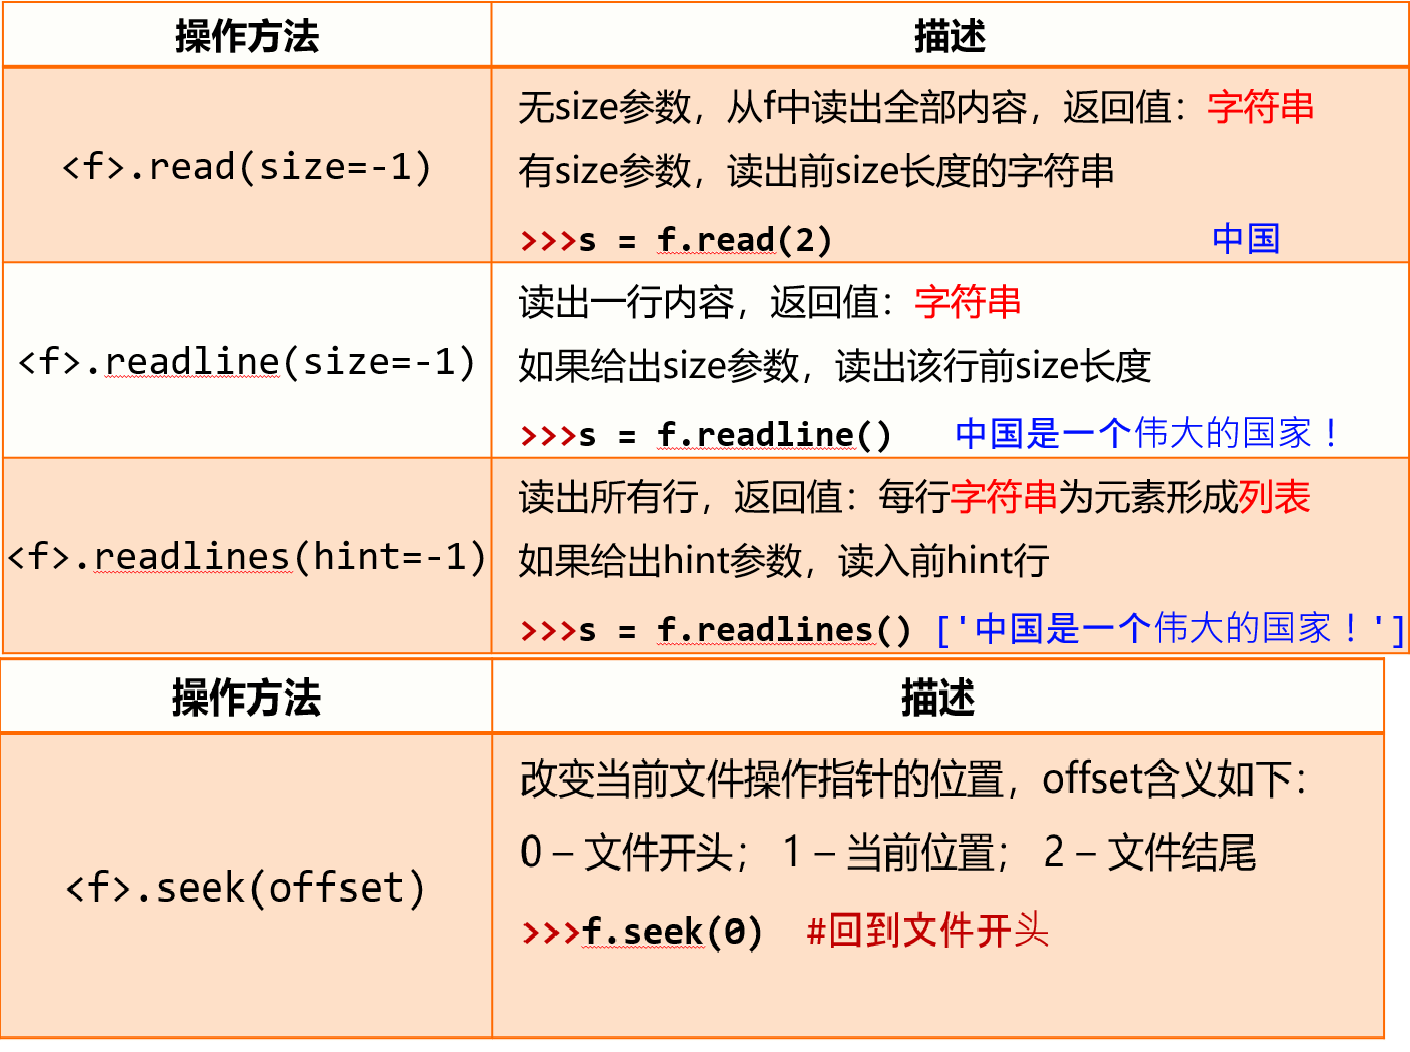
文件内容的读取:
文件的全文本操作:
# 遍历全文本:方法一
# 一次读出,统一处理
fname = input("请输入要打开的文件名称:")
file = open(fname,"r")
txt = file.read()
# 对全文txt字符串进行处理
file.close()
# 遍历全文本:方法二
# 按数量读出,逐步处理
fname = input("请输入要打开的文件名称:")
file = open(fname,"r")
txt = file.read(2)
while txt != "":
#对txt(长度为size的字符串)进行处理
txt = file.read(2)
file.close()文件的逐行操作:
# 逐行遍历文件:方法一
# 分行读出,分行处理
fname = input("请输入要打开的文件名称:")
file = open(fname,"r")
line = file.readline().strip()
while (line):
    print(line)
    line = file.readline().strip()
file.close()
# 逐行遍历文件:方法二
# 一次读出,分行处理
fname = input("请输入要打开的文件名称:")
file = open(fname,"r")
lines = file.readlines() #list
for line in lines:
print(line)
file.close()# 逐行遍历文件:方法三
# 分行读入,逐行处理
fname = input("请输入要打开的文件名称:")
fo = open(fname,"r")
for line in fo:
print(line)
fo.close()数据的文件写入:
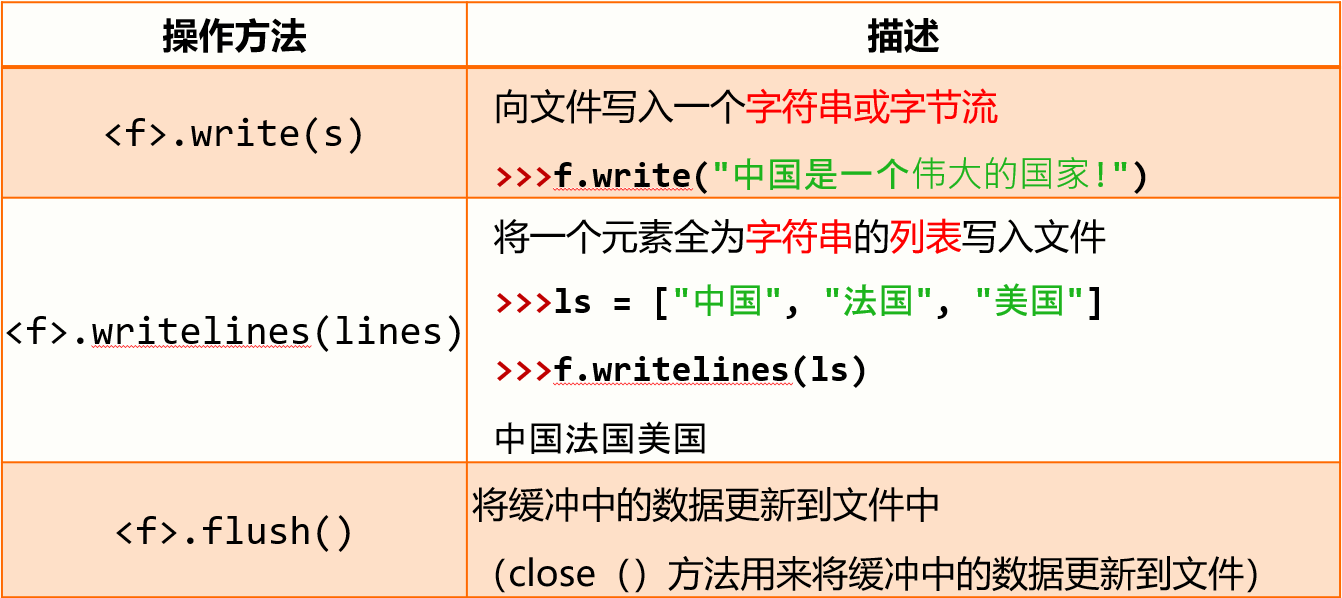
fo = open("output.txt","w+")
ls = ["中国", "法国", "美国"]
fo.writelines(ls)
for line in fo:
    print(line)
fo.close()
# 该程序没有任何输出
fo = open("output.txt","w+")
ls = ["中国", "法国", "美国"]
fo.writelines(ls)
fo.seek(0)
for line in fo:
print(line)
fo.close()上面代码的输出结果:(打印信息和文件中内容一样,都没有换行)
中国法国美国【作业】 课程成绩统计2(从文本文件读入)
数据文件:
23.5
23
432
23
45
65
78
96
100
1
0
-1
23
2
87
q
代码:
import math

def scoresFromFile():
    nums = []
    cnt = 0
    f = open("D:\mypycode\作业-课程成绩统计2\\thedata.txt")
    for line in f:
        cnt += 1
        line = line.replace("\n","")
        if line == "q":
            return nums
        nums.append(eval(line))
        if not(isinstance(nums[-1], int)) or nums[-1]<0 or nums[-1]>100:
            print("第{}行数据非法,将被略去".format(cnt))
            del nums[-1]
    nums.sort()
    return nums

def mean(numbers):  # 计算平均值
    if not numbers:
        return 0
    s = 0.0
    for num in numbers:
        s = s + num
    return s / len(numbers)

def abcde_label(numbers):  # 打等级
    label_dict = {}
    for score in numbers:
        if score >= 90 :
            label_dict["优"] = label_dict.get("优",0) + 1
        elif score >= 80 :
            label_dict["良"] = label_dict.get("良",0) + 1
        elif score >= 70 :
            label_dict["中"] = label_dict.get("中",0) + 1
        elif score >= 60 :
            label_dict["及格"] = label_dict.get("及格",0) + 1
        else :
            label_dict["不及格"] = label_dict.get("不及格",0) + 1
    return label_dict

real_score = scoresFromFile()
print(real_score)
print(mean(real_score))
print(abcde_label(real_score))
输出结果:
第1行数据非法,将被略去
第3行数据非法,将被略去
第12行数据非法,将被略去
[23, 23, 45, 65, 78, 96, 100, 1, 0, 23, 2, 87]
45.25
{'不及格': 7, '及格': 1, '中': 1, '优': 2, '良': 1}
【实例】 自动轨迹绘制
需求:根据脚本来绘制图形。数据给出如下:
300,0,144,1,0,0
300,0,144,0,1,0
300,0,144,0,0,1
300,0,144,1,1,0
300,0,108,0,1,1
184,0,72,1,0,1
184,0,72,0,0,0
184,0,72,0,0,0
184,0,72,0,0,0
184,1,72,1,0,1
184,1,72,0,0,0
184,1,72,0,0,0
184,1,72,0,0,0
184,1,72,0,0,0
184,1,720,0,0,0
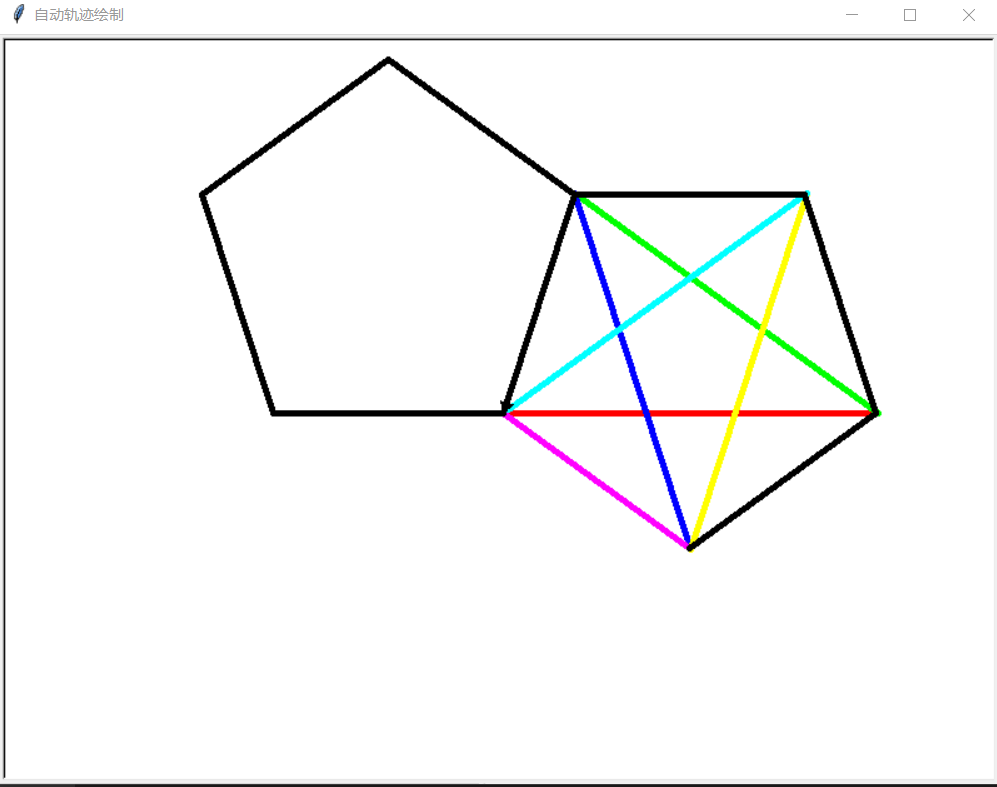
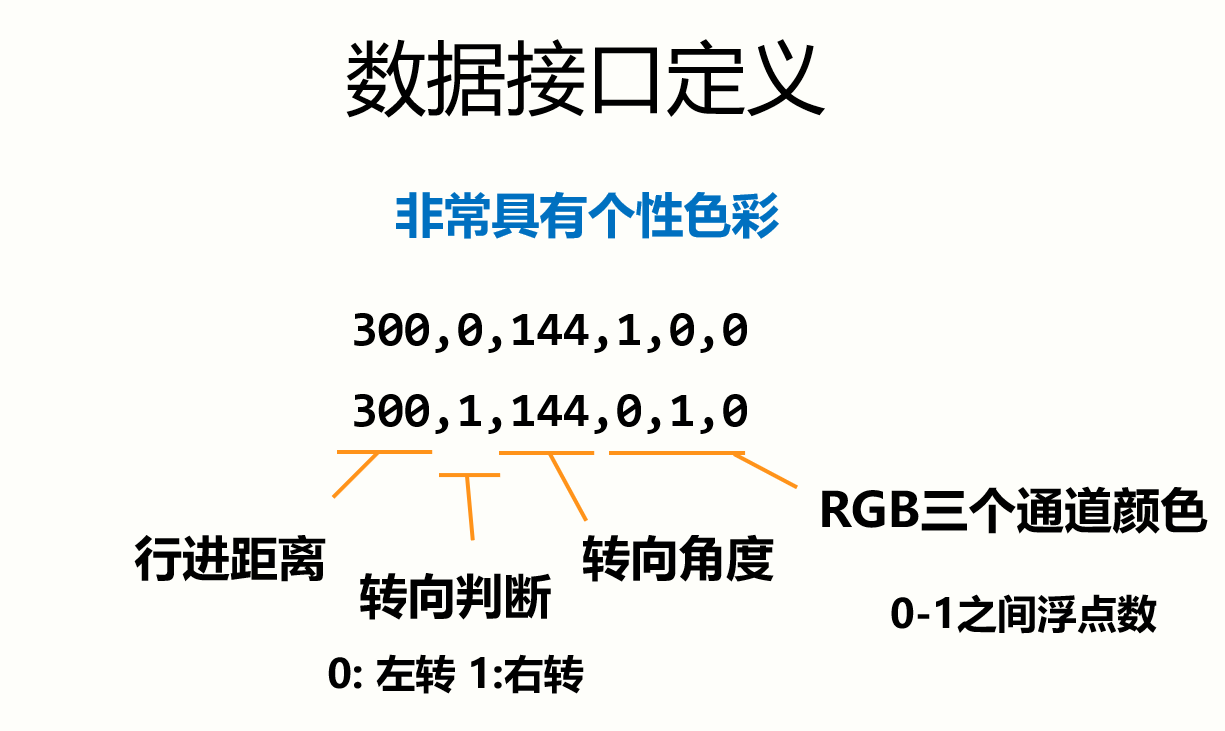
下面给出代码:
#AutoTraceDraw.py
import turtle as t
t.title('自动轨迹绘制')
t.setup(800, 600, 0, 0)
t.pencolor("red")
t.pensize(5)
#数据读取
datals = []
f = open("D:\mypycode\AutoTraceDrawData.txt")
for line in f:
    line = line.replace("\n","")
    datals.append(list(map(eval, line.split(","))))
f.close()
#自动绘制
for i in range(len(datals)):
    t.pencolor(datals[i][3],datals[i][4],datals[i][5])
    t.fd(datals[i][0])
    if datals[i][1]:
        t.right(datals[i][2])
    else:
        t.left(datals[i][2])

t.done()
第 11、12 行的代码解释(ChatGPT):
这两行代码的作用是读取文件中的每一行数据,将其中的换行符(\n)替换为空字符串(""),然后将字符串按照逗号(,)分隔,将每个子字符串转换为相应的数据类型(比如整数、浮点数等),最后将转换后的数据存储到一个列表(datals)中。 具体来说,第一行代码使用
replace()方法将字符串中的 \n 替换为空字符串 "",这是因为在文件中每行数据的末尾通常会包含一个换行符。第二行代码使用split()方法将字符串按照逗号分隔,得到一个子字符串列表。然后,map()函数将列表中的每个子字符串转换为相应的数据类型,比如使用eval()函数将字符串转换为数值类型。最后,list()函数将转换后的数据列表转换为一个普通列表,并将其添加到 datals 列表中。
filter(function,iterable):过滤,根据指定的函数对指定的可迭代对象进行过滤。
- 参数:函数,可迭代对象
- 对 iterable 中的每个元素判断是否符合特定条件,保留结果为真的元素,舍弃结果为假的元素
- None:不调用任何函数,只对可迭代对象中的元素本身判断真假
- 函数值:一个迭代器
- 如果要转换为列表,可以使用
list()来转换
- 如果要转换为列表,可以使用
>>>gradesintlist =[78, 98, 90, 87]
>>>result=
list(filter(lambda x:x>=80,gradesintlist))
[98,90,87]
高维数据:仅利用最基本的二元关系展示数据间的复杂结构。
{
   "firstName" : "Tian" ,
   "lastName"  : "Song" ,
   "address"   : {
                   "streetAddr" : "中关村南大街5号" ,
                   "city"       : "北京市" ,
                   "zipcode"    : "100081"
                 } ,
   "professional" : ["Computer Networking" , "Security"]
}
从空格分隔的文件中读入数据:
# 需读入的数据为:中国 美国 日本 德国 法国 英国 意大利
txt = open(fname).read()
ls = txt.split()
f.close()
输出结果:
>>> ls
['中国', '美国', '日本', '德国', '法国', '英国', '意大利']
从特殊符号$分隔的文件中读入数据:
# 需读入的数据为:中国$美国$日本$德国$法国$英国$意大利
txt = open(fname).read()
ls = txt.split("$")
f.close()
输出结果:
>>> ls
['中国', '美国', '日本', '德国', '法国', '英国', '意大利']
采用空格分隔方式将数据写入文件:
ls = ['中国', '美国', '日本']
f = open(fname, 'w')
f.write(' '.join(ls))
f.close()
采用特殊分隔方式将数据写入文件:
ls = ['中国', '美国', '日本']
f = open(fname, 'w')
f.write('$'.join(ls))
f.close()
二维数据的表示(使用列表类型):
- 使用两层for循环遍历每个元素
- 外层列表中每个元素可以对应一行,也可以对应一列
[  [3.1398, 3.1349, 3.1376],
   [3.1413, 3.1404, 3.1401]  ]
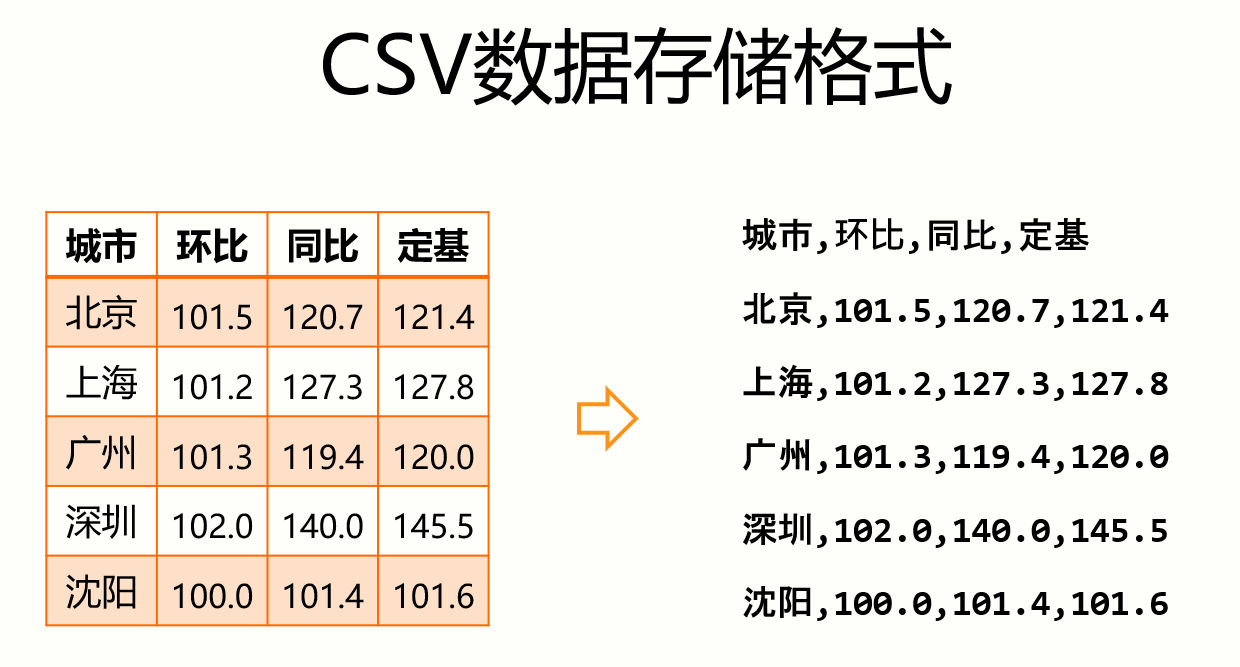
CSV数据存储格式(CSV:Comma-Separated Values):
- 国际通用的一二维数据存储格式,一般.csv扩展名
- 每行一个一维数据,采用逗号分隔,无空行
- Excel和一般编辑软件都可以读入或另存为csv文件
- 如果某个元素缺失,逗号仍要保留
- 二维数据的表头可以作为数据存储,也可以另行存储
- 逗号为英文半角逗号,逗号与数据之间无额外空格
二维数据的存储:
- 按行存或者按列存都可以,具体由程序决定
- 一般索引习惯:
ls[row][column],先行后列 - 根据一般习惯,外层列表每个元素是一行,按行存
从CSV格式的文件中读入数据:
fo = open(fname)
ls = []
for line in fo:
    line = line.replace("\n","")
    ls.append(line.split(","))
fo.close()
将数据写入CSV格式的文件:
ls = [[], [], []]    # 二维列表
f = open(fname, 'w')
for item in ls:
    f.write(','.join(item) + '\n')
f.close()
二维数据的逐一处理(采用二层循环):
ls = [[1,2], [3,4], [5,6]] # 二维列表
for row in ls:
    for column in row:
         print(column)
wordcloud、imageio及其他
安装:
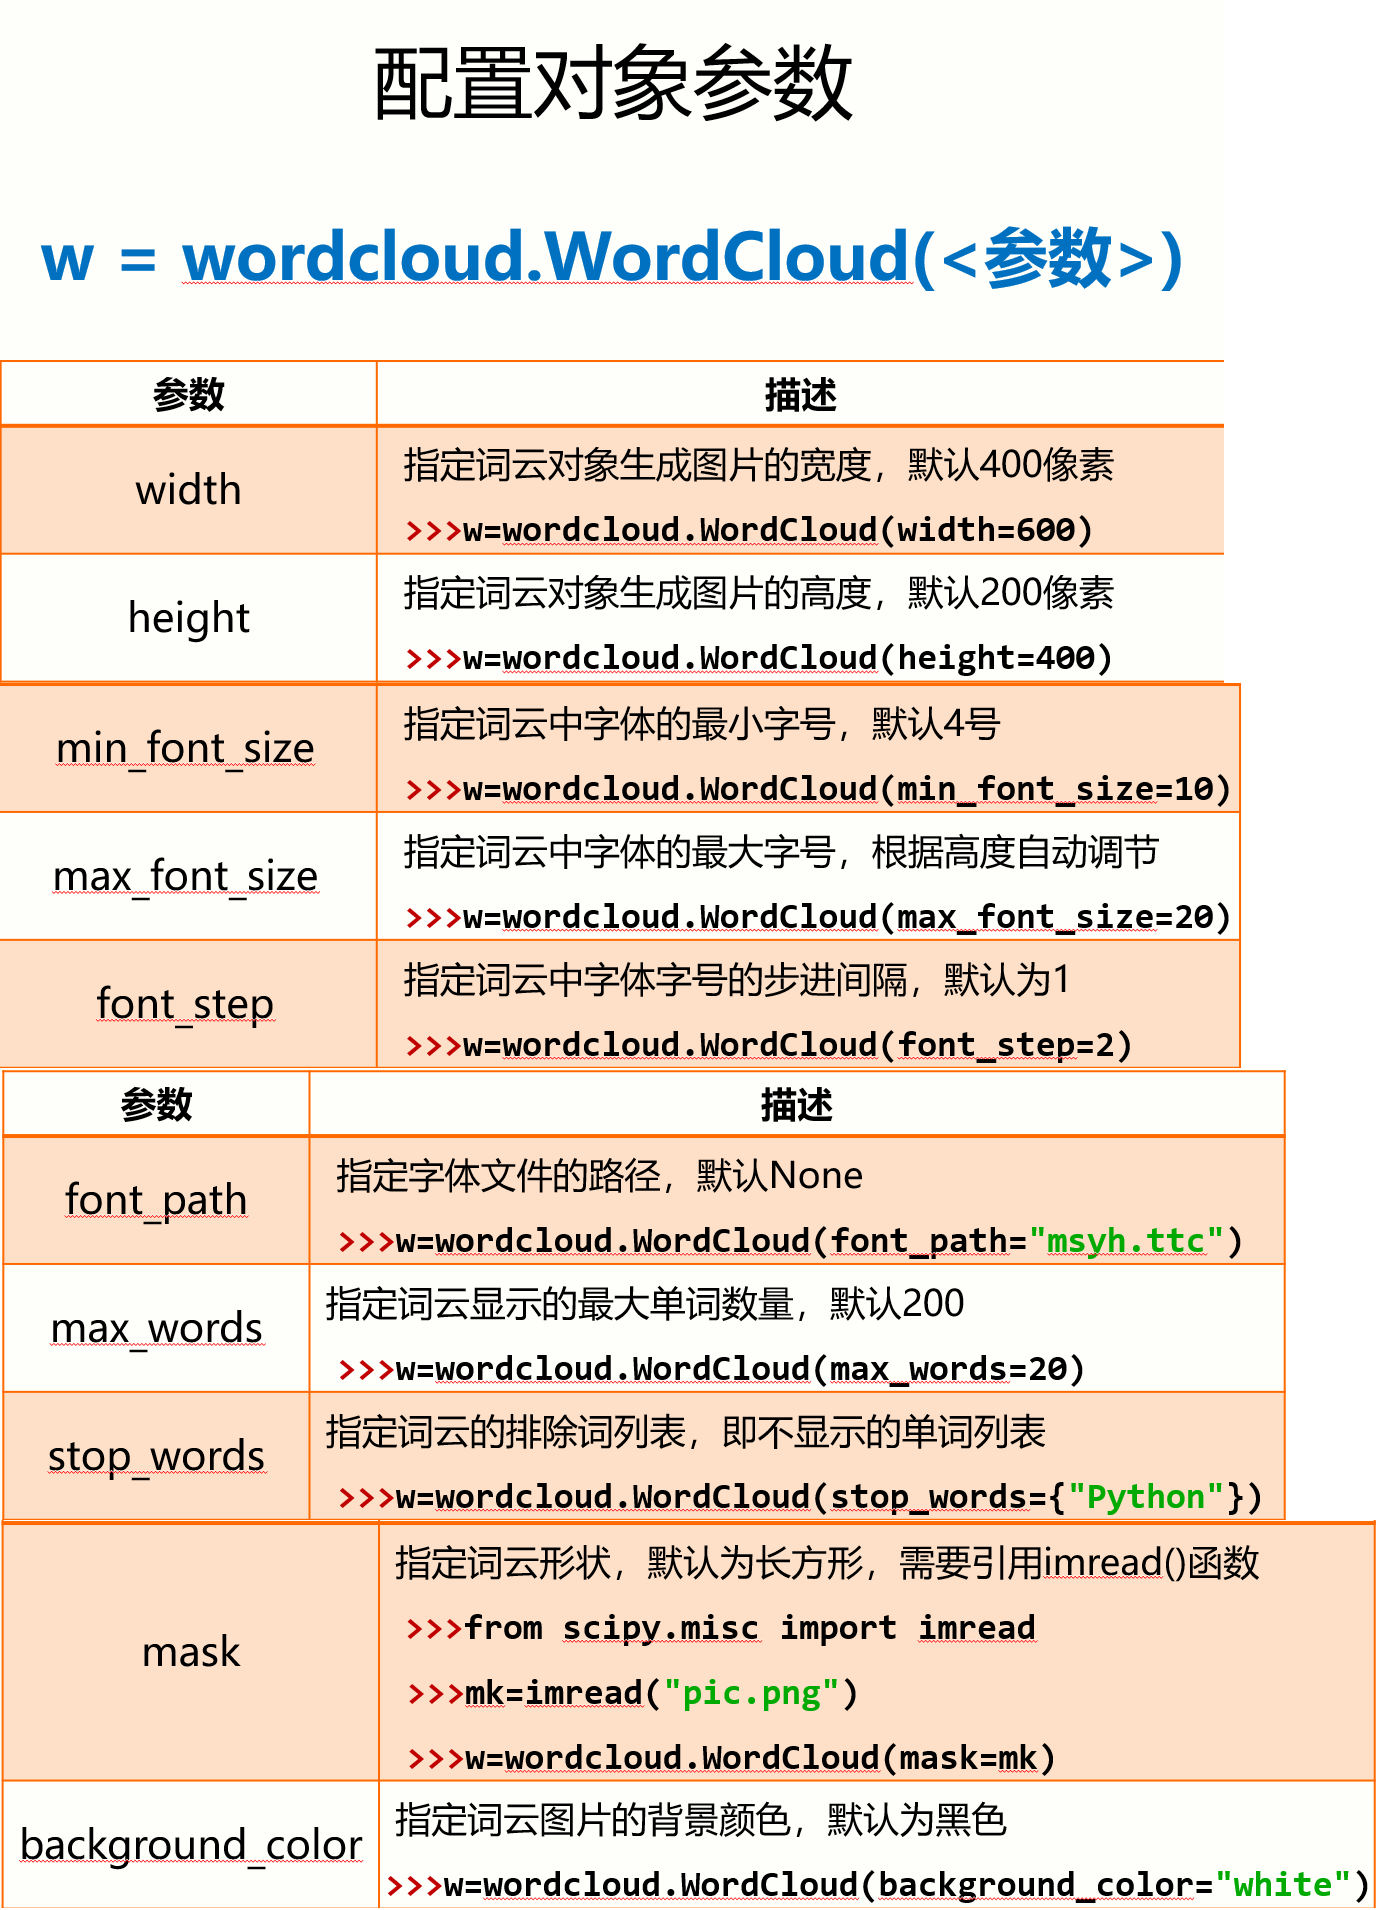
pip install wordcloud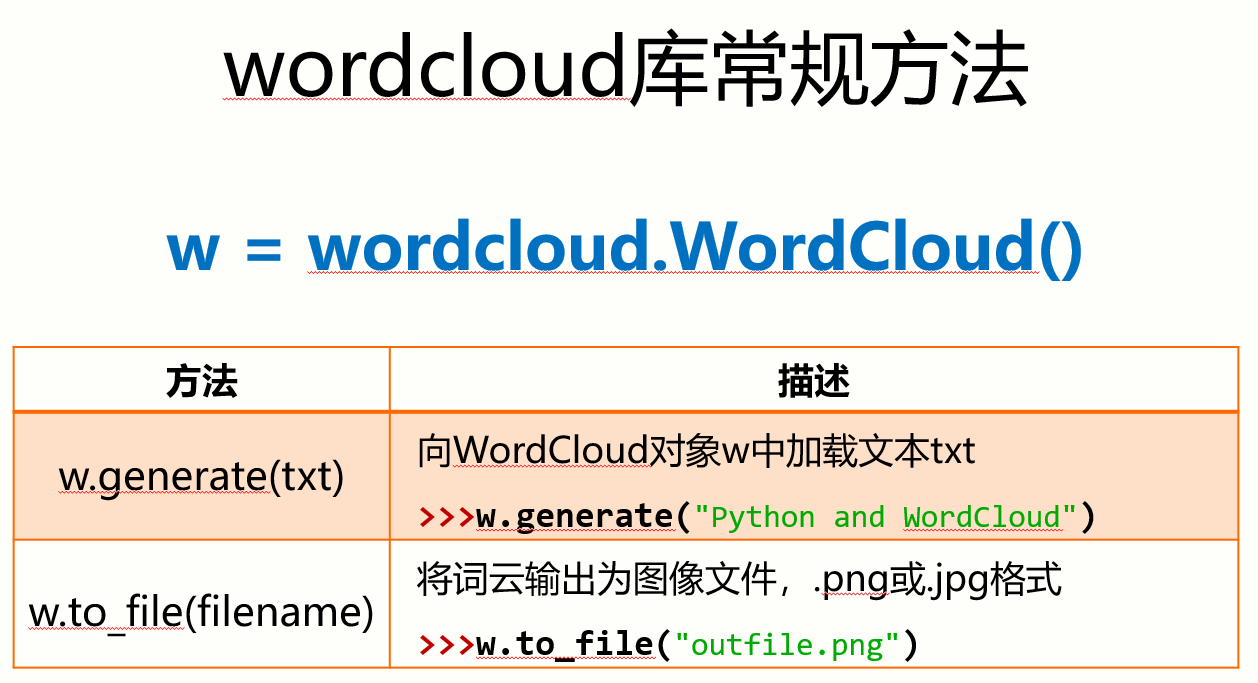
文本转为词云的过程:
- 分隔: 以空格分隔单词
- 统计: 单词出现次数并过滤
- 字体: 根据统计配置字号
- 布局: 颜色环境尺寸
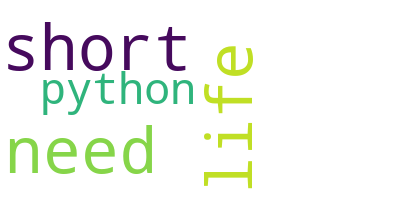
英文例子:
import wordcloud
txt = "life is short, you need python"
w = wordcloud.WordCloud(background_color = "white")
w.generate(txt)
w.to_file("D:\mypycode\mywordcloud\\test1img.png")
输出结果:
中文例子:
import jieba
import wordcloud
txt = "程序设计语言是计算机能够理解和\
识别用户操作意图的一种交互体系,它按照\
特定规则组织计算机指令,使计算机能够自\
动进行各种运算处理。"
w = wordcloud.WordCloud( width=1000,\
    font_path="msyh.ttc",height=700)
w.generate(" ".join(jieba.lcut(txt)))
w.to_file("D:\mypycode\mywordcloud\pywcloud.png")
输出结果:

【实例】 有形状的词云
代码:
import jieba
import wordcloud
from imageio import imread
mk = imread("D:\mypycode\mywordcloud\guoba.png")

f = open("D:\mypycode\\threekingdomscnt\\threekingdoms.txt", "r", encoding="utf-8")
t = f.read()
f.close()
ls = jieba.lcut(t)
txt = " ".join(ls)
for ch in '!"#——$%&(。),()*+,-./:;;<:《》、=>??@[\\]^_‘{|}~!“”':
    txt = txt.replace(ch, "")

w = wordcloud.WordCloud(font_path="msyh.ttc", mask=mk, width=1000, height=700, background_color="white")
w.generate(txt)
w.to_file("D:\mypycode\mywordcloud\\test3img.png")输出结果(这个图形是我之前用 Python 代码生成的):

在上面的例子中,用到了imageio。下面简单介绍之。
安装:
pip install imageio官方文档:https://imageio.readthedocs.io/en/stable/examples.html
图片的保存:
from imageio import imread,imsave

im = imread('D:\mypycode\imageiostuff\Lumine.png')
print(im.shape)
imsave('D:\mypycode\imageiostuff\Lumine_copy.png',im)
输出结果1(打印信息,在terminal中显示。warning已略去):
(1910, 987, 4)输出结果2(在对应目录下可以找到 Lumine_copy.png):

shape里的1910,987,指的是图片的像素,高度是1910像素,宽度是987像素。
shape里还剩下一个4,指的是颜色通道。
png 图片比 jpg 多了一个 Alpha 通道, 一个 RGB 颜色模型的真彩图形,用由红、绿、蓝三个色彩信息通道合成的,每个通道用了8位色彩深度,共计24位,包含了所有彩色信息。为实现图形的透明效果,png 图片采取在图形文件的处理与存储中附加上另一个8位信息的方法,这个附加的代表图形中各个素点透明度的通道信息就被叫做 Alpha 通道。
这里的im是numpy.ndarray,即上面的代码,我们使用 imageio 把一个图片转换成一个多维数组。把一张图片,转换为了数字格式。
以下只是我个人的理解,好像有那么一点道理,反正能说服我自己。不保证正确(不如说如果正确那还真是巧了):
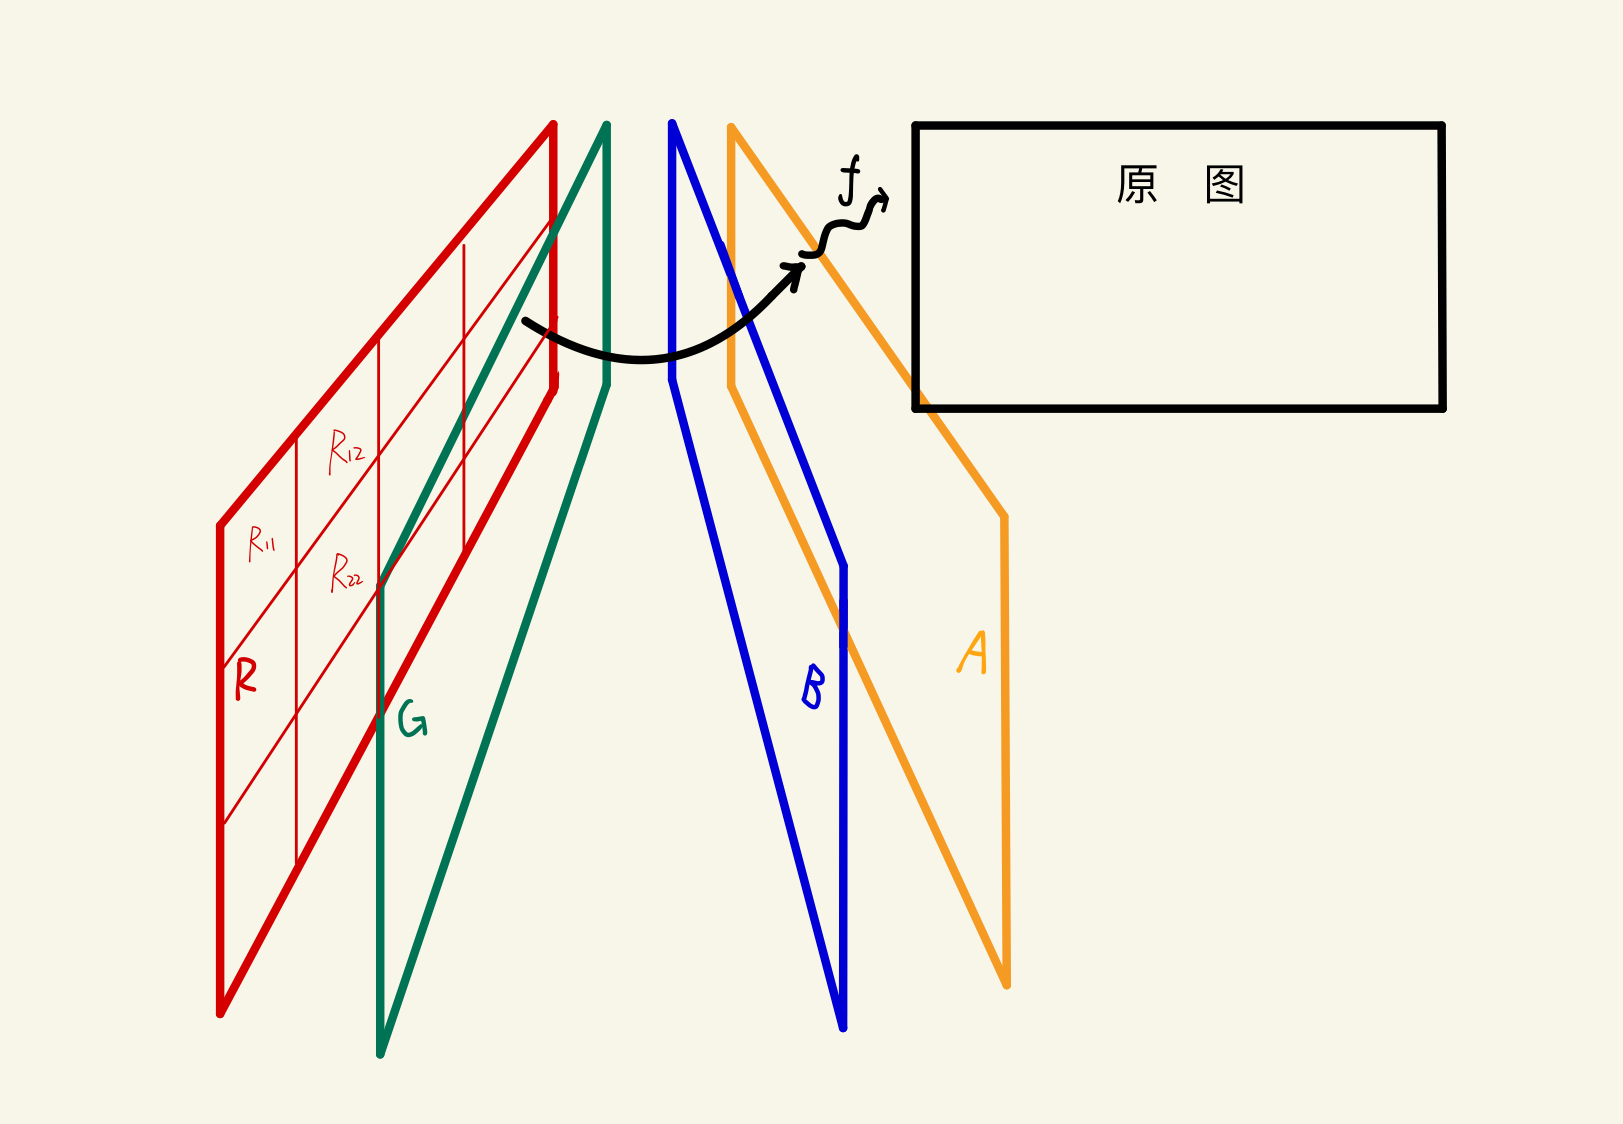
图片的修改:
from imageio import imread,imsave,imwrite

im = imread('D:\mypycode\imageiostuff\Lumine.png')

im_r = im.copy()
im_g = im.copy()
im_b = im.copy()
im_a = im.copy()

im_r[:,:,1] = 0
im_r[:,:,2] = 0
imsave('D:\mypycode\imageiostuff\Lumine_r.png',im_r)

im_g[:,:,0] = 0
im_g[:,:,2] = 0
imsave('D:\mypycode\imageiostuff\Lumine_g.png',im_g)

im_b[:,:,0] = 0
im_b[:,:,1] = 0
imwrite('D:\mypycode\imageiostuff\Lumine_b.png',im_b)
# imwrite 和 imsave 似乎效果一样

im_a[:,:,3] = 0.5*255  # 将 alpha 通道值设置为半透明
imsave('D:\mypycode\imageiostuff\Lumine_a.png',im_a)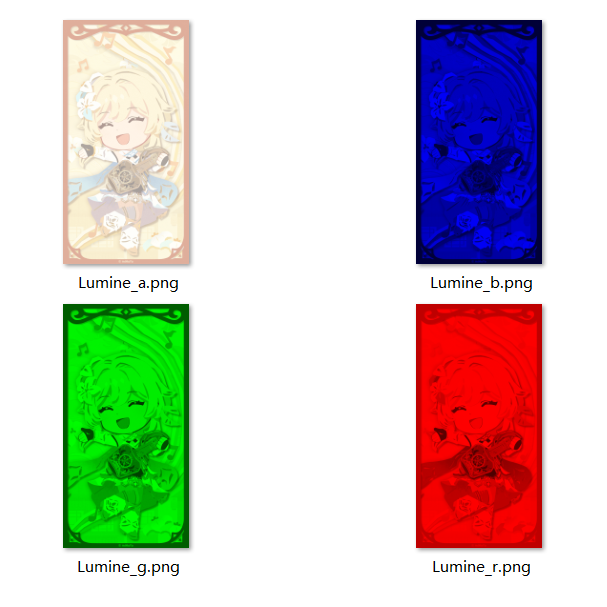
注意:将一个图像保存为具有透明度的 PNG 格式时,必须将 alpha 通道的值归一化为[0, 255]范围内。因此,将一个 alpha 通道的值设置为 0.5 并不会生效。需要将其乘以 255,以将其值转换为[0, 255]范围中。
图片压缩。例如,我们需要压缩如下的图片:

from imageio import imread,imwrite

im = imread('D:\mypycode\imageiostuff\LLPaimon.jpeg')

imwrite('D:\mypycode\imageiostuff\LLPaimon_25.jpeg',im,quality=25)
imwrite('D:\mypycode\imageiostuff\LLPaimon_50.jpeg',im,quality=50)
imwrite('D:\mypycode\imageiostuff\LLPaimon_75.jpeg',im,quality=75)
imwrite('D:\mypycode\imageiostuff\LLPaimon_100.jpeg',im,quality=100)
注意:在上面的例子中,我们压缩了 jpg/jpeg 文件,但若要压缩 png 文件,不能依葫芦画瓢简单地改一下文件名就行(至少目前的 imageio 版本是这样)。可能相关的讨论:
https://stackoverflow.com/questions/35859140/remove-transparency-alpha-from-any-image-using-pil
将多个PNG图片转为GIF。代码(改编自这里):
import imageio
import os
import sys

def create_gif(source, name, myduration):
    """
    生成gif的函数,原始图片仅支持png
    source: 为png图片列表(排好序)
    name: 生成的文件名称
    myduration: 每张图片之间的时间间隔
    """
    frames = []  # 读入缓冲区
    for img in source:
        frames.append(imageio.imread(img))
    imageio.mimsave(name, frames, 'GIF', duration=myduration)
    print("done")

def main(or_path):
    """
    or_path: 目标的文件夹
    """
    path = os.chdir(or_path)
    pic_list = os.listdir()
    gif_name = input("Name the target file (end with .gif) :")
    duration_time = eval(input("Give the duration_time (0.5 recommended) :"))
    create_gif(pic_list, gif_name, duration_time)

if __name__ == '__main__':
    parm_list = sys.argv
    if len(parm_list) != 2:
        print("Please enter the folder you want to process !")
    else:
        main(parm_list[1])
考虑如下图片:
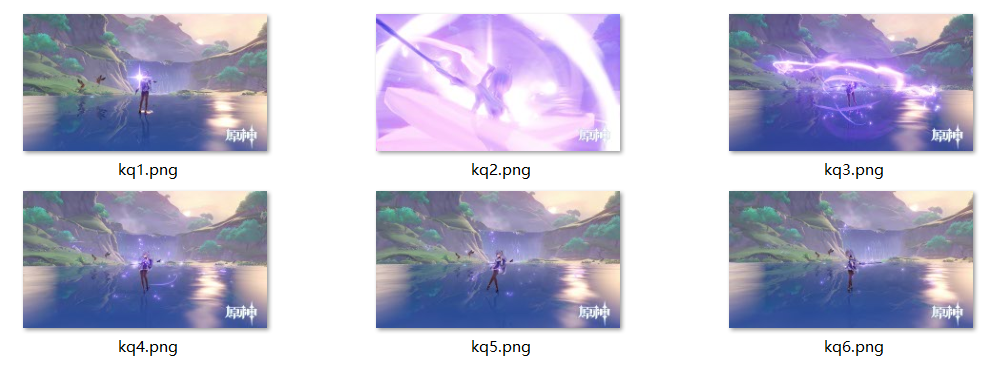
运行上面的代码:
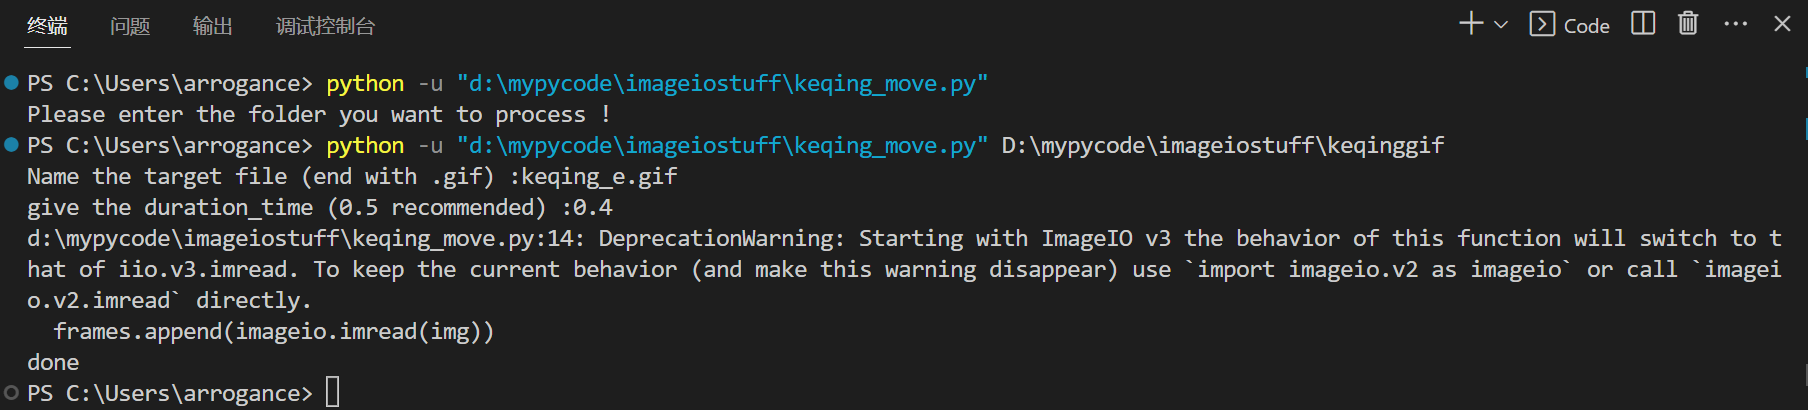
最终效果:

第三方库与计算生态概览
Python第三方库安装
pip 安装方法:略。
文件安装方法(有些第三方库用 pip 可以下载,但无法安装?):
- pip下载后可得到可执行文件(pip)、源代码
- 源代码则需要编译再安装
- 如果操作系统没有编译环境,虽能下载但不能安装
- 可以直接下载编译后的版本用于安装吗?
http://www.lfd.uci.edu/~gohlke/pythonlibs/
实例:安装 wordcloud 库
- 步骤1:在UCI页面上搜索wordcloud
- 步骤2:下载对应版本的文件放入pip路径
- 步骤3:使用pip install <文件名>安装
集成安装方法(结合特定 Python 开发工具的批量安装):
- Anaconda 网址:https://www.continuum.io
- 支持近800个第三方库
- 包含多个主流工具
- 适合数据计算领域开发
Python社区
Python社区:
- 13万个第三方库 https://pypi.org/
实例:开发与区块链相关的程序
- 第1步:在 pypi.org 搜索 blockchain
- 第2步:挑选适合开发目标的第三方库作为基础
- 第3步:完成自己需要的功能
程序设计模式
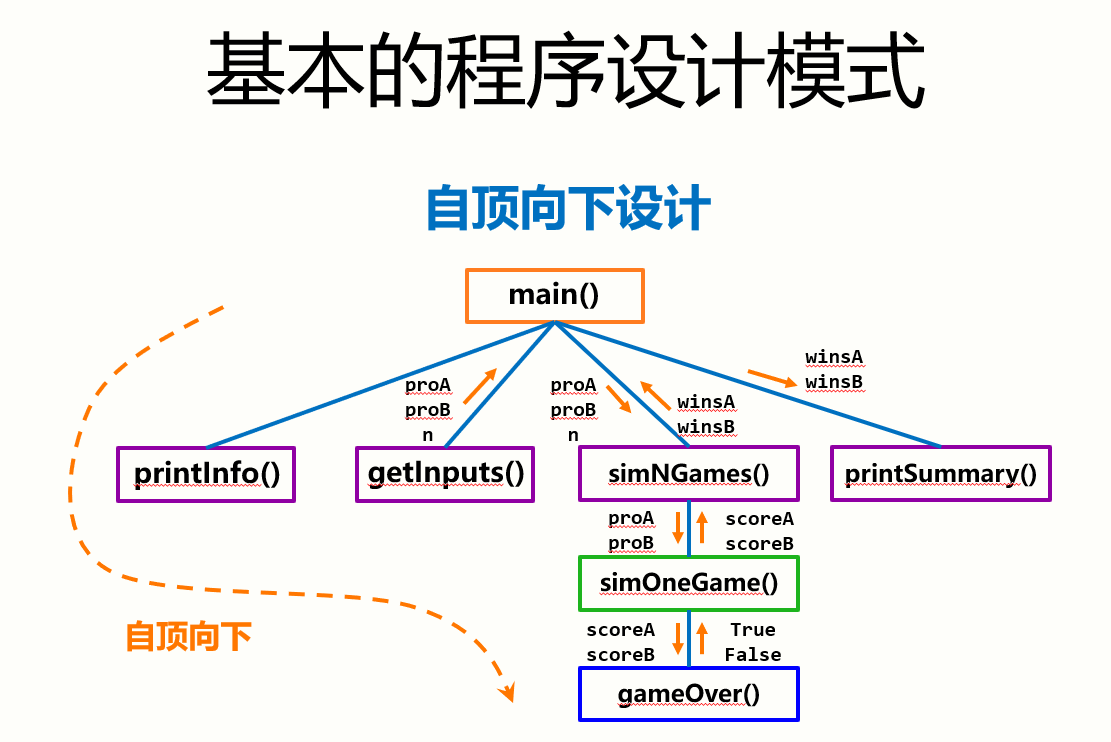
模块化设计:
- 通过函数或对象封装将程序划分为模块及模块间的表达
- 具体包括:主程序、子程序和子程序间关系
- 分而治之:一种分而治之、分层抽象、体系化的设计思想
- 紧耦合:两个部分之间交流很多,无法独立存在
- 松耦合:两个部分之间交流较少,可以独立存在
- 模块内部紧耦合、模块之间松耦合
配置化设计:
- 引擎+配置:程序执行和配置分离,将可选参数配置化
- 将程序开发变成配置文件编写,扩展功能而不修改程序
- 关键在于接口设计,清晰明了、灵活可扩展
Python的第三方库
从数据处理到人工智能
Numpy:表达N维数组的最基础库
Pandas:Python 数据分析高层次应用库
- 提供了简单易用的数据结构和数据分析工具
- 理解数据类型与索引的关系,操作索引即操作数据
- Python最主要的数据分析功能库,基于Numpy开发
SciPy:数学、科学和工程计算功能库
- 提供了一批数学算法及工程数据运算功能
- 类似Matlab,可用于如傅里叶变换、信号处理等应用
- Python最主要的科学计算功能库,基于Numpy开发
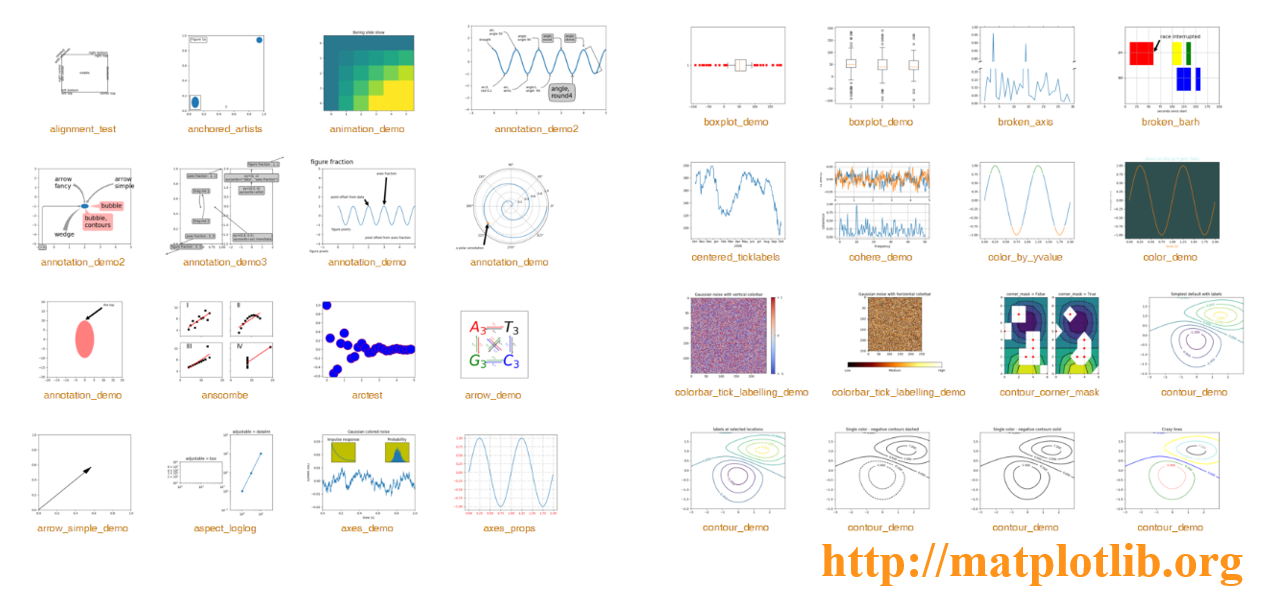
Matplotlib:高质量的二维数据可视化功能库
- 提供了超过100种数据可视化展示效果
- 通过matplotlib.pyplot子库调用各可视化效果
- Python最主要的数据可视化功能库,基于Numpy开发
Seaborn:统计类数据可视化功能库
- 提供了一批高层次的统计类数据可视化展示效果
- 主要展示数据间分布、分类和线性关系等内容
- 基于Matplotlib开发,支持Numpy和Pandas
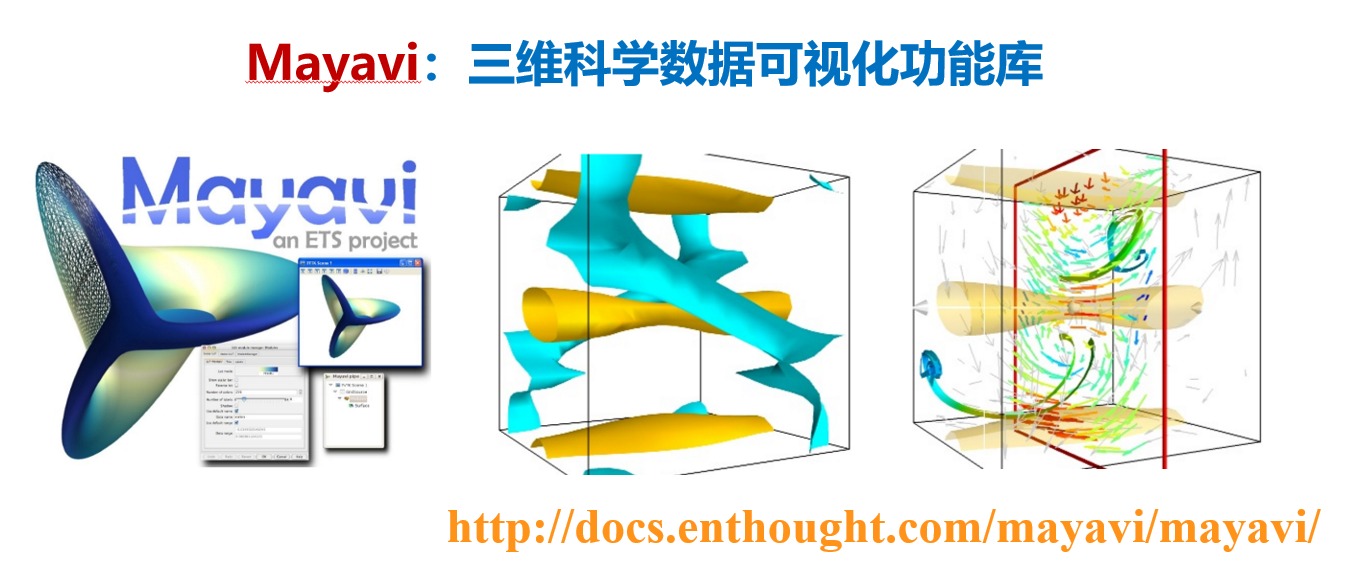
Mayavi:三维科学数据可视化功能库
- 提供了一批简单易用的3D科学计算数据可视化展示效果
- 目前版本是Mayavi2,三维可视化最主要的第三方库
- 支持Numpy、TVTK、Traits、Envisage等第三方库
PyPDF2:用来处理pdf文件的工具集
- 提供了一批处理PDF文件的计算功能
- 支持获取信息、分隔/整合文件、加密解密等
- 完全Python语言实现,不需要额外依赖,功能稳定
- http://mstamy2.github.io/PyPDF2
from PyPDF2 import PdfFileReader, PdfFileMerger
merger = PdfFileMerger()
input1 = open("document1.pdf", "rb")
input2 = open("document2.pdf", "rb")
merger.append(fileobj = input1, pages = (0,3))
merger.merge(position = 2, fileobj = input2, pages = (0,1))
output = open("document-output.pdf", "wb")
merger.write(output)NLTK:自然语言文本处理第三方库
- 提供了一批简单易用的自然语言文本处理功能
- 支持语言文本分类、标记、语法句法、语义分析等
- 最优秀的Python自然语言处理库
from nltk.corpus import treebank
t = treebank.parsed_sents('wsj_0001.mrg')[0]
t.draw()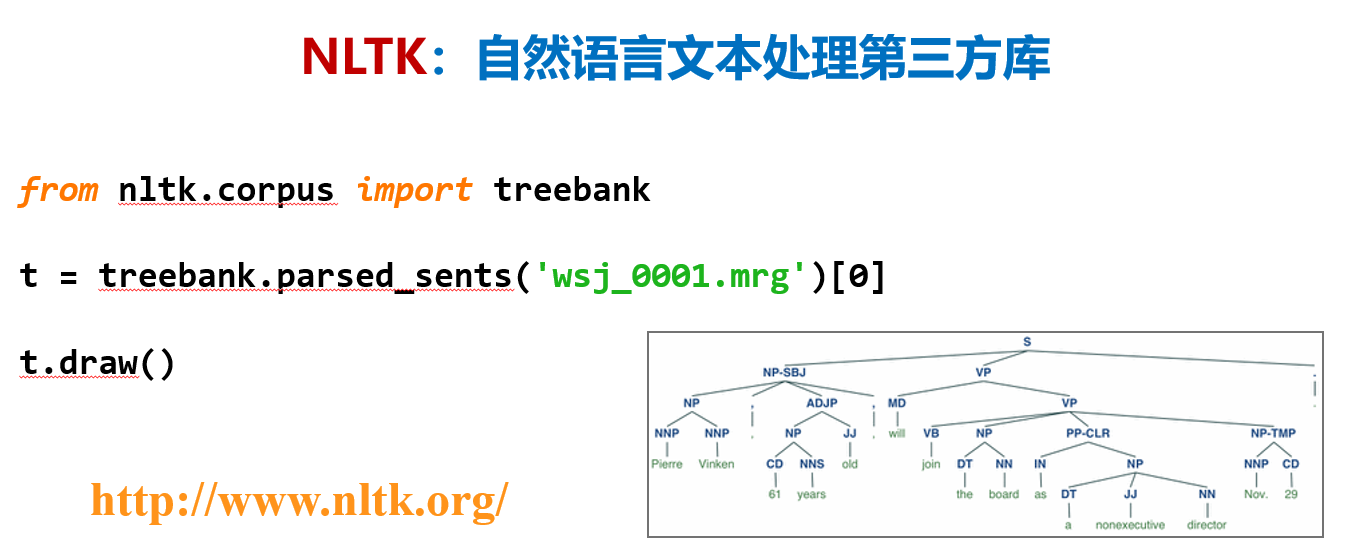
Python-docx:创建或更新Microsoft Word文件的第三方库
- 提供创建或更新.doc .docx等文件的计算功能
- 增加并配置段落、图片、表格、文字等,功能全面
- http://python-docx.readthedocs.io/en/latest/index.html
from docx import Document
document = Document()
document.add_heading('Document Title', 0)
p = document.add_paragraph('A plain paragraph having some ')
document.add_page_break()
document.save('demo.docx')Scikit-learn:机器学习方法工具集
- 提供一批统一化的机器学习方法功能接口
- 提供聚类、分类、回归、强化学习等计算功能
- 机器学习最基本且最优秀的Python第三方库
TensorFlow:AlphaGo背后的机器学习计算框架
- 谷歌公司推动的开源机器学习框架
- 将数据流图作为基础,图节点代表运算,边代表张量
- 应用机器学习方法的一种方式,支撑谷歌人工智能应用
- https://www.tensorflow.org/
import tensorflow as tf
init = tf.global_variables_initializer()
sess = tf.Session()
sess.run(init)
res = sess.run(result)
print('result:', res)MXNet:基于神经网络的深度学习计算框架
- 提供可扩展的神经网络及深度学习计算功能
- 可用于自动驾驶、机器翻译、语音识别等众多领域
- Python最重要的深度学习计算框架
- https://mxnet.incubator.apache.org/
从Web解析到网络空间
Requests: 最友好的网络爬虫功能库
- 提供了简单易用的类HTTP协议网络爬虫功能
- 支持连接池、SSL、Cookies、HTTP(S)代理等
- Python最主要的页面级网络爬虫功能库
- http://www.python-requests.org/
import requests
r = requests.get('https://api.github.com/user',\
                 auth=('user', 'pass'))
r.status_code
r.headers['content-type']
r.encoding
r.textScrapy: 优秀的网络爬虫框架
- 提供了构建网络爬虫系统的框架功能,功能半成品
- 支持批量和定时网页爬取、提供数据处理流程等
- Python最主要且最专业的网络爬虫框架
- https://scrapy.org
pyspider:强大的Web页面爬取系统
- 提供了完整的网页爬取系统构建功能
- 支持数据库后端、消息队列、优先级、分布式架构等
- Python重要的网络爬虫类第三方库
- http://docs.pyspider.org
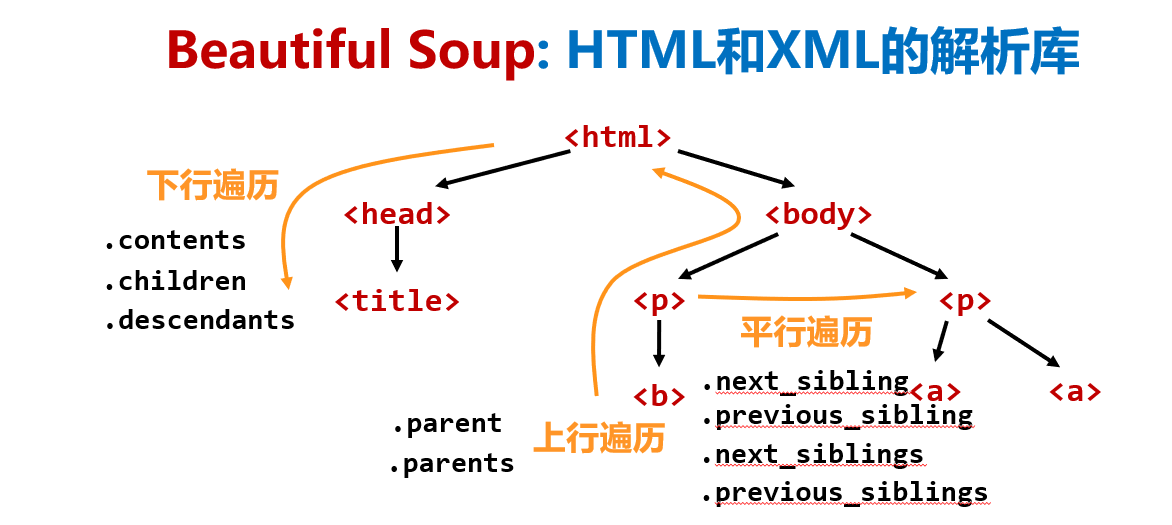
Beautiful Soup:HTML和XML的解析库
- 提供了解析HTML和XML等Web信息的功能
- 又名beautifulsoup4或bs4,可以加载多种解析引擎
- 常与网络爬虫库搭配使用,如Scrapy、requests等
- https://www.crummy.com/software/BeautifulSoup/bs4
Re:正则表达式解析和处理功能库
- 提供了定义和解析正则表达式的一批通用功能
- 可用于各类场景,包括定点的Web信息提取
- Python最主要的标准库之一,无需安装
- https://docs.python.org/3.6/library/re.html
Python-Goose:提取文章类型Web页面的功能库
- 提供了对Web页面中文章信息/视频等元数据的提取功能
- 针对特定类型Web页面,应用覆盖面较广
- Python最主要的Web信息提取库
- https://github.com/grangier/python-goose
from goose import Goose
url = 'http://www.elmundo.es/elmundo/2012/10/28/espana/1351388909.html'
g = Goose({'use_meta_language': False, 'target_language':'es'})
article = g.extract(url=url)
article.cleaned_text[:150]Django:最流行的Web应用框架
- 提供了构建Web系统的基本应用框架
- MTV模式:模型(model)、模板(Template)、视图(Views)
- Python最重要的Web应用框架,略微复杂的应用框架
- https://www.djangoproject.com
Pyramid:规模适中的Web应用框架
- 提供了简单方便构建Web系统的应用框架
- 不大不小,规模适中,适合快速构建并适度扩展类应用
- Python产品级Web应用框架,起步简单可扩展性好
- https://trypyramid.com/
# 10行左右Hello Word程序
from wsgiref.simple_server import make_server
from pyramid.config import Configurator
from pyramid.response import Response
def hello_world(request):
    return Response('Hello World!')
if __name__ == '__main__':
    with Configurator() as config:
        config.add_route('hello', '/')
        config.add_view(hello_world, route_name='hello')
        app = config.make_wsgi_app()
    server = make_server('0.0.0.0', 6543, app)
server.serve_forever()Flask:Web应用开发微框架
- 提供了最简单构建Web系统的应用框架
- 特点是:简单、规模小、快速
- Django > Pyramid > Flask
- http://flask.pocoo.org
from flask import Flask
app = Flask(__name__)
@app.route('/')
def hello_world():
return 'Hello, World!'WeRoBot:微信公众号开发框架
- 提供了解析微信服务器消息及反馈消息的功能
- 建立微信机器人的重要技术手段
- https://github.com/offu/WeRoBot
# 对微信每个消息反馈一个Hello World
import werobot
robot = werobot.WeRoBot(token='tokenhere')
@robot.handler
def hello(message):
return 'Hello World!'aip:百度AI开放平台接口
- 提供了访问百度AI服务的Python功能接口
- 语音、人脸、OCR、NLP、知识图谱、图像搜索等领域
- Python百度AI应用的最主要方式
- https://github.com/Baidu-AIP/python-sdk
MyQR:二维码生成第三方库
- 提供了生成二维码的系列功能
- 基本二维码、艺术二维码和动态二维码
- https://github.com/sylnsfar/qrcode
从人机交互到艺术设计
PyQt5:Qt开发框架的Python接口
- 提供了创建Qt5程序的Python API接口
- Qt是非常成熟的跨平台桌面应用开发系统,完备GUI
- 推荐的Python GUI开发第三方库
- https://www.riverbankcomputing.com/software/pyqt
wxPython:跨平台GUI开发框架
- 提供了专用于Python的跨平台GUI开发框架
- https://www.wxpython.org
import wx
app = wx.App(False)
frame = wx.Frame(None, wx.ID_ANY, "Hello World")
frame.Show(True)
app.MainLoop()PyGObject:使用GTK+开发GUI的功能库
- 提供了整合GTK+、WebKitGTK+等库的功能
- GTK+:跨平台的一种用户图形界面GUI框架
- 实例:Anaconda采用该库构建GUI
- https://pygobject.readthedocs.io
import gi
gi.require_version("Gtk", "3.0")
from gi.repository import Gtk
window = Gtk.Window(title="Hello World")
window.show()
window.connect("destroy", Gtk.main_quit)
Gtk.main()PyGame:简单的游戏开发功能库
- 提供了基于SDL的简单游戏开发功能及实现引擎
- 理解游戏对外部输入的响应机制及角色构建和交互机制
- Python游戏入门最主要的第三方库
- http://www.pygame.org
Panda3D:开源、跨平台的3D渲染和游戏开发库
- 一个3D游戏引擎,提供Python和C++两种接口
- 支持很多先进特性:法线贴图、光泽贴图、卡通渲染等
- 由迪士尼和卡尼基梅隆大学共同开发
- http://www.panda3d.org
cocos2d:构建2D游戏和图形界面交互式应用的框架
- 提供了基于OpenGL的游戏开发图形渲染功能
- 支持GPU加速,采用树形结构分层管理游戏对象类型
- 适用于2D专业级游戏开发
- http://python.cocos2d.org/
VR Zero:在树莓派上开发VR应用的Python库
- 提供大量与VR开发相关的功能
- 针对树莓派的VR开发库,支持设备小型化,配置简单化
- 非常适合初学者实践VR开发及应用
- https://github.com/WayneKeenan/python-vrzero
pyovr:Oculus Rift的Python开发接口
- 针对Oculus VR设备的Python开发库
- 基于成熟的VR设备,提供全套文档,工业级应用设备
- Python+虚拟现实领域探索的一种思路
- https://github.com/cmbruns/pyovr
Vizard:基于Python的通用VR开发引擎
- 专业的企业级虚拟现实开发引擎
- 提供详细的官方文档
- 支持多种主流的VR硬件设备,具有一定通用性
- http://www.worldviz.com/vizard-virtual-reality-software
Quads:迭代的艺术
- 对图片进行四分迭代,形成像素风
- 可以生成动图或静图图像
- 简单易用,具有很高展示度
- https://github.com/fogleman/Quads
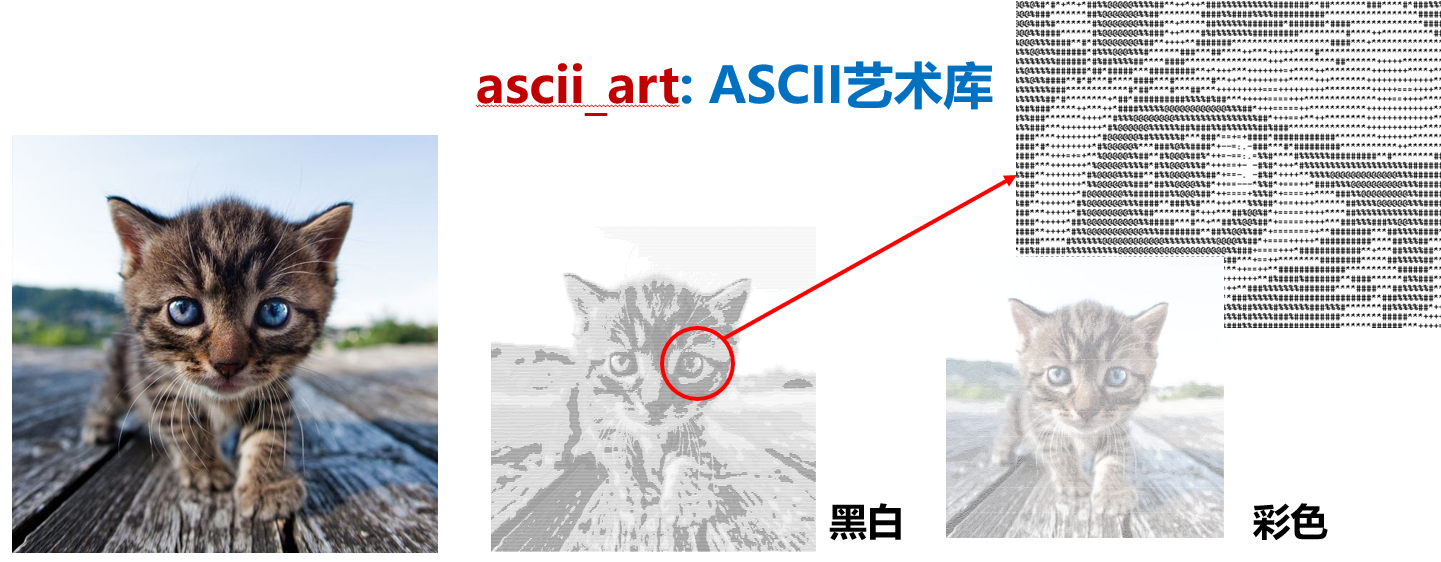
ascii_art:ASCII艺术库
- 将普通图片转为ASCII艺术风格
- 输出可以是纯文本或彩色文本
- 可采用图片格式输出
- https://github.com/jontonsoup4/ascii_art